|
Reference section
This chapter is a reference section describing the basic elements of Paint and the tools in detail. It also outlines some of the terms, concepts and basic techniques for creating and editing sprites in Paint
Sprites
Sprites have the following attributes:
- A name used to identify the sprite (sprite names are 1 to 12 characters long).
- A definition mode indicating the screen mode that was set when the sprite was defined, or the number of colours for newer format sprites.
- A height and a width (these are given in pixels).
- A palette defining the colours used in the sprite (optional).
- Optionally, a mask (sometimes called a transparency mask).
Within the sprite, each pixel has a colour, chosen either from the sprite's palette, if it has one, or the palette for the screen mode it was defined in. If the sprite has a mask, you can use a special value in place of a colour, which indicates the pixel is transparent. When a sprite is painted, the existing screen display shows through the transparent pixels. By setting transparent pixels on the border of a sprite, you can construct sprites which are effectively non-rectangular, although the sprite itself must always be a rectangle.
All of these attributes are defined in the Create new sprite window, which is displayed each time you want to start a new sprite.
Paint windows
Paint has several windows with specialised functions:
Sprite file window
The sprite file window shows all the sprites which are defined in the file you are working on. If you prefer, you can keep just one sprite in each sprite file, though if you are designing sprites for an application you will need to keep them together. Try looking at the sprite file for the Paint application itself. Hold down Shift while double-clicking on the Paint icon in the Apps directory; this will open the application directory Double-click on the Sprites file to load it into Paint. Scroll through the sprite file window to see the range of sprites used by Paint.
The sprite file window shows the sprites at actual size if possible, or in a scaled-down form if they are large. You can edit more than one sprite file at a time; each has its own sprite file window.
Sprite windows
Sprite windows are used for creating and editing the sprites themselves. You can have any number of sprite windows on the screen, or none. Each window contains one sprite. Open a sprite window for a sprite by double-clicking on its name in the sprite file window.
Sprite colours windows
Sprite colours windows are used for choosing the colour that you are painting with. There is a separate sprite colours window for each sprite, because different sprites may have a different range of colours available. To open or close the colours window for a particular sprite click on the palette icon in the tool window at the bottom of the sprite window.
 Paint toolbar
The toolbar is normally attached to the left hand side of the paint sprite window. It is used to select and alter the tools you use for painting the picture. If you press MENU on the sprite window and move to the Utilities submenu you will see an item Show tools. If this is ticked the toolbar will be present, if it is not ticked there will be no toolbar.
Basic techniques
Editing an existing sprite
To edit an existing sprite, follow these steps:
- Load a sprite file into Paint by double-clicking on its icon.
- Open a sprite window for the sprite you want to edit by double-clicking on its image in the sprite file window,
- Modify the sprite by selecting tools and colours and using them in the sprite window.
- Save the modified sprite file.
To create a new sprite
- Open a Create new sprite window by clicking on the Paint icon on the icon bar.
- Enter a name for the sprite, and values for its other characteristics (full details of these are given later).
- Click on Create. The new sprite window and its associated sprite tile window will open.
The tool window
You will already have seen how this changes according to the tool selected, however some items are always present.
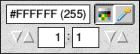
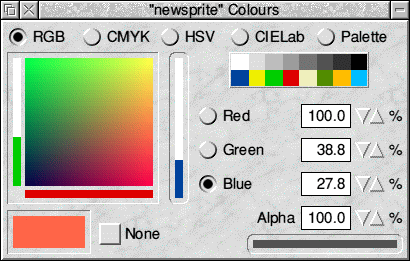
At the top left is shown the currently selected colour. This box will not only display the actual colour but also its number (from the colour selection window) and its definition in hexadecimal RRGGBB (red, green, blue) format.
 Next to this is a button which will open and close the colour window. Next to this is a button which will open and close the colour window.
 At the top right is the Colour picker button. If you click on this and then click anywhere in the sprite window the colour that you click on will be selected in the colour window. This is very useful, especially with 32,000, 64,000 or 16 million colour sprites, as it lets you quickly re-select a colour you have used previously. At the top right is the Colour picker button. If you click on this and then click anywhere in the sprite window the colour that you click on will be selected in the colour window. This is very useful, especially with 32,000, 64,000 or 16 million colour sprites, as it lets you quickly re-select a colour you have used previously.
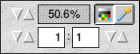
The icons in the lower part of the window set and display the Magnification or Zoom. This doesn't actually alter the size of the sprite, just the magnification for editing purposes.
The main toolbar
To use a tool to edit a sprite:
- Click SELECT on the tool on the Paint toolbar.
- If you wish, set or change any parameters such as the size of the brush to be used
- If necessary, change the colour of the 'paint' to be used by clicking on the new colour in the Sprite colours window.
- Move the mouse to the sprite window, and apply the tool as described below.
For operations such as drawing lines and rectangles, you can click ADJUST instead of SELECT. This moves the nearest previously set point to the current position. For example, in the parallelogram operation, clicking ADJUST instead of SELECT at step 3 returns you to step 2, with the first corner taken from the location at which you clicked ADJUST.
While some operations are in progress, a skeleton line or area is shown. You can cancel any of the sequences of operations described below by clicking again on the current tool in the Paint toolbar.
The illustration below shows the toolbar with each button's function indicated. There then follows a detailed description of the operation of each button. Where appropriate the relevant Tool Window which appears at the bottom if the paint window is shown.
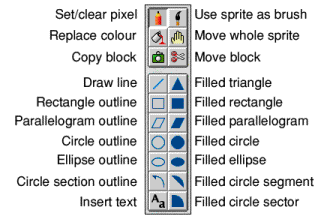
Set/clear pixels
To set a single pixel to the current colour, click SELECT over the pixel. To set several pixels, press SELECT and drag the mouse over the pixels. If you move the mouse slowly, a line will be created, but if you move it faster, the line will be broken. You can use this for shading areas of the picture. If you want to draw lines use one of the other tools instead.
If you use ADJUST instead of SELECT the pixels are cleared to the first colour in the palette. This is normally black by default except for 16 colour sprites where it is white by default.
Use sprite as a brush
This tool takes a sprite (not the one you are working on) and makes it into a 'brush'. Four simple brush shapes are provided:
- A square.
- A triangle.
- A circle.
- A brush.
Type in one of these options in the writable box and click on OK to select this simple brush shape.
However, you are more likely to want to use a sprite of your own to paint with. These could be single objects placed with a single click, like the sheep and house used in the tutorial, or patterns that you can drag over an area. Normally, you will want to give the brush sprite a transparent mask so that the shape does not appear with an unwanted surround.
There are two ways of using a sprite as a brush.
- With the Shape option selected, you can use the sprite as a brush shape. The brush takes on the outline of the sprite. The brush paints in whatever colour you have selected.
- With the Shape option deselected, you can use the brush to put a sprite into another sprite. The brush paints the sprite in its entirety.
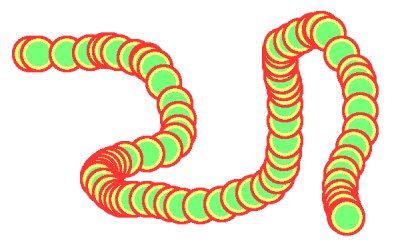
The example below can be created as follows:
- Open a new sprite file and create a sprite, 600 pixels wide by 400 high. with the name demo.
- In the same sprite file, create a second sprite, with a mask and the name blob. Paint it using the filled circles tool, with a red circle first, a yellow circle inside it, and a green circle inside that. Fill the background (with the Global option set) with the transparent colour.
- Open a sprite window for demo.
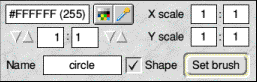
- In the tools window, select the Use sprite as brush tool. Delete the default name, type the name blob, make sure Shape is ticked and click on Set brush.
- Move the pointer back over the sprite window for demo. Enlarge it to full size and make it larger using the Zoom option if you wish. Starting near the top left drag a squiggly line across the window. Notice how the sprite outlines merge into a single brush stroke.
- Now to see the difference, try it again with the Shape option unticked. Notice how this time you plot a series of unconnected sprites.
Parameters:
The toolbox displays a box in which you can set four features:
- Shape determines whether just the mask of the sprite is used, or its colours as well. To change the parameter, click on the button. When Shape is set the brush fills the pixels in the brush sprite which are not transparent with the current colour. When Shape is not set, the brush paints with the coloured sprite image. By default Shape is set.
- Name of the sprite to be used for the brush. Enter the name of any sprite within an open sprite file window.
- X scale, Y scale: multipliers defining the actual size of the area painted by the brush relative to the size of the sprite. For example, a scale factor of 2:1 means the brush is twice the size of the sprite defining it, and 2:3 means two-thirds the size, Each scale factor consists of two numbers which can be set independently. This can be particularly useful when you want to use the same shape several times in a picture, but not always at the same size.
When you have entered the values you want, click on Set Brush.
Replace colour
To replace one colour by another in a sprite (also called flood fill):
- Select the new colour from the sprite colours window.
- Click SELECT in the area of the sprite to be changed.
Colours can be changed locally or globally. In a local change, the pixels that are changed are the ones you click on, and any others which are connected to it by pixels of the same colour. In a global change, all pixels in the sprite which have the same colour as the one you click on are changed.
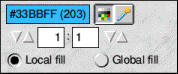
To select local or global changes, click SELECT on the corresponding button in the tools window. The current option is highlighted.
Move whole sprite
To move the entire sprite, press SELECT within the sprite window, drag the mouse to the new position and release SELECT. The parts of the sprite image that move outside the limits of the sprite are permanently lost.
Copy block
To copy a rectangular block of pixels from one part of a sprite to another:
- Select Copy area from the Tools window.
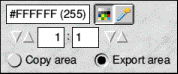
- Position the pointer on one corner of the block to be copied.
- Press SELECT, drag the mouse to the other corner of the block and release SELECT.
- Move the pointer to the destination for the block and click SELECT.
Step 4 may be repeated to make multiple copies of the selected block. To finish copying, click the Copy block icon in the tools window again. Note that the box you mark is actually rounded outwards to the nearest block of pixels that encloses the box.
Copy block can also be used to create a new sprite from a section of an existing sprite. The new sprite can be set up in one of the sprite files you are already editing in Paint, or it can be saved in an entirely new sprite file, either to disc or for importing into another file or application.
To perform either of these operations, first click on Export area in the Tools window. Then follow steps 2 and 3 as above to mark the block. When you release the mouse, a Save as dialogue box for the block appears. To save the block as a new sprite in a sprite file, enter a name for the sprite, and drag the icon to a Paint sprite file window.
Move block
To move a rectangular block of pixels from one part of a sprite to another:
- Position the pointer on one corner of the block to be moved.
- Press SELECT and drag the mouse to the other corner of the block to be moved, and release SELECT.
- Move the pointer to the destination for the block and click SELECT. The area occupied by the source of the move is set to the first colour defined in the palette, so in 16-colour mode, it will be left as a white rectangle and in most other modes it will be left as black, as in the following example, where a block in the right hand picture has been moved:

As with Copy block, the box you mark is actually rounded outwards to the nearest block of pixels that encloses the box. Move block can be used to export a block of pixels using Export. This is identical in use to Copy block.
Draw lines
To create a solid line of pixels in the current colour:
- Click SELECT at the start point of the line.
- Move the mouse to the end point of the line.
- Click SELECT.
Rectangle outline
To create a rectangular outline in the current colour:
- Click SELECT at one corner of the rectangle.
- Move the mouse to the other corner and click SELECT.
Parallelogram outline
To create a parallelogram outline in the current colour:
- Click SELECT at one corner of the parallelogram.
- Move the mouse to the next corner.
- Click SELECT
- Move the mouse to the third corner.
- Click SELECT.
The position of the fourth corner is derived from the other three.
Circle outline
To create a circle outline:
- Click SELECT where you wish to place the centre of the circle.
- Move the mouse until the circle has the required radius.
- Click SELECT.
Ellipse outlines
To create an ellipse outline:
- Click SELECT where you wish to place the centre of the ellipse.
- Move the mouse to indicate the width of the ellipse.
- Click SELECT.
- Move the mouse until the ellipse has the required size and orientation.
- Click SELECT.
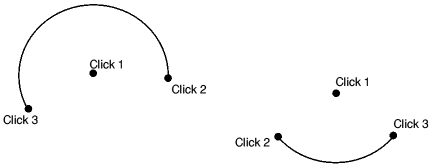
Circle section outlines
To create a section consisting of a circular arc:
- Click SELECT where you wish to place the centre of the arc.
- Move the mouse to one end point of the arc.
- Click SELECT.
- Move the mouse to where you wish the arc to finish.
- Click SELECT.
Filled triangles
To create a filled triangle in the current colour:
- Click SELECT at one corner of the triangle.
- Move the mouse to the second corner.
- Click SELECT.
- Move the mouse to the third corner of the triangle.
- Click SELECT.
Filled rectangles
Filled rectangles are created in the same way as outline rectangles.
Filled parallelograms
Filled parallelograms are created in the same way as outline parallelograms.
Filled circles
Filled circles are created in the same way as outline circles.
Filled ellipses
Filled ellipses are created in the same way as outline ellipses.
Filled circle segments
Filled circle segments are created by indicating the end points of an arc, using the same technique as circle outline sections. The area filled is bounded by the arc and by a straight line between the end points of the arc.
Filled circle sectors
Filled circle sectors are created by indicating the end points of an arc, using the same technique as circle outline segments. The area filled is bounded by the arc and by lines running from the end points of the arc to the centre of the circle.
Insert text
To insert text into the sprite, first select the text tool. The tools window will change as shown below.
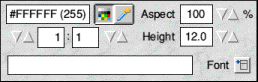
- Click on the Font menu icon and a font menu will appear. Select the font you wish to use from this menu in the usual way.
- Enter the font point size in the Height box.
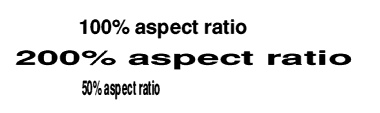
- The Aspect box lets you set the width/height ratio of the font. By default this is 100%, which means the font will appear 'normal'. Less than 100% means the text will be 'compressed', more then 100% means it will be 'expanded'.
- Enter the text in the box provided. The text will scroll if it is too wide for it all to be displayed at once.
- Click SELECT in the sprite window at the position where the centre of the text is to be positioned.
The text is drawn in the current colour.
Alpha channels
For those who don't understand what it is, an alpha channel is a type of mask. You will be familiar with 'normal' masks. When a sprite has a mask then any 'unfilled' parts of the canvas are transparent so that the background can be seen through these areas. For example, application icon sprites normally have a mask if they're of irregular shape. With this type of mask the transparency is either 'on' or 'off', in other words you either see the solid colour of the sprite or it's completely transparent and you can see the background. With an alpha channel the 'mask' can have a variable level of transparency, in fact up to 255 levels, so that parts of the sprite can be semi-transparent, that is, you can see the actual sprite but also see the background through it.
The additional option to create an alpha channel sprite can be seen at the bottom right hand corner of the 'Create new sprite' window. When you create a sprite with an alpha channel mask, what happens when you select the mask from the colour window or 'None' as the colour picker is slightly different from what happens with a 'normal' mask.
With an alpha channel mask selected the tool window will appear like this.
Using the 'bump' icons you can vary the saturation of the alpha channel between zero and 100%. This value can also be adjusted using the Alpha settings at the bottom right of the Colour Picker window by selecting the required position on the slider and then clicking on 'None' again. Using the mask in this way and painting with 'None' selected, it is possible to edit the level of transparency of areas of an existing image without modifying the colours.
With the introduction of the Alpha settings to Colour Picker, this provides a much easier way to paint with semi-transparent colours directly in a single operation, rather than editing the degree of transparency after painting, as described above. Both methods of painting have advantages, although directly painting with variable transparency colours is likely to be most useful when creating images rather than editing them.

|
![[Select]](../images/ro6doc.gif)