 |
Sprite windows and menus
Each sprite window contains a single sprite. All individual sprite editing actions are carried out in the sprite window. You can have more than one window open for a particular sprite. This enables you to set different magnifications, display a grid in one window but not the other, scroll to different parts of the sprite, and so on. Changes made in one window are reflected in the other(s).
There is a menu associated with sprite windows. Click MENU over a window to obtain it.
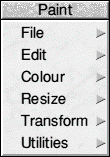
The menu entries are as follows:
File leads to the Sprite file menu which contains the following items.
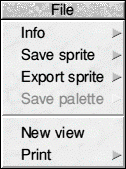
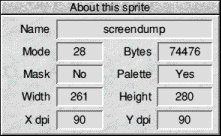
- Info leads to a window which displays information about the sprite.
- Save sprite leads to a standard Save as dialogue from which you can save the current sprite. Note that if there are multiple sprites in the file this does not save the entire file but only the current sprite.
- Export sprite leads to a sub-menu from which you can save the sprite in various 'foreign' formats such as BMP, PNG and JPEG. Each item leads to a standard Save as dialogue.
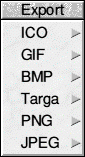
When exporting a sprite using one of these formats it is also best to save it as a standard sprite if there is any possibility that you may wish to re-load it into Paint to modify it in the future. This is because there are sometimes slight differences in the way images are represented using different file formats and so when you export a sprite in an alternative format and then import it back into Paint it may be slightly different from the original sprite.
This is particularly true of JPEG where the compression process used is inherently 'lossy' and so repeatedly saving and re-loading a JPEG file will inevitably cause a significant reduction in quality.
- Save palette lets you save the 'palette' file for the sprite. Palette files will be described later.
- New view will open a second sprite window for the sprite. Each window shows the same sprite, and changes made in one will appear in the other. This is particularly useful if you want to do some fine detail work as the two windows may have different magnification so you can see your changes simultaneously in fine detail and at normal magnification.
- Print leads to a dialogue from which you can print the sprite.
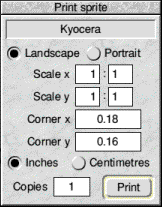
- Scale allows you to change the proportions of the printed image. Setting both X and Y to 1:2 will produce a half-sized image.
- Corner defines where on the printed page the image will be printed. The default settings define the edge of the printable page for your printer. Changing these settings will move the printing position of the image.
- Choosing Inches or Centimetres sets the measurements used for the corner offset.
- Copies sets the number of copies to be printed.
Edit leads to the Edit submenu used for miscellaneous editing actions on the sprite. It has the following entries:
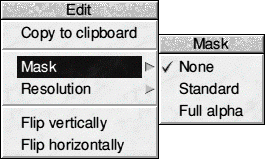
- Copy to clipboard places a copy of the sprite on the clipboard
- Mask leads to a sub-menu where you can choose whether or not the sprite has a mask and whether it is a 'normal' mask or a Full alpha mask.
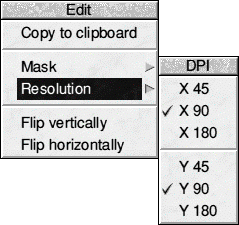
- Resolution allows changing of the resolution between 45, 90 or 180 dots per inch (dpi) in both horizontal and vertical directions.
- Flip vertically inverts the sprite vertically about its centre:
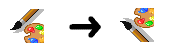
- Flip horizontally inverts the sprite horizontally about its centre:
Colour leads to the Colour menu.
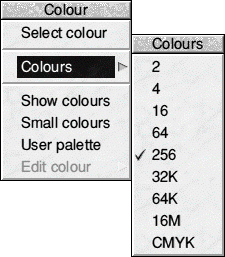
- Select colour duplicates the action of the Colour picker button in the tool window.
- Colours leads to a submenu that allows conversion from one depth of colours to another.
- Show colours sets whether the colour window is open or not. It will be ticked if the window is open.
- Small colours sets whether the standard or small colour window is used.
- User palette sets whether the standard palette for the screen mode is used or a special palette file. Most sprites will have a palette file, even if this is just the standard palette for the screen mode in which they were created, so this will normally be ticked. If you intend to export a sprite to another application, such as Draw, you should give it a palette, since otherwise it may not retain the colours you gave it. A sprite with no palette of its own uses the current desktop palette. A Sprite's palette can be changed by dropping a palette file icon onto the window displaying the sprite.
- Edit colour will be active only of you have loaded a special palette file for the sprite and leads to a normal colour picker dialogue in which you can edit the currently selected colour.
Resize leads to the Resize menu .
- Change size leads to a dialogue box which you can use to alter the height and width of the sprite. The values are changed either by typing in new values, or by using the boxes marked with arrows to alter the values. When you have set the size you want, click on Set. The arrows allow you to add and delete rows and columns from the top and right hand sides of the sprite.
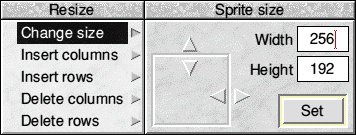
The next four operations are applied at the position the pointer was over when you pressed MENU. This will be shown as a line on the sprite. By moving the pointer into the sprite window (without passing over a menu) you can change the number of columns or rows you are adding or deleting. The menu option shows the current number of rows or columns you are adding or deleting. Click SELECT to use the current size.
- Insert columns leads to a writable icon into which you type the number of columns to insert. This extends the width of a sprite by the number of columns specified, filled with the background colour.
- Insert rows leads to a writable icon into which you type the number of rows to insert. This extends the height of the sprite by the number of rows specified, filled with the background colour.
- Delete columns leads to a writable icon into which you type the number of columns to delete.
- Delete rows leads to a writable icon into which you type the number of rows to delete.
Transform leads to the Transform menu.
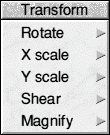
- Rotate leads to a writable icon which you type the rotation angle (expressed in degrees anticlockwise). The sprite size changes if you rotate for angles other than multiples of 90 degrees.
- X scale and Y scale lead to writable icons into which you type a multiplication factor to enlarge or reduce the sprite on its horizontal or vertical dimension. Negative scale factors are not allowed. A scale of 0.5 halves the sprite size. A scale of two doubles the sprite size.
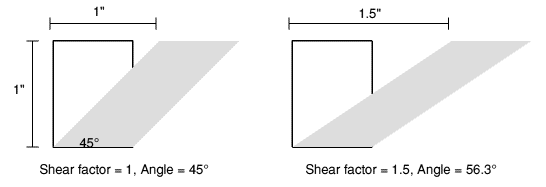
- Shear enables you to slant the sprite. The option leads to a dialogue box into which you type a shear factor. The top row of pixels is moved rightwards by an amount defined by multiplying the height of the sprite by the factor given. The rows in between are moved proportionally. The factor is, in fact, the tangent of the angle you wish to shear by. A factor of 1 slants the sprite 45°:
- Magnify leads to a writable icon which you can use to alter the size of the sprite. This is similar to X scale and Y scale except that the value is applied to both axis.
Utilities leads to the Utilities menu.
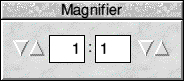
- Scale view leads to a dialogue where you can set the 'zoom' used for the sprite window. This duplicates the action of the magnifier in the Tool window.
- Grid leads to a submenu of colours. Choose one to display a grid in that colour in the sprite window. The grid shows where the pixel boundaries are. It can be useful for lining up parts of the sprite. If you click on Grid on the menu, the grid is toggled on or off. The grid is not shown if the displayed size of the sprite is too small, that is, if the magnification is less than 4:1.
- Toolbox sets whether or not the toolbox appears attached to the sprite window.

|
![[Select]](../images/ro6doc.gif)