![[Select]](../images/ro6doc.gif)
|
User Guide: The Filer |
|
|
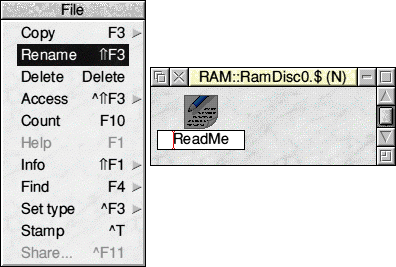
The FilerThe Filer is the system that lets you access the features of the Filing System, in other words, to move around the RISC OS directory structure, to load and save files, run programs and carry out various other operations on files. Filer MenuThe filer menu appears each time you click the MENU button when the pointer is over a directory viewer or window. An example filer menu is shown below. This is the result of clicking MENU while the mouse pointer was over the icon for a Text file called "ReadMe". 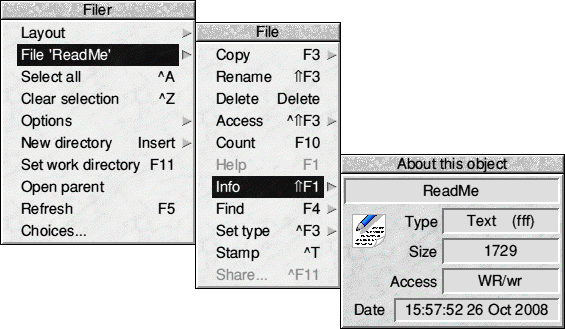 The filer menu will always contain the same items, but sometimes one or more of these will appear in grey instead of black. A grey menu option cannot be selected, and this means that the option is inappropriate at that stage. For example, if you click the HardDisc4 icon then click the MENU button while the root directory is open the Open Parent option will be "greyed out" as you are already viewing the top level directory so there is no parent. The rest of this chapter describes the various items on the filer menu and its sub-menus. LayoutThis lets you change the way the directory viewer displays the contents of a directory. Move the mouse over the arrow to the right of Layout and onto the Layout window. You will see something similar to the picture below. 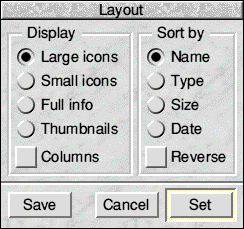 Large icons means that the display is shown, as in the previous illustrations, with full size icons and the name below the icon.  Small icons, as the name suggests, uses half size icons for folders, applications and files with the name beside the icon instead of below it. This is more compact so you can see more of the contents of a directory if it contains a large number of objects.  Full info shows the contents in a single vertical column with small icons. To the right of each icon is not just the filename but also information about the file, its type, size, access status and the date it was created or last modified as shown.  Thumbnails will display a thumbnail image of each file. A thumbnail is a small image of the file concerned. For example selecting the Thumbnails option will show small sized samples of any graphics files, these include Sprites, Drawfiles, JPEGs, GIFs etc. Files that do not have an image in them will be displayed with their normal large icon. 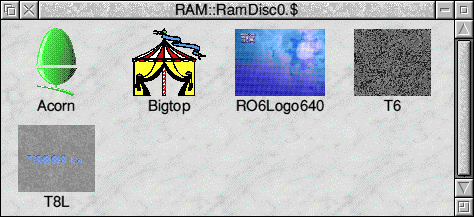 Columns will display your files sequenced down columns rather than across rows as was the original behaviour. In Column mode, the vertical scroll bar is replaced with a horizontal one instead. In addition to the type of display, there are five options which define how the items in the window are sorted. Sort by name will sort the items in a directory alphabetically, whatever their type. Sort by type will sort all the objects by filetype. Note that they are sorted by their filetype number, not name, (more about this later) so may not appear in the order you would expect. Within each group of items of the same type files will be sorted alphabetically. Sort by size will, as you might expect, sort files by their size, the largest file first. Sort by date will sort the files by the date they were created or last modified. The latest appearing first, at the top of the filer window. Reverse will sort the files by the method chosen from one of the four options above, but will do so in reverse order. You can experiment with these options and see how the filer display changes. With older versions of RISC OS, changes made here became permanent and so would apply the next time you switch on. With RISC OS Six and above the permanent changes are set in the main Configure program, which will be described later. Changes made from these menus only remain in force until you switch off. The one slight exception to the above, with version 6.12 or later, is that there is now the option to configure layout permanence. With permanent layouts enabled (see the Configure section of this guide), the Save button on the Layout window will save the selected layout options for the directory over which the Filer menu was opened. This saved layout will override, for the directory in question, any other defaults or automatic layouts.
To delete a saved layout, deselect all icons in this layout window (using ADJUST on the Radio icons) and click Save SelectionThis is the option below Layout on the filer menu. It actually shows which objects the action you are intending to perform will be carried out on, so precisely what appears in this position depends upon where the mouse was when you clicked the MENU button and whether any items in the window had been selected. If you had previously selected two or more objects, then the word Selection will appear here. This means that whatever you intend to do will be done to all of the selected objects. As you will see later some operations can only be carried out on single files, and so if you have selected more than one object these items will be grey on their respective menus so that they can't be used. If no items were selected and the mouse pointer was over a file, application or directory icon then the name of that item (preceded by "File", "App." or "Dir." as appropriate) will appear in this position. So, in the example shown earlier, because the mouse pointer was over a Text file named "ReadMe" what appeared in this position was File "ReadMe". The Selection sub-menuOpen a directory viewer on your hard drive and click MENU over it to display the filer menu. Now slide off the second item on the menu, (which could say any of a variety of things depending on where the mouse pointer was when you clicked MENU , as described previously) to open the Selection menu, which will look something like the one on the right.  With your hard drive filer window open (displaying something like ADFS::HardDisc4.$ at the top), click on the Apps directory - the directory will become highlighted. Click the MENU button and you will see that the Selection option shows "Dir. Apps" . Moving the mouse to the right over the arrow will take you into the directory sub-menu. If you select any option within this menu it will be carried out on the directory Apps. The options on this sub-menu are:
Some operations can be carried out on more than one item if several are selected and many of the options above are available for both files and folders. Obviously not all operations can be performed on a group of objects, for example, you can't rename a group of files. Select allAs you might expect this selects all the objects in the directory. Clear selectionDe-selects any and all objects that have been selected. OptionsThis leads to a menu that lets you set a number of options that affect the way filer operations are carried out. The Options sub menu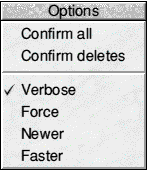
As with the Display options described earlier options selected from this menu only remain in force until you switch off the computer. They can be set permanently using the Configure application described later. New DirectoryThis lets you create a new directory or folder. You will find as you acquire more files and applications that you need to create directories to put them in. Try to do this in a methodical way so that you can group similar items together to help you to find them when you need them just as you do with a 'paper' filing system. When you choose a name for a directory it is a good idea to make it reflect the contents, e.g. Letters, Games etc. There are a few restrictions on the characters you can use in directory names;
Open the Filer menu and slide the mouse pointer off New Directory and the window shown will appear. 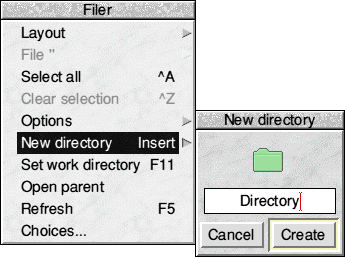 A default name of 'Directory' is placed in the icon for the new directory name. You probably won't want to use this, so delete it using the Backspace key and enter the name of your choice. If you now either press the Return key or click on the OK button the new directory will be created in the same directory that the mouse pointer was over when you opened the Filer menu. Alternatively you can drag the folder icon in the window to a directory viewer and the new directory will be created there. To drag the icon just put the mouse pointer over it and hold down the SELECT button. Move the mouse pointer while keeping SELECT held down and the Folder icon will follow. When it is over the directory viewer you want to create the new directory in just release the mouse button. With recent versions of the Filer, it is possible to create a directory structure in one single operation, by giving a pathname with dots separating the subdirectories, for example a.b.c.d. If any part of that path does not exist, Filer will create it as necessary. Set work directoryThis makes the directory the mouse pointer was over when you opened the Filer menu the Currently Selected Directory (CSD). There is no need to bother too much about this as you will probably never need to use this facility. Open ParentAs you might expect this will open the parent directory of the directory the mouse pointer was over when you opened the Filer menu. It is similar to clicking ADJUST on the window's close icon except that it leaves the first directory viewer open. RefreshThis re-reads the contents of a directory from the filing system and updates the display. It can be useful if a filing system does not notify the filer about changes to the directory contents. Keyboard shortcutsKeyboard shortcuts for Filer were first introduced in RISC OS 6.06, later versions expand on those and provide greater power and flexibility when using the keyboard. Since Filer is now able to display vertical (column) layout or the normal horizontal (row) layout of objects in a viewer, some keyboard shortcuts have alternate behaviour according to which view layout is active. These are the shortcuts which have meanings with "or" in their descriptions. Below are the standard keyboard shortcuts for Filer that will allow you to navigate around viewers and load files and applications from the keyboard.
The following shortcuts are used when building a selection of files. These will be easier to understand if you experiment in Filer whilst reading them.
There are a number of keyboard shortcuts which will perform actions previously only possible with the mouse and menus, these are listed in the following table.
Alphanumeric keys: These move the highlight through the files as the name is progressively entered. The break for typing the name of the object is 1 second. Any keys pressed after this will initiate a new search. NotesIt is strongly advised that Recyclone is used with key shortcuts, although some limited protection has been added to the Delete key shortcut.
Refresh (F5) now also re-evaluates -AutoThumb ratio (if enabled) and forces images which were previously too big to be re-tried (for thumbnail display). Search as you type will move to the nearest object for 'sort by name'. For other sort types the highlight will move only when an exact match is found. If you wish to search for an object name that starts with a Space character you must press Space twice. This is not required for a Space within a name. The 'new directory', 'copy as', and 'rename' writables can now contain a sub-path. A sub-path is created (relative to the viewer directory) if it does not exist, raising an error if any part already exists but is not a directory. Filer toolbarsFiler now has support for toolbars. This feature allows users to add their own toolbars or those published by others, to Filer. Below is a picture of Filer with a toolbar at the top. Refer to the Configure section of this guide to see how to manage your toolbars. 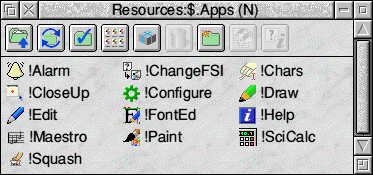
|
|
This documentation is copyright 3QD Developments Ltd 2013 and may not be reproduced or published in any form without the copyright holder's permission. RISC OS is subject to continuous development and improvement as such all information is provided by 3QD Developments Ltd in good faith and is believed to be correct at the time of publication E&OE. 3QD Developments Ltd cannot accept any liability for any loss or damage arising from the use of any information provided as part of the RISC OS Documentation. HTML document version r23142 (3rd November 2015) |