|
The floppy disc drive
- Using floppy discs
- Formatting a disc
- Backing up a disc
RISC OS computers which have a floppy disc drive make use of 3½ inch discs. Note that the A9 computer does not have a floppy disc drive. For machines running VirtualAcorn products this section only applies to computers that have an internal IDE floppy drive, it does not apply to machines with an external USB floppy drive as these cannot read RISC OS discs.
Although floppy discs are very robust they do need some care:
- Always treat your discs with respect and handle them carefully
- Keep them in a safe place away from dusty environments.
- Do not touch the inner part of the disc which you can expose by opening the metal slider.
- Keep the discs away from magnetic forces and power cables.
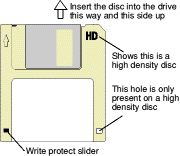
The disc will only fit into the drive one way. Insert the edge with the metal slider into the drive with the arrow on the front of the disc to the left and the 'cut off' corner to the right. If you try to insert a disc wrongly it won't go into the drive fully. Don't force it or you will damage the drive.
The disc has a write protect slider which works like the tabs you can break off music or video cassettes to prevent accidental over-recording or erasure. The slider can cover or uncover a hole. If you can see through the hole then the disc is write protected this means that information can only be read from the disc and not written to it.
In computer terms when you write to a disc you put or record something onto it, in other words you save something. If the disc is write protected you will not be able to save anything onto it but you will be able to load programs and files into the computer. This is known as reading from the disc. The terms read and write will appear often, so it is important to understand the difference.
Usually you would not wish your discs to be write protected as you may wish to save work you have done for future use. Remember that if you can see through the write protect slider then you will not be able to save or write onto the disc.

Types of disc
There are two types of disc in common usage, Double Density and High Density. A high density disc can be distinguished by the letters 'HD' either written or etched into the plastic beside the slider and it will have a square hole on the opposite side to the write protect slider.
High density discs (sometimes referred to as 'hi density') should only be used for formats greater than 1 Mb. Double density discs should only be used for formats less than 1 Mb. Most computers will not allow you to format a disc wrongly, but some models of RISC OS computers will let you override this and use an inappropriate format, so do check first. If you do use the wrong format for the type of disc it might initially appear OK but your data may not be safe and the disc may not read in another machine.
Formatting a disc
When you purchase a disc you will often find that it has been pre-formatted for use with PC computers. While RISC OS can read from and write to PC formatted discs this does have disadvantages as you can only use upper case characters with a maximum of eight letters in the filename so any applications you copy to the disc may not work.
You will therefore need to format the disc for use on RISC OS. This means that the computer will lay out the various tracks and sectors upon which data is placed and write other information to the disc which enables RISC OS to recognise it. Once a disc has been formatted for use on RISC OS it will not be readable on a PC or Mac without special software.
A PC formatted disc can be used to easily exchange files with PC owners. Using common file formats, such as TXT, GIF, JPEG etc. you can ensure that your PC owning friends can read your data, or applications such as EasiWriter will create files that natively support PC programs.
Put the disc in the drive. If you are having problems inserting the disc it's probably because there's something blocking it. Do not force it as you may damage the drive. You will have noticed that the button next to the disc drive springs out when you insert a disc. If you push in this button the disc will eject.

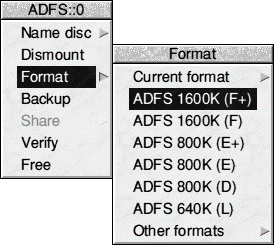
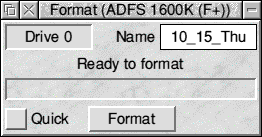
With the disc in the drive place the mouse pointer over the floppy drive icon (:0) and click the MENU button. A menu will appear as shown. Move the pointer over Format then to the right over the arrow and the Format sub-menu will open. Move to F+ and click SELECT. Using RISC OS Six you can format discs in all previous Acorn formats and also prepare discs for use on PCs and Atari ST computers. A window will open asking you to confirm that you wish to format the disc. If you do, click on Format and wait as the disc is formatted. If you do not, close the window and the disc will be left in its original state.

RISC OS Six includes a Quick formatting option. This should only be used to format discs that are known to be error free as in order to speed up the formatting some checks made by RISC OS are skipped.
Formatting takes a few minutes.
You are always asked to confirm formatting because the process is destructive of all data on the disc. Formatting completely wipes the disc with no chance of recovering anything that was on it. There is no limit to the number of times you can format a disc, but over time they can lose their data integrity.
Choice of formats
You will notice that the format menu has a number of options.
- ADFS 1600K (F+)
- ADFS 1600K (F)
- ADFS 800K (E+)
- ADFS 800K (E)
- ADFS 800K (D)
- ADFS 640K (L)
and through the Other Formats menu:
- DOS 1.44M
- DOS 720K
- DOS 1.2M
- DOS 360K
- Atari 720K
- Atari 360K
The 1600K, 800K, 720K, 640K, 360K, 1.2M and 1.44M refer to disc capacity - (K = Kilobytes, M = Megabytes). All twelve of these formats are using what is referred to as ADFS, or Advanced Disc Filing System. The L format was available on the BBC Master, and was the standard format used by developers releasing software for the BBC Master Compact. This format will be of interest to you if you want to exchange data with either of these machines. Most people will find no benefit at all in using the L format.
The D format was used by the first Archimedes computers at the time of their launch in 1987. It was later replaced by E format which should always be used in preference. It is included only to retain compatibility with early machines.
The F format was introduced with RISC OS 3 to support high density disc drives.
All of these formats are limited to 10 character filenames and 77 files per directory.
RISC OS Six includes a number of key extensions to these formats, especially in the support of long filenames, up to 255 characters, and almost unlimited files per directory.
E+ and F+ formats were introduced with RISC OS 4. These remove the restrictions of 10 characters per filename and 77 files per directory. However these disc formats can only be read by machines with RISC OS 4 or later. If you want to exchange data with people with older versions of RISC OS you should not use these disc formats.
Other Formats lets you create discs that will allow data to be shared with users of other types of computer. Note that while there are a number of options available you are recommended to only use the DOS 1.44M or 720K as these can be read by almost every other computer platform.
When the disc has been formatted a window will appear telling you that formatting is complete. Click on OK to close the window. Put the mouse pointer over the disc drive icon (:0) and click the SELECT button. A small empty window, like that shown below, will open on the screen. This confirms that the disc is now formatted. The window is empty because as yet there is nothing on the disc. The next chapter deals with filer windows in more detail.

Verifying a disc
It is possible that a disc may report a number of disc errors during the second stage of formatting. This verification process allows you to ensure that there are no serious defects on the disc, which could result in data being lost or corrupted.
If the verification stage (when the Formatting window is replaced with a Verifying window) reports more than a couple of errors it is best to throw the disc away. A floppy disc only costs a few pence and it really isn't worth risking your data on defective discs.
If you intend you use a disc that has not been recently formatted it is a good idea to verify it to check that it doesn't have any errors before you commit your data to it.
To verify a disc move the mouse pointer over the floppy disc icon and click on MENU. The floppy disc menu will now open. Select Verify from the menu and a window similar to the Format window will appear and the disc will be verified and any errors found will be reported. As this process is non destructive you can do it to a disc which contains data without affecting the data.
Making a backup copy of a disc.
It is always a good idea to make a backup or a copy of any floppy disc that contains valuable data. This also applies to discs used to distribute programs (provided they are not copy protected in some way) just in case the original is lost or damaged.
The easiest way to produce a backup copy of a floppy disc is to place the disc you wish to backup in the drive. Now open the floppy disc menu and click on the Backup option with the SELECT mouse button.
A window will open inviting you to insert the Source disc, and as you've just done that you can click on OK. The computer will pause for a few seconds, before starting a process to copy the disc content into memory. Note that if you're copying a disc with more data on it than you have free memory, this process will take several passes.
When prompted to do so, insert the destination disc, and click on OK. What you'll be left with is an exact duplicate of the first disc. You can only backup discs of the same size but they do not have to be of the same format type, so 1600K F+ to 1600K F is fine, or 800K D to 800K E is fine, but Acorn 1600K to DOS 1.44M is not as the disc size is very different even though the disc is physically the same.

|
![[Select]](../images/ro6doc.gif)
![[Select]](../images/ro6doc.gif)