|
The Skeleton window
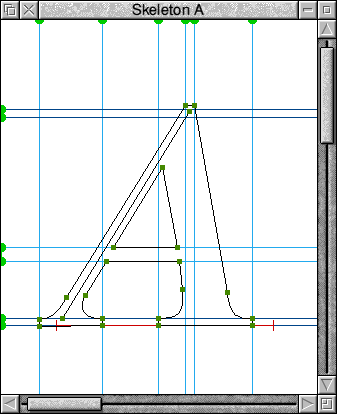
The skeleton window shows a character's outline definition, including endpoints of lines and any scaffold lines. It can also show the outline of one other character as a 'template', if you drag the relevant character from its font index window into the skeleton window (see above).
Note that when editing the contents of the skeleton window (either the character outline or any scaffold lines), any other windows which depend on the skeleton (eg. Full char windows or bitmaps) will be automatically updated as well. In particular, this means that if a bitmap has been hand-tuned since it was computed from its outline, altering the outline will cause the bitmap to be recomputed, overwriting the hand-tuning.
The character outline is converted to a bitmap by filling all closed subpaths using the Draw module (with even-odd window number rule, filling interior and interior boundary pixels), and thin-stroking all open subpaths (known as skeleton lines). In the 'Full char' window, the thin-stroking is drawn first in red, and the filling is done over the top in black, so that it is immediately apparent when the thin-stroking makes any difference to the appearance. The idea is that for diagonal lines and thin curves, the thin-stroking acts as a kind of 'insurance' against the line disappearing altogether at small sizes - one should put an open subpath down the centre of the line. The font has a threshold pixel size above which the open subpaths are ignored completely, since they are likely to have no effect at large sizes. This threshold can be changed using the menu option Alter.Skeleton.
While no scaffold lines are selected:
Clicking SELECT or ADJUST on a line segment selects that line, deselecting any other. The line is displayed in light blue, with the control points displayed in red.
Clicking SELECT not on a line deselects any selected line. If there are more than one included composite section, this also selects the next one in the list, the selected composite being displayed in red. This means that you can use the cursor keys to move that section around within the character.
Dragging SELECT creates a new straight line segment: if the mouse was originally over another point, the line segment is connected to it, and if this was already a 2-node, the new line is linked in between the point and the selected line (so you can choose which side of the point to insert the line).
Dragging ADJUST over a point moves that point. For a Bezier curve, dragging an endpoint moves both control points which are attached to that point by the same amount, thus preserving the angle of the tangent, while dragging either 'control point' of a straight line segment converts it to a Bezier curve.
When dragging a point using SELECT or ADJUST, when the point is released, the Font Editor checks to see if the point is sufficiently close to an endpoint - if it is, and the endpoint is a 1-node, then it connects the dragged point precisely to the other one, and 'beeps' to show that it has done it. This has one important side-effect when drawing open subpaths which are to act as thin-stroked 'skeletons' - for example, when doing the skeleton for an 'O'. The problem is that one wants the first point in the path to coincide with the last, without actually being connected to it. The solution is to proceed normally, allowing the Font Editor to connect the first and last points together. You can then press and release SELECT on the final point, holding it down long enough to register as a drag operation. This will cause a zero-length straight line to be inserted between the first and last points in the skeleton - since it is also selected, one can now select 'Delete' from the menu (see below) to remove the line and achieve the desired open subpath.
Clicking on a scaffold line's control point selects that line:
When a scaffold line is selected, all characters which contain that line are displayed in red in the Font Index window. This provides a quick check as to which characters would be affected by moving the line.
In the skeleton window, any points connected to that line are displayed in red. You can connect more points to the line by clicking on them using SELECT, or by dragging a rectangle over a group of points and releasing it. Note that Bezier curve control points are always linked to the same scaffold line as their nearest endpoint, and that any endpoint is linked to one X-scaffold and one Y-scaffold line (line 0 is the null line, see 'Disconnect' below).
You can also link any other scaffold line to the selected one by pressing SHIFT-SELECT on its control blob. When rendering the character, this causes the position of the linked line to be adjusted by the movement caused by the selected line, before the movement of the linked line is itself computed. Any lines linked to the selected line have their control blobs displayed in red, and if the selected line is linked to another line, that line's control blobs are displayed in dark green, as opposed to light green.
Typically one would use this feature on character baselines, where the straight-bottomed and curve-bottomed characters are linked to different grid lines, but one of the grid lines is linked to the other, to ensure that they move in a consistent manner. One would normally also link the upper serif line of a font to the baseline serif line, so that the height of the font is kept close to the ideal value.
Pressing CTRL-SELECT on a scaffold line links it linearly between the selected scaffold line and its parent. For example, for a capital 'E', one would first link the top stem H-scaffold line to the bottom stem H-scaffold line, and would then select the top stem scaffold line and click CTRL-SELECT on the middle stem H-scaffold line to link it linearly between the other two. When the character is rendered, the top and bottom stems are first adjusted to fit the grid, and then the middle line is adjusted to restore the original proportions of the sections above and below this line before that line is itself fitted to the grid. This ensures that if the upper portion of the 'E' is meant to be slightly smaller than the lower section, the final bitmap character will always have the upper section smaller than or equal to the lower section.
You can drag any scaffold line using the SELECT or ADJUST buttons - any other characters containing a reference to the line are also affected.
Clicking SELECT on the window background will only deselect the scaffold line if SHIFT is pressed (this is to allow SELECT-drag to drag a rectangle over a set of points without deselecting the scaffold line). Pressing Escape will also deselect any selected scaffold line.
Skeleton menu
The Skeleton window's menu is central to the font editing process and contains many options and features required to produce or edit existing fonts.
Delete
Deletes the selected line (straight line or Bezier curve) or scaffold line, depending on which is selected at the time - note that selecting a scaffold line automatically deselects any selected line.
Straighten
Straightens the selected Bezier curve, if any (ie. turns it back into a straight line segment).
Scaffold
Various options dealing with scaffold lines, listed under 'Scaffold menu' below.
Display
The submenu allows various artifacts in the skeleton window to be displayed or not as required:
Pointer
If not ticked, the pointer is removed whenever a drag commences, and is restored afterwards.
Co-ordinates
If ticked, the coordinates of a point (in design units) are displayed as it is dragged.
Width
If ticked, the character's origin and width are displayed. If no metrics file is loaded, all characters have width 0 (the origin is displayed as a cross).
Character BBox
If ticked, the character's current bounding box is displayed in red.
Original BBox
If ticked, the character's "original" bounding box (ie. that specified by the metrics file) is displayed. This does not change if the character is edited - only if the metrics file is reloaded.
Font BBox
If ticked, the font bounding box is displayed, with two horizontal lines showing the height of one em (in design units, the distance between these two lines is the design size of the font).Note that the font bbox is not updated until the font is saved or reloaded.
Bitmap
If ticked, then any bitmap dragged into the skeleton window will be displayed at its current scaling and orientation. Normally the bitmap would be made invisible to allow the outline to be inspected.
Bitmap handles
If ticked, then if there is a bitmap in this window then a red box will be drawn round it with 8 'handles' to allow its size and orientation to be altered. Note that if the handles are displayed, dragging SELECT inside the area covered by the bitmap will cause it to be moved - to draw lines over the bitmap, the handles must be made invisible.
Show full
This allows another way of getting hold of the 'full char' window, instead of double-clicking ADJUST on the Font Index window.
Zoom
This allows the size of the character display to be changed. If the 'variable' box is ticked, then the displayed character size depends on the height of the window, otherwise the numbers in the writable fields determine the scale factors. A ratio of 2:1 gives an exact correspondence between design units and pixels on the screen (useful when lining up scaffold lines).
Scaffold menu:
New local
This allows a new local scaffold line to be created, subject to the restriction that any one character can have at most 7 vertical and 7 horizontal lines. The line will only exist in the current character, but if an ADJUST drag operation is subsequently made which causes another character to use this character as a base, the line will be inherited by the new character.
New global
This is similar to the previous operation, except that the new line is propagated along all children of the character (ie. all those which use it as a base, and all their children) immediately inherit the line. This operation is only allowed if a line index can be found which is free in the current character and all its children.
Replace
If a scaffold line is selected, this operation can be used to override it with a new local line. Any children of the character which contained the old line will have it replaced by the new line.
The above three options share the same submenu, which is used to select the type of scaffold line required. These options will be shaded if the appropriate line type cannot be selected, eg. if there are no more scaffold lines allowed in that direction, or if you are trying to replace a line you can only replace it with one in the same direction (X or Y).
H-scaffoldfor horizontal stems (eg. middle of 'A')
U-tangent for upward-facing arcs (eg. top of 'C')
D-tangent for downward-facing arcs (eg. bottom of 'U')
V-scaffoldfor vertical stems (eg. left of 'b')
L-tangent for left-facing arcs (eg. left of 'C')
R-tangent for right-facing arcs (eg. right of 'D')
Undelete
This option is used to restore a line from a parent character in its child if that line has been deleted or replaced in the child. To use it, you should select the line in the parent that you want to put back in the child, then click MENU in the child and choose Scaffold.Undelete. If the line had been replaced by another line in the child, this will be replaced by the parent line, including any inheritances of that line in children of the child(!).
Disconnect
If there is a selected scaffold line, this will attach all points currently connected to the selected line to line 0 (ie. no line). Note that this only affects the scaffolding in the direction of the selected line, so if an H/U/D-scaffold line was selected, the V/L/R-scaffold connections of the points would be unaffected.
Skeleton keys:
When the mouse is clicked in a skeleton window, it grabs the caret (its window border lights up), which allows various keyboard shortcuts to be used:
- F9 is equivalent to 'Scaffold.Disconnect' on the menu.
- Escape deselects the current line / scaffold line.
- Cursor keys while dragging - move the pointer by one pixel.
- Cursor keys while not dragging (and a scaffold line is selected) all points connected to that line are moved by 1 design unit in the appropriate direction.
- Cursor keys while not dragging (and no scaffold line is selected and there is a composite character segment) this segment will be moved by 1 design units in the appropriate direction. If there is more than one composite section, clicking SELECT in the window will select the next section for movement.
- SHIFT-cursor as for cursor keys, but move by 4 design units.
- CTRL-cursor as for cursor keys, but move by 16 design units.

|
![[Select]](../images/ro6doc.gif)