|
Configuring Draw
With earlier versions of Draw it was necessary to write a complicated script file to set your preferences. Choosing Choices from the icon bar menu now opens a dialogue from which you can set most of Draw's features.
The Choices dialogue is divided into four sections, and you can move between using the four 'radio' buttons at the top right of the window.
The first of these is Tools & Zoom.
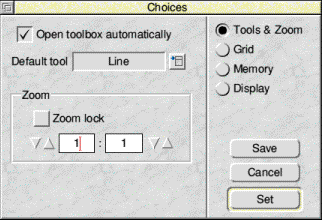
If Open toolbox automatically is set then the toolbox will always appear on each Draw window.
The Default tool sets the tool that is selected when you open a Draw window.
The Zoom section lets you choose whether or not you want Zoom lock to be on and to set your chosen default zoom.
The next section is Grid.
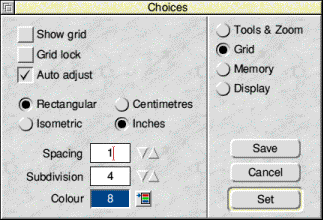
This sets all the default parameters for the grid and whether or not you want the grid and Grid lock to be on by default.
For the meaning of all these parameters you should refer to the section titled Using the Grid to place objects accurately.
The next section is Memory.
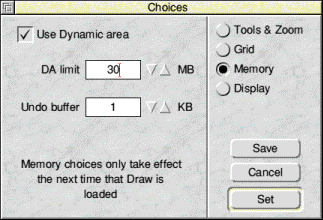
If Use Dynamic area is set then Draw will use this feature instead of storing its data in an extended Wimp Slot. If you do not enable Dynamic area use then Draw will be limited to handling files of less than 28 MB. This might seem like a huge file, and it is if you are dealing only with a 'normal' Draw file, but if your file includes bitmap images, particularly high resolution bitmap images such as photos, then it could become very large. The use of Dynamic areas also enables the Wimp to operate more efficiently, and hence slightly faster when larger files are being used.
DA limit sets the maximum permitted size of the Dynamic area. This is to avoid Draw grabbing so much memory that other applications running at the same time might be 'starved'.
Undo buffer sets the amount of memory reserved for Draw's Undo facility. If this is too small then it may be impossible to undo some actions.
The next section is Display.
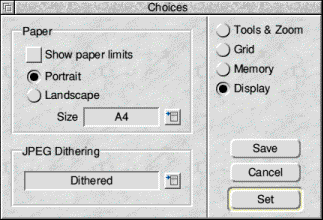
The upper section sets the paper size used by default when you open a new Draw window. You can choose whether you want Portrait (upright) or Landscape (wide) layout and the paper size.
If Show paper limits is set then the printable area of your file will be indicated by a grey border.
There is more information about these in the section Printing Draw files.
The lower item JPEG Dithering sets how JPEG files are displayed. Since a JPEG may have up to 16 million colours and you may be working in only a 256 colour screen mode there may need to be some compromise.
Note that this does not actually alter the JPEG file itself, merely the method used to display it on screen.
Setting your choices
When you have made any alterations to a Choices dialogue you can either click on Set, which will make the changes active for the current session, or Save which will also make them active but will also save them as your defaults the next time you run Draw. As you might expect clicking on Cancel will close the choices dialogue without enacting any changes.
Note that the Memory options do not take effect immediately but are only enacted the next time you run Draw. Hence if you wish to alter them you must use the Save option.

|
![[Select]](../images/ro6doc.gif)