![[Select]](../images/ro6doc.gif)
|
Configuration System: Firewall |
|
|
FirewallThis section discusses the configuration of the RISC OS firewall. Although the configure system makes it easier to configure the firewall than was previously the case, you still need to be mindful of the implications of activating the firewall and any rules you may add. If you click on the Firewall icon in the Network section of Configure, a window similar to the following will appear: 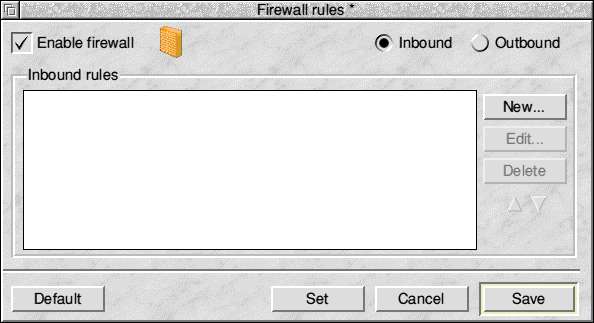 This is the main Firewall configuration window. All the configuration options described below will not take effect until you either click Set or Save. Enable firewall controls whether the firewall and any configured rules will be active or not. It is possible to configure all your rules but easily toggle between having the firewall active or disabled using this option. If the option is not selected, most of the other parts of the window will be faded to show that the firewall is to be inactive. Near the top right of the window are Inbound and Outbound buttons. These toggle the view between display of Inbound or Outbound rules. The white area in the centre of the window is the currently displayed list of rules. This list will have scrollbars when necessary and allows you to select an individual rule to Edit, Move or Delete. The New button is used to add new rules, this will open the rule editing window (see later).
The Edit button allows you to edit the currently selected rule. This will also open the rule editing window. Delete will delete the currently selected rule. No warning is given because this allows faster deletion and any changes since the last save may be easily undone with an Adjust click on Cancel. The two arrows below Delete allow you to move the position of the selected rule within the list. The order of the list is important because this affects how rules are applied by the firewall. Rules at the top will be matched before rules lower down the list. Default will delete all rules and apply some default rules. These are unlikely to be exactly what you need. Set will apply the current firewall configuration to the current Desktop session only and these will revert to the saved configuration after a reboot. Clicking on Cancel with Select will close the firewall configuration window if no unsaved changes have been made or will warn if unsaved changes have been made, giving the option to save or discard these. If Cancel is clicked with Adjust, then this will undo any unsaved changes and revert to the saved changes. Save will save the current firewall rules and apply them. Rule editingBelow is the rule editing window. This is used for adding new rules and modifying existing rules. The title changes according to which is performed. 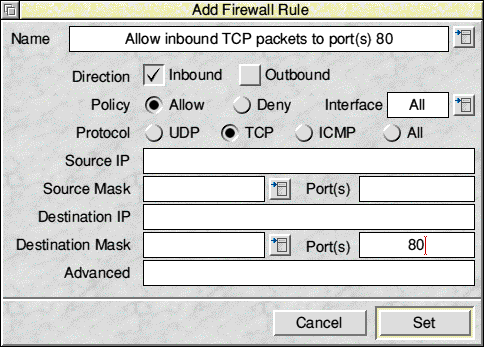 For anyone familiar with firewall rules, most of this window is likely to be self-explanatory. At the top, is the rule Name. Names can contain alphanumeric characters, space and some other characters, but you should keep things sensible and not try to use all sorts of odd symbols. Specifically, square brackets are prohibited in rule names as these are used internally by the system. To the right of the rule name is a pop-up menu icon. This gives access to predefined rules, if available. Predefined rules may be used as is, or as templates which you then modify to suit your needs. Below the rule name are the Direction options. Each rule applies to either Inbound, Outbound or both directions. Selecting neither implies both. Policy dictates whether the rule is to Allow or Deny network traffic that matches the other criteria of the rule, through the firewall. Rules can be applied to specific network interfaces. Interface Allows you to choose from those interfaces that have been detected on your computer (via the popup menu), or to type in your own choice (assuming you're editing the script on a different machine to that which it will be deployed on to). The popup menu will list any interfaces detected as present, and any found in the existing rule set loaded in from disc. Protocol specifies which of the three TCP/IP protocols the rule is to match. Only one or All of, UDP, TCP and ICMP may be specified. Source IP is the Source IP Address or Hostname (from the Hosts file) to match. This makes most sense if writing an inbound rule. If you specify this field, you must also specify Source Mask Source Mask is used in conjunction with Source IP and specifies either an exact host (with the value 255.255.255.255) or a subnet if less bits are specified (e.g. 255.255.255.0). The mask may be specified as either dotted decimal (octet format), or by number of bits (e.g. 24). The pop-up menu to the right offers some common subnet masks to choose from. To the right of Source Mask is Port(s), this is the source port number or port range or list of ports from which traffic must come for the rule to match. Number ranges are specified by a pair of numbers separated by a minus sign. Only one number range is allowed and must be specified before any other ports. Number lists are comma separated. Destination IP, Mask and Port(s) are the same as for Source, but obviously match against the equivalent destination fields in the network traffic. Advanced will not normally be used. This will contain any rule parameters read in from a loaded script which are not supported by the other options in the Editing window. Users familiar with the underlying RISC OS firewall may want to make use of those extra parameters by typing them in directly here. Cancel will close the window without adding or updating the rule if clicked with SELECT, but if clicked with ADJUST, will undo any changes made since the window opened. Set will commit the edited changes to the relevant rule list(s). If clicked with SELECT, the window will close. When clicked with ADJUST, the behaviour depends on whether you were editing an existing rule or adding a new one. If you're editing an existing rule, this will commit your changes to the relevant list(s) and leave you editing the same rule. If, however you were adding a rule, then your rule will be added and you seamlessly begin working on the next rule to be added
|
|
This documentation is copyright 3QD Developments Ltd 2013 and may not be reproduced or published in any form without the copyright holder's permission. RISC OS is subject to continuous development and improvement as such all information is provided by 3QD Developments Ltd in good faith and is believed to be correct at the time of publication E&OE. 3QD Developments Ltd cannot accept any liability for any loss or damage arising from the use of any information provided as part of the RISC OS Documentation. HTML document version r23142 (3rd November 2015) |