
|
www.riscos.com Technical Support: |
Maestro enables you to transcribe music in standard musical notation and play it through the computer's own sound system; it also provides some simple editing facilities. This chapter assumes that you are familiar with the basic ideas of musical notation.
| Maestro is in the Apps directory on your hard disc or network. To start the application Double-click on the !Maestro icon. The application icon will then appear on the icon bar. |
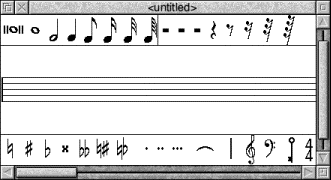
Click on this icon to display the Maestro window
The best way to get started with Maestro is to load one of the tunes supplied as part of the Applications Suite. To do this, double-click on one of the tune icons in the Tunes directory, or drag it onto the Maestro icon on the icon bar.
If you load the file Fanfare, the window that appears looks like this.
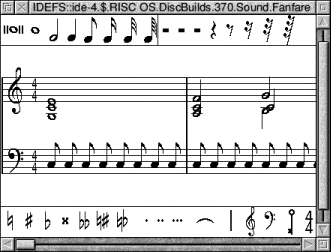
The Maestro window is divided into three horizontal panels, with the stave in the centre. Scrolling affects only the central panel. Above and below the stave are toolboxes containing icons for notes, rests, clefs and other symbols.
To play the tune, press Menu to open the main Maestro menu. Choose Play to start the music. As the music plays, the score scrolls across the screen. Click on Play again to stop the tune. Another bar or so will play before it actually stops. To return to the beginning of the score, use the horizontal scroll bar.
Before setting up your own score, try out the following editing procedures on one of the tunes supplied on the disc.
To add a note or rest, select the value you want by clicking on its icon in the window above or below the score. The selected item will appear with a frame around it, and when you move the pointer onto the score window, a 'trial icon' appears, which moves around as you move the pointer. When the item is in the position you want, click Select. To get rid of the trial icon without adding a note or rest to the score and without selecting an alternative trial icon, press Menu, move the pointer off the Menu and press Select.
You can place notes anywhere; above and below each stave they will create their own ledger-lines. In the case of notes with stems, the stem trails behind the trial icon: if the pointer is moved downwards, the stem will be above the note; if upwards, the stem will be below the note.
Rests will appear only in their valid positions, in the centre of the stave.
To delete a note or rest, select the icon for the same value, and position the trial icon exactly over the item you wish to remove (it doesn't matter whether the stem goes the same way or not). When it is in the right place, the trial icon will appear to blot out the original item. Click Select and the item will be deleted.
Select a lengthening dot in exactly the same way as a note or rest. Move the pointer over the note you wish to lengthen and click Select. To delete a dotted note, you do not have to delete the dot separately: delete the note and the dot will disappear too.
Select and place accidentals, bars and ties in the same way: like notes and rests, they will appear only in valid positions. A bar will be inserted across all the staves in the score when you click on one of them.
The tie character is of a fixed length, but when placed between notes of the same pitch, a single note will sound, with a duration equal to the two notes added together.
You can select and place clefs like other items: they will appear only at the beginning of a bar.
You need to select key and time signatures before positioning them on the score. Use the Maestro menu to do this; this process is described later.
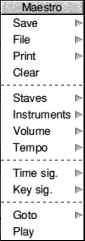 |
As in any application, clicking Menu on the Maestro window will display the top-level menu.
The Save procedure is exactly the same as for other applications such as Edit or Draw. Save a score by dragging the Maestro icon into the directory window where you want to save it, or by typing in the full pathname and clicking on OK. File gives you some information about the file you are working on. |
Clear removes the current score from the stave but leaves the Maestro window on the screen.
Staves displays a box where you can enter the numbers 1, 2, 3 or 4 (others are not accepted), and an option +percussion. Clicking on this option will add a single line percussion stave; when it is selected, the menu item is ticked. Click on it again to remove the percussion stave.
Instruments presents you with a full window containing a line for each voice on each normal stave you have selected, and a single line for the percussion stave (if selected). If you click on Instruments, the window will stay on the screen. There is a maximum of eight voices: if you have selected more than two staves, they will be distributed roughly equally between staves. You can scroll this window vertically in the normal way.
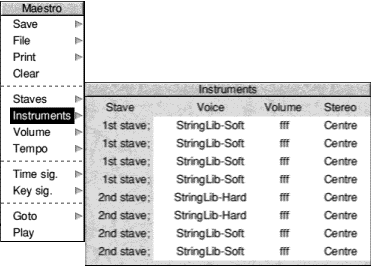
You can change the following:
If you have installed a MIDI expansion card in your computer, the Instruments box will have an extra column headed MIDI. The line for each instrument contains a figure 1 by default, indicating that it will play on MIDI channel number 1. Click on this number to change the channel number for each instrument. In addition, when a MIDI card is installed a MIDI only entry is added to the set of voices that appears when you click on the voice entry; choose this entry to prevent any sound being played through the computer's own speaker(s).
Volume enables you to set the overall volume on a scale from ppp to fff.
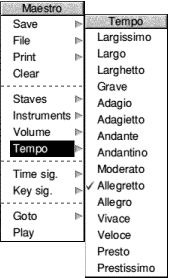
Tempo allows you to set the tempo on a scale from largissimo to prestissimo.
Time signature presents you with a small box containing a time signature. Position the pointer over the upper number; successive clicks cycle the values from 2 to 16. The lower number can take values of 2, 4, 8 and 16 only.
To assign a time signature to a score or to add a new time signature in the middle of a score;
The selected time signature will appear on all staves.
To delete a time signature, select the 4/4 icon, move the pointer onto the time signature and click Select.
Display the Key signature menu tree by choosing the Key sig. option.
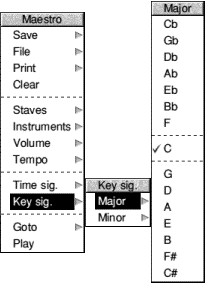
The Key signature menu tree first asks you to choose between major and minor keys. Taking the major path offers you a set of key signatures with C at the centre, 'flat' key signatures grouped above and 'sharp' signatures below. For minor keys, A is at the centre.
To place a key signature at the beginning of a score, or at the beginning of a bar:
The selected key signature will appear on all staves.
To delete a key signature, select the key icon, move the pointer onto the existing key signature and click Select.
Goto presents you with a box into which you type the number of the bar you wish to move to.
Play starts the tune playing from the point displayed on the screen. To stop, click on Play again.
The preceding description of the Maestro menu options gives you the information you need to set up your own score. However, for the sake of clarity, the following section sets out the steps to take in their most convenient order (though they can all be changed at any time). The menu options are shown in bold type.
You are now ready to start placing notes on the staves.
If you copy a piece of music from a written score it will occasionally need some minor modifications to play correctly.
In fugues scored for the keyboard, several distinct parts may be written on one stave. In the following example from a Shostakovich fugue, bar 20 contains a semibreve G belonging to the top part, and in the second half of the bar, two crotchets belonging to the middle part, which had started bar 20 in the bass stave.
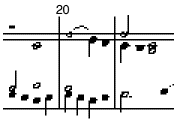
Maestro tries to play these three notes in succession, not understanding that the first crotchet should start half way through the semibreve. Since the semibreve is long enough to complete the bar by itself, the two crotchets are lost. The solution is to write the top line like this:
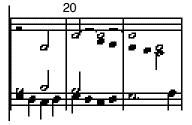
This indicates to Maestro that the crotchet E starts half way through the bar. Problems of this type can generally be resolved by splitting notes into shorter notes tied together.
Note also that Maestro does not allow two rests in the same time slot on one stave, as is sometimes done in fugues to indicate that two parts are silent.
These are not implemented as such, but the effect can be achieved by entering notes of the appropriate small duration, and deducting their value either from the note they would normally be attached to (for an appoggiatura) or from the preceding note (for an acciaccatura). Very effective trills can be produced using an elaborated form of the same method.
Maestro cannot extend its memory slot once it has started up. It therefore takes at least 256K, to allow for the editing of long transcriptions. However, if the Next slot in the Task manager is set to more than 256K, Maestro will use up all the space in Next. Since this may be more than you need, you can use the Task manager (described in Managing the desktop) to reduce Next to 256K, before loading Maestro.