| Graphics on the ARM | |
| Roger Amos |
>Ray Tracing
Ray tracing is almost as old as computer graphics itself. The philosophy of the technique is as follows: if you have a mathematical model of an object or a group of objects and you know precisely how it is illuminated, then given sufficient computing power you can reconstruct the image of it that would be seen by an observer or captured by a camera trained on it at any point. Working through the image pixel by pixel, the computer retraces the history of the light falling on each part of the image and traces it back to all possible sources, taking into account reflection off surfaces and refraction within transparent objects. For this reason the system needs details of not only the colour but also the reflective and refractive properties of the objects in the scene. The resulting images-in pixel graphics format of course-are usually startlingly realistic. 'Photographic' is not an apt description; they are more than that. They represent idealised photography, photography that is not subject to the limitations of lenses, film and chemical processes.
There are two essential prerequisites for ray tracing, apart of course from sufficient computing power (and time!). You need a ray tracing algorithm, i.e. a ray tracing program, and a mathematical model of the scene, including the full reflective properties of all surfaces.
Given these demanding prerequisites, you might be excused for thinking that not many would undertake the daunting prospect of writing ray tracing software for the ARM machines. In fact many such packages are available and one of them, Clare's original Render Bender dates back to the earliest days of RISC OS. This chapter examines four contrasting packages, one of which is not true ray tracing at all, but offers similar facilities, While most packages could theoretically run in any desktop screen mode, the very nature of ray tracing presupposes a 256 colour mode (13, 15, 21 or 28).
ArcLight
ArcLight is one of that family of linked applications from Ace Computing whose members Euclid and Mogul we met in Chapter 6. It was natural that this family should include a ray tracing member because the other members of the family provide some of the prerequisites.
One prerequisite for ray tracing is a mathematical model of the three-dimensional scene to be raytraced. Now a Euclid file contains just such a three-dimensional model. Indeed Euclid itself contains the elements of a ray tracing system in that it allows you to place one or more cameras trained on the scene and, with some limitations, to define how it is lit. Each camera can then show its particular 'view' of the scene with proper perspective and with lighting and shading effects. ArcLight uses the Euclid file as its mathematical model and takes the process a stage further.
To use ArcLight is very simple. You drag the Euclid file on to the ArcLight icon. This calls up a dialogue box in which you set up various options. Finally, drag the sprite file icon into a directory display to start the process. The sprite image builds up in a window on screen and is finally saved in the destination directory. Another dialogue box provides interesting statistical information
ArcLight will also ray-trace whole animations made using Mogul. You create a directory for the new film and place in it a Euclid file named Picture and a Mogul sequence file named Sequence. Then you drag the entire directory on to the ArcLight icon. The process can take some time depending on the number of frames in the film and the screen mode in use. But the process operates in the background so, subject to memory availability, you can use your computer for other tasks at the same time.
To speed up what would otherwise be a tediously slow operation ArcLight examines the scene and if it contains more than a certain number of polygons, it divides the scene into 8 areas called voxels. Each of these is examined and, if it is too complex, it is subdivided again and so on, the maximum number of such successive subdivisions being set as the depth. Voxels are too complex for handling if the number of polygons inside them exceeds an arbitrary value known as the simplicity. Both depth and simplicity are user-definable. In general, increasing the depth and reducing the simplicity speed up rendering, but also increase the likelihood of the machine running out of memory.
Another facility for speeding the ray tracing is the Fast option. This suspends normal RISC OS multitasking and allows ArcLight to take over the whole of the computer's processing power. Normally multitasking operation is resumed if any mouse button is clicked.
Render Bender II
The original Render Bender from Clares probably did more than any other package to stimulate interest in the Archimedes' potential for graphics and, especially, animation in the early days. Who wasn't captivated by the line of toy soldiers marching endlessly out of the castle, the swinging balls in the cradle or the flying saucer buzzing the suburban street?
Today Render Bender II is a suite of four main and several subsidiary applications. Illuminator is a 3D vector graphics application similar to Euclid. You use this to create the mathematical model that will be ray traced. Render Bender itself is the ray tracing application which requires an Illuminator file as its input. It converts this to a ray traced image. Animator takes a sequence of pixel-graphics images and converts them to an animated sequence stored in a compressed format. Although the source images are usually Render Bender II images, it will work with sprites from a variety of sources. Converter converts compressed screens to sprites and also allows you to extract individual screens from animations for editing.
Illuminator provides a graphical front end for the Render Bender suite; prior to its introduction, the mathematical model of the scene had to be constructed as a text file which was less user friendly. Illuminator's main screen recalls that of Drain or, even more, Euclid. The top six icons in the tool panel produce primitives: sphere, cube, pyramid, disc, cone and tube. The next two icons, outline and sweep, allow for the design of more complex objects. A text facility allows the entry of text objects using three special fonts provided. The select facility works exactly as in Draw or Euclid, selected objects being distinguished by their grey outlines. The next pair of icons provide a toggle switch, toggling between wire-frame and solid rendering within the drawing. The bottom four tools are indicators only, showing which pair of axes are represented in the current screen view.
The main menu allows files to lie saved and duplicates the tools in providing entry to the Select menu and for the creation of objects. From the Select submenu you can delete, copy, move, group and ungroup objects and change their colours. From the Enter submenu three types of light can be added to the scene; these are not available from the tools; each scene must contain between one and four lights. The Display submenu is concerned with various aspects of the display including an optional background, grid and zoom facilities. Views determines which view of the scene is displayed; the default being the front. Clicking left, for instance, opens an additional window showing the scene from the left. Clicking top opens yet another window showing the scene from above. Examples are shown in Figure 13.5. The Function menu allows you to move, rescale and rotate objects. A Show option provides very fine control of object placing. The Animate option allows you to choose how many frames the animation will include and which frame is being edited. Most powerful is an Enter Formula option which determines how an object moves throughout the animation. Inbetweening, i.e. the generation of intermediate frames, is performed automatically.
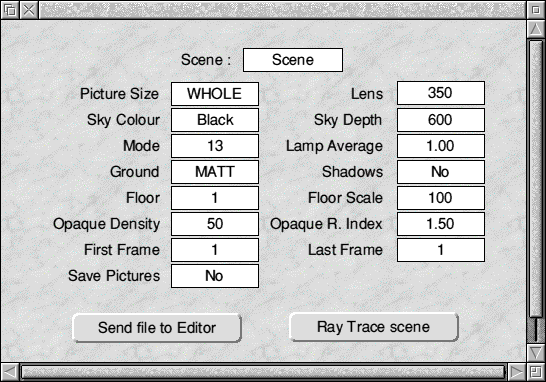
Render Bender II is the application that converts scene files from Illuminator into ray-traced images. Its operation is quite simple, the hard work having been undertaken in Illuminator. A click on the icon opens a window (Figure 13.6) in which you enter various parameters for the ray-traced image(s). Within this window a menu is available offering further choices. A total of 14 floor designs is provided with Render Bender and these can be seen from the Floor item in the window. If none suits your purposes, you can design your own as a sprite and import it; a special palette is provided for this purpose.
The ray-traced images may be in any 256 colour screen mode. They may also be in any of several sixes from full size down to 1/1024 size. The reason for the provision of such very small sizes is that the time taken to ray trace the image increases dramatically with size and it is disappointing after waiting on tenterhooks perhaps an hour or so for the computer to process your image to find that, owing to some silly mistake, the very effect sought has been ruined. Instead you can quickly produce a very small rendering of the image which will show if anything major has gone wrong and allow you to correct it. Then, when you are sure that all is well, you can leave the computer to produce the final version.
Like ArcLight, both background and fast ray tracing options are available. The fast option takes over the whole computer and displays the number of the row of pixels on which it is working; this gives you an idea of its progress. Ray-traced images are stored in a compressed format shared by several of Clare's applications. They can be converted to standard RISC OS sprites using the Converter application.
Animator creates animations from numbered sequences of Render Bender II images, but it also accepts RISC OS sprite files, ProArtisan files and Illusionist (see later) files. An animated sequence may use images from several different sources, but all must be in the same screen mode. Click on the Animator icon to open a window and drag one of the files into the window. All files in the same directory are examined and all scenes having the same name are noted and indicated by number in the window. You can then edit the sequence in which screens are displayed by editing the secquence of numbers. The same number may be used as often as you wish, allowing repeated or cyclical motion with minimal memory requirements. When you are satisfied with the sequence, you can compile the animation; this introduces additional compression (delta compression) which essentially saves only the differences between successive frames. You can convert an animation back to individual frames using Converter.
The quality of the rendering in Render Bender II is almost legendary. But the process can take a long time. To produce an animation of the quality of the demonstrations is a commitment to many hours of painstaking work and, depending on your choice of screen mode and size, is likely to lie up your computer for several hours of processing.
Illusionist
Strictly speaking Illusionist should not he in this chapter at all; it is not a ray tracing application. It describes itself simply as a 3-D art and design package. But this application from Clares, the same stable that produced Render Bender (above), uses similar techniques and also produces high-quality images. The difference is that instead of building up the final image pixel by pixel, analysing the rays of simulated light that fall on each, it divides the image into polygons and works through them one by one, calculating the exact colour and shade needed to paint each. It does not allow shadows or reflections as Render Bender does, but it is faster and somewhat easier to use.
One valuable feature is a facility to 'map' a sprite or picture file on to any surface. Supplied for this purpose are reproductions of woodgrain, marble and a stunningly realistic ancient brick wall. Any sprite or picture file can be used provided it is in mode 12 or 13. So you could even wrap a map of the world around a sphere if you wished to reproduce a geographer's globe.
Illusionist is all contained in just one application. As in Render Bender the production of an image is a two-stage process involving drawing in a vector-graphics environment, followed by rendering. The vector-graphics drawings are referred to, appropriately enough, as vectors. There is a facility to export these as Draw files. The resulting pixel-graphics images can be saved in either RISC OS sprite format or Clare's own compressed format used in Render Bender and ProArtisan. Illusionist itself does not produce animations, but the Animator application supplied with Render Bender will accept Illusionist images.
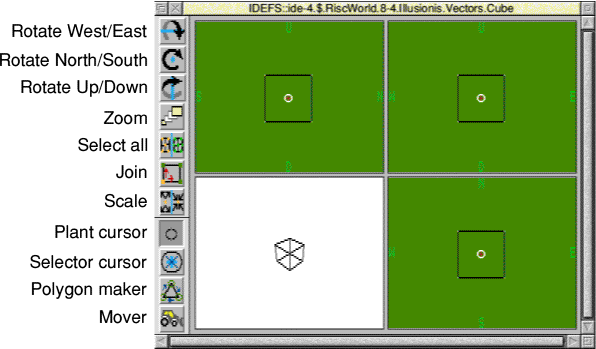
The editing facilities provided are comprehensive. The main screen is split in four, three divisions providing simultaneous views: side elevation, front elevation and plan. These are thoughtfully labelled with the six directions for identification: N, S, E, W, U (up) and D (down). All changes are reflected immediately in all three views. The fourth view is a wire-frame full perspective drawing and it is this that can be exported to Draw, it appears as a single path object (over 170 Kbytes for the drawing of the Archimedes).
The tools are mainly concerned with movement and editing. Selection is normally applied to points rather than objects and the first three tools rotate selected points about three axes; the other tools are concerned with zooming, selection, scaling, polygon creation and moving. Apart from the polygon creator (which handles polygons having up to 32 sides) objects are always created by the Add object option in the Edit menu. This provides for eight primitives: cube, pyramid, sphere, torus, hemisphere, tube, cone and disc. Also available are sweep objects (user defined complex objects) and surfaces which are flat planes consisting of intersecting lines. All objects, even spheres, are made up from polygons; there are no curves in Illusionist. However, both smoothing and anti-aliasing facilities are offered which can give the illusion (this is the most aptly named software!) of smooth curves.
Whole objects can be deleted or just selected polygons (surfaces) can be deleted. Objects can be given a variety of materials whose texture will affect their appearance. Polygons can be single or double faced-if double faced the appearance of their inner faces is also taken into account; this may be important if part of the object is transparent or missing.
Up to 14 lamps can be used in a scene; the colour, position, target, distance and type (point or spot) can be predefined. The observer or camera position can also be moved to any position "within the scene. There are settings for exposure and ambient light (it is fairly easy to underexpose and end up with a rather dark image especially if the light is oblique to the main surfaces).
When you are finally ready to render your scene, there is a useful 'mini-test' facility which quickly produces a small version of the picture. This allows you to make any necessary adjustments before starting the full-size rendering. Although faster than Render Bender, Illusionist images still take appreciable time.
PowerShade
Roger Attrill's Powershade has been described as the most powerful and sophisticated ray tracer available for the ARM machines. At the time of writing (mid-summer 1992) its publication by Arxe Systems is imminent.
It differs from the other applications described in that it normally takes its input in the form of a text file (but it can also use Euclid files). A typical extract from a text file is given below. This is written in a simple but comprehensive object definition language which allows the following primitive object types: sphere, plane, box, cylinder (open or closed), cone, triangle, phong triangle, superquadric and n-sided polygon. Each object's surface is defined with the following properties: ambient colour, diffuse colour, specular colour, specular coefficient, reflection coefficient, transmission coefficient, refractive index, translucency coefficient and phong transmission coefficient. In addition, each object may have any of the following textures: chequer, marble, wood, tile, cork, gloss and sky. And if those don't provide sufficient choice, you may alternatively apply hump mapping, fractal or picture mapping to get just the effect you want.
Each object can be rotated by any angle about any vector and can be scaled in each axis. Objects may be grouped and groups may include other groups.
Three types of light source may be used: point source, directional source at infinity and area light sources (for penumbra effects). The image may be traced by taking a number of samples in each pixel or by anti-aliasing with adaptive subdividing of a pixel colour until there is even contrast at each corner.
Output is available as an 8-bit RISC OS sprite with Floyd and Steinberg dithering (see Chapter 11) or as a 24-bit RGB file. Support is provided for 24-bit video enhancers. Effects which may be available include stereo views for left and right eyes, mist or smoke effects and depth of focus.
Powershade was written entirely in Assembler for speed and compactness. Nevertheless its comprehensiveness is such that tracing takes appreciable time; its progress is reported. Even with an ARM3, several hours should be allowed for a picture to be completed.
Password Fred
jittered samples 1
eyep 1,1 -9 3.2
lookp 0 0 2.5
up 0 0 1
fov 58 47.88
screen 648 512
node 21
background 0 0 0
surface wood 0.15 0.1 0.045 1. 0.75 0.13 1 0.75 0.13 9. 0 0. 0.
surface shade1 0.1 0.1 0.1 .9 .9 .9 .9 .9 .9 40 0.5 0 0
surface shade2 0.1 0.05 0.01 .9 .6 .1 .9 .6 .1 24 0 0 0
surface stand 0 0 0 .9 0 0 .9 0 0 30 .3 0 0