| Graphics on the ARM | |
| Roger Amos |
Image Processing
We met the term image processing in the two previous chapters. It is a generic term for several types of operation that are applicable to pixel graphics, but not to vector graphics. The operations are generally applied to the whole image, although some may occasionally be applied to only a part of an image.
The following types of operation are generally regarded as image processing:
- conversion of image format, e.g. changing PC screens to RISC OS sprites.
- scaling of images, e.g. converting a mode 15 (640 x 256 pixel) image to a mode 21 (640 x 512 pixel) image or a half-size mode 21 (320 x 256 pixel) image. In these scaling operations the number of pixels in the image is changed. This stands in contrast with the scaling of sprites imported into DTP and drawing packages, which changes the size of the image on the screen or in the printout, but leaves the number of pixels unchanged.
- changing the screen mode of a sprite.
- changing all pixels of a certain colour to another colour, e.g. darkening or lightening the image or expanding its dynamic range (darkening the dark parts and lightening the light parts).
- more complex pixel colour changes which take into account or even affect the colour of adjacent pixels, e.g. in image sharpening and softening.
The simplest example of image processing is the substitution of one colour by another. Paint allows this, offering the choice of global substitution, that is, every pixel of the affected colour is changed throughout the sprite, or local substitution, which changes only pixels of the affected colour that are contiguous with the pixel beneath the pointer.
Some public domain applications offer a more sophisticated version of this process. Applicable usually only to 256-colour sprites, the application examines each pixel in turn and multiplies its red, blue and green content by conversion factors set up on a set of sliders not unlike those in the system palette except that they are usually scaled in percentages. Since you may wish to increase the content of a certain colour, the sliders generally allow settings over 100%-they may go as high as 1000%. Clearly this kind of application can be used to lighten dark scenes or darken pale scenes or to remove, say, a reddish cast that is spoiling an otherwise acceptable image.
In Chapter 9 we encountered edge detection in ARCtist and in Art20 some sophisticated operations that could soften or sharpen an image or reduce its resolution giving a 'mosaic' effect (Figure 9.8). In these operations the changes that are made to pixels must take into account the status of adjacent pixels; this is true of many image processing operations.
Of course, there should normally be no reason to apply any such processing to a sprite that was composed pixel by pixel in Paint or an art package or, for that matter, to a sprite which was 'screen-grabbed' from a vector graphics package. If the artist was competent, he or she should have achieved the very effect that was intended. Image processing is sometimes applied to such sprites, however, to prepare them for printing. But, as we saw in the last chapter, many sprites are created electronically. They are the output from scanners or video digitisers used to convert into digital format images that originated on paper or, ultimately, from a video camera. Now unlike an artist who can idealise, depicting the scene as it would appear under perfect conditions, a (video) camera records the real world with all its imperfections. It may be true that 'the camera never lies' (although it can be tricked), but the camera does not see as the human eye sees. It records, but unlike the human faculty of sight, it does not interpret what it records. For this reason its output sometimes fails to do justice to the scene portrayed- although sometimes it can also reveal detail that the living photographer failed to notice! When a photograph or video frame is converted into digital format, this adds an additional set of limitations to an image that was probably already less than perfect. Consequently, sprites from these sources often benefit from image processing.
Let me make one fact plain from the outset. Image processing is not a panacea for all evils. As in all branches of data processing, the rule 'rubbish in-rubbish out' applies to image processing. If the vital information is absent from the source material, no amount of image processing will restore it. Consequently, if you attempt to process a sprite obtained from a video digitiser connected to a worn out video cassette recorder playing back a recording made on a different machine of a television broadcast that was itself of less than broadcast quality (such as a vintage film or an outside broadcast in poor conditions), you must not be surprised if you fail to obtain any improvement.
On the other hand, in some sprites vital data are present but eclipsed by other detail. And sometimes, if the process parameters are correctly set, you will obtain a worthwhile improvement. As in so much of life, it takes practice. After a while, you learn to recognise the kind of condition that can be improved and you will know instinctively the steps to take. Until then, the golden rule is: don't be afraid to experiment. Don't be disappointed by your failures; learn from them.
There is one imperative: never process your only copy of an image; always keep a copy of the original in a safe place. Most image processing operations are irreversible. So if the chosen operation ruins the image-and sometimes this happens-there will probably be no way in which you can restore it to its former condition. But if you have a copy of the original, clearly you can discard the failure and try some other processing operation.
There are several image processing packages available, but the one that you are most likely to encounter is Roger Wilson's ChangeFSI.
ChangeFSI
Although ChangeFSI originated at Acorn Computers, it is widely available from public domain and shareware sources. It is also distributed with some scanners, such as those supplied by Irlam Instruments, as a means of converting their output to RISC OS sprite format. Its name is derived from Change (self explanatory), the names of R. W. Floyd and L. Steinberg, who in 1975 devised a process called 'error diffusion' which the application uses to improve the rendering of images, and Integer since the application performs all its arithmetic in 32-bit fixed-point integers.
Floyd and Steinberg error diffusion is used principally to improve the rendering of images having 24-bit colour information when they are converted to 256-colour sprites. Clearly only 256 of the 16,777,216 original colours can be reproduced exactly; the other 16,776,960 are simulated using dither patterns. When the colour is applied over an appreciable area, the dither pattern is carefully contrived so that the red, green and blue content of the original colour is conserved. Generally two colours from the current palette are deployed in a pseudo-random pattern and any error in the weight of the overall red, green and blue content is compensated for by adjusting the colours of individual neighbouring pixels. ChangeFSI works from right to left in one row and then left to right in the next to minimise the likelihood of error diffusion resulting in conspicuous repeating patterns.
ChangeFSI's icon suggests that its purpose is to convert any pixel graphic material to a RISC OS sprite. And for many that is its main use. Drop a file of 'alien' pixel graphics on to its icon and after a while (the length of time depending on the size and format of the source file) up pops a RISC OS window containing the image sought. Clicking Menu over the image produces a save icon which allows you to save the image as a RISC OS sprite. But quite apart from this very useful facility, ChangeFSI contains a valuable selection of image processing operations. ChangeFSI is loaded in the normal way, its icon appearing on the icon bar. (Unusually for an ARM application it can also be run entirely from the operating system command line.) Clicking select on the icon does nothing-you start it off by dragging the source file on to the icon. But first you will almost certainly wish to set up some parameters. You do this by clicking menu over the icon; it brings up a menu of seven options.
Most important are Scaling, Processing and Output which lead to dialogue boxes described later. Fast gives faster operation. Save choices saves the options you have selected from the dialogue boxes, allowing you to reuse processing combinations that worked well on further material from the same source. Info and Quit have their usual functions.
Input material
ChangeFSI (version 0.82) accepts as input the following RISC OS file types:
- standard RISC OS sprite files
- the ArVis format from Video Electronics Ltd (file type FF9)
- the Pineapple colour digitiser format from Pineapple Software
- the Watford Video Digitiser 'picture' format from Watford Electronics Ltd (file type DFA)
- the ProArtisan compressed picture file format from Clares (file type DE2)
- two different TimeStep satellite image formats (file types 300 and 7A0)
- CCIR601 (file type 601)
- the AIM and Wild Vision V10 format (file type 004)
- the Wild Vision V9 format
- the Translator Clear format (file type 690)
- the Atari ST 'Degas' format (file type 691)
ChangeFSI recognises and attempts to convert the following image types which are most likely to have originated in other computer systems. They are recognised by their contents and structure rather than by directory information such as file type. Some of these formats such as TIFF and GIF are very widely used for image transfer between computers; others such as the RT format are used by certain pixel graphics applications.
- the Millipede Prisma format (also used by CadSoft)
- the Aldus/Microsoft TIFF format (also filetype FF0 is assigned to TIFF)
- the CompuServe GIF format
- the Electronic Arts IFF ILBM format
- the Microsoft Windows 3 .BMP format
- the Digital Research GEM .IMG format
- the PC .PIC format
- the MacPaint format
- the ZSoft .PCX format
- the RIX Softworks ColoRIX format
- the Sun pixrect format
- the UNIX rie format
- the Truevision Targa format
- the 'Flexible Image Transport System' (FITS) format
- the PC .DSP format
- the QRT .raw format
- the MTV pic. format
- the RT image format
More recent versions of ChangeFSI may recognise other image formats. As new formats are discovered, their data are added to the application which is highly accessible, being written in a mixture of BASIC and Assembler.
Output options
Output options are set up in the output dialogue box shown in Figure 11.1. Output is always a RISC OS sprite (although there is an option to output AIM/Wild Vision V10 format images) and ChangeFSI defaults to the current screen mode, although any desktop mode can be selected. (Clearly this provides an elegant means of changing sprites from one screen mode to another.) The radio buttons at the top of the dialogue box provide a quick way of selecting screen mode by pixel shape and number of bits per pixel, useful for folk who can never remember which mode is which.
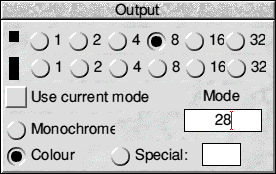
The other options in the box control various output parameters.
Scaling options
ChangeFSI offers a comprehensive range of scaling operations, set up in a scaling dialogue box (Figure 11.2). Note that these scaling operations change the number of pixels present, not just the size of the image on the screen or in the printout.
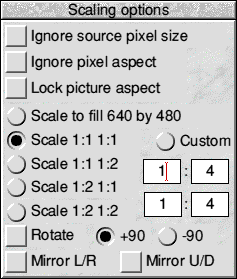
Ignore Source Pixel Size is an option that can be set when the source material is from a format that specifies the pixel size. Some files get their pixel size wrong! If this option is set, all pixels will be assumed to be the same size as a mode 18 pixel (i.e. 2 OS units or 1/90 inch per side). Scale to fill x by y scales the source material to fill a screen, the current screen mode being assumed, x and y are replaced by the width and height of the current screen mode in pixels. In the four standard scalings that are offered the first figure relates to the horizontal (x) axis and the second the vertical (y) axis. Thus the scalings offered are no change, either axis halved or both axes halved. Halving refers to an actual halving of the number of pixels, not simply the size of the image on the screen. You are quite likely to wish to scale an image downwards in this way. Halving the number of pixels forces ChangeFSI to merge pairs of adjacent pixels into single pixels and this is one way of eliminating dither patterns. You may wish to eliminate a dither pattern if, for instance, you wish to apply sharpening. If you use sharpening on a dithered image, you will sharpen the dither itself which will result in an appalling mess.
Besides the four pre-set scalings, you may enter any scaling factor you wish. You must click in the Custom box and set up your ratios in the four boxes beneath it. The upper pair relate to the horizontal (x) axis and the lower pair to the vertical (y) axis. Either box will accommodate figures up to three digits, so you can enter ratios such as 30:400 if you wish.
The last three options may be set individually or in any combination. They rotate the image anticlockwise through 90 degrees, mirror it left-to-right or reflect it vertically.
Processing options
The processing dialogue box in version 0.82 is shown in Figure 11.3. The eight processes are quite independent and theoretically all could be selected and applied, although you are unlikely to want both to expand the dynamic range and to brighten the picture.
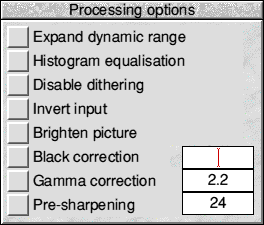
Expand Dynamic Range causes ChangeFSI to survey the image and see how much of the dynamic range (from black to white) it uses. If it does not use the full range, the range is expanded to fill it-it is rather like the contrast control on a monitor or TV receiver. Thus a dark picture (containing no white) will be lightened and a light one (containing no black) will be darkened, while a picture that contains neither black nor white will be selectively darkened and lightened. Beware of using this option on images from animated sequences unless all the images in the sequence have the same dynamic range. Otherwise you may end up with frames whose brightness varies in a rather disconcerting manner.
Histogram Equalisation is a rather brutal process, which forces the widest use of the colours available. Usually it makes pictures inferior, but it can sometimes recover a picture that is otherwise useless or reveal detail locked in a small part of the input scale.
Disable Dithering prevents ChangeFSI from using dithering in the output sprite. Normally it uses dithering to represent colours not available in the palette. Moreover, as we have seen, it is able to use both dispersed and clustered dot dithers. "this option will force it to use only the colours in the palette.
Invert Input as its name suggests inverts me colours. Although rarely useful in colour images, monochrome images frequently need inverting. Brighten Picture lightens all colours by adding 1 to each RGB level. Obviously, it is unwise to use it in a picture that is already pale.
Black Correction is a facility for improving the appearance of images printed on 'write black' printers (such as dot matrix and ink jet types). The parameter tells ChangeFSI how much larger an inked dot is than a pixel in the sprite; the default setting is 32 which represents a printed dot having an area 50 per cent greater than a pixel. Use of this facility generally makes screen images look pale. Of course, to print pictures which have received black correction you must scale the sprite so that its pixels match the printer pitch, i.e. by 90:300 for a 300 dpi printer. Gamma Correction is a useful option for output intended for the screen. Monitors vary widely in the brightness with which they display colours; many make dim colours appear unnaturally dark.
Gamma correction can be used to compensate for such discrepancies. The default value of 2.2, the standard in the TV industry, lifts dim colours appreciably and will often improve pictures from video digitisers or from other computers having more bits per pixel.
Pre-Sharpening is a powerful tool. It enhances the edges of objects in the picture, usually resulting in a more acceptable output. A value must be entered: the lower the number the greater the level of sharpening. A value of 8 performs edge detection. Values in the range 10 to 20 are normally used to sharpen images, while values in the range 20 to 30 can be used to compensate for the fuzziness introduced by dithering. It is worthwhile experimenting to find the best setting for each individual source image.
The image menu
When ChangeFSI has finished processing the image, the finished sprite is displayed in a standard RISC OS window. Clicking MENU in this window calls up a menu of five options.
Sprite info gives useful information about the sprite: its name (ChangeFSI allocates a name based on the processing options used), screen mode, size in pixels and file size.
Source info gives similar information about the source file that was processed.
Range info gives information about the dynamic range if the Expand Dynamic Range operation was used.
Zoom leads to a standard zoom facility exactly like that in Paint. The maximum zoom settings are 999:1 and 1:999 which should be adequate for most purposes.
Save sprite leads to a standard save dialogue box allowing the sprite to be saved to disc or into another application.