
|
www.riscos.com Technical Support: |
The Filer is the system that lets you access the features of the Filing System, in other words, to move around the RISC OS directory structure, and load and save files, run programs and carry out various other operations on files.
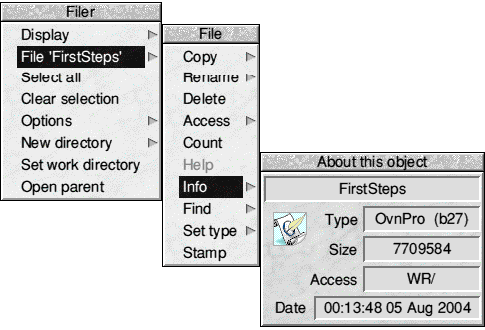
The filer menu appears each time you click the MENU button when the pointer is over a directory viewer or window. An example filer menu is shown below. This is the result of clicking MENU while the mouse pointer was over the icon of the file of this book on the author's hard disc.
The filer menu will always contain the same items, but sometimes one or more of these will appear in grey instead of black. A grey menu option cannot be selected, and this means that the option is inappropriate at that stage. For example, if you click the HardDisc4 icon then click the menu button while the root directory is open the Open Parent option will be greyed out as you are already viewing the top level directory so there is no parent.
The rest of this chapter describes the various items on the filer menu and its sub-menus.
This lets you change the way the directory viewer displays the contents of a directory. Move the mouse over the arrow to the right of Display and onto the Display sub-menu. You will see the various display options available, which are:
Large icons means that the display is shown, as in the previous illustrations, with full size icons and the name below the icon.
Small icons, as the name suggests, uses half size icons for folders, applications and files with the name beside the icon instead of below it. This is more compact so you can see more of the contents of a directory if it contains a large number of objects.
Full info shows the contents in a single vertical column with small icons. To the right of each icon is not just the filename but also information about the file, its type, size, access status and the date it was created or last modified as shown.

Below this are four options which define how the items in the window are sorted.
You can experiment with these options and see how the filer display changes. Note that the display on a directory viewer that is already open does not alter, the changes only take effect when you open a new directory viewer or close and re-open one that is already open.
With older versions of RISC OS changes made here became permanent and so would apply the next time you switch on. With RISC OS 4 and above the permanent changes are set in the main Configure program, which will be described later. Changes made from these menus only remain in force until you switch off.
This is the option below Display on the filer menu. It actually shows what objects whatever action you are intending to do will be carried out on, so precisely what appears in this position depends upon where the mouse was when you clicked the MENU button and whether any items in the window had been selected.
If you had previously selected one or more objects then the word Selection will appear here. This means that whatever you intend to do will be done to all of the selected objects. As you will see later some operations can only be carried out on single files, and so if you have selected more than one object these items will be grey on their respective menus so that they can't be used.
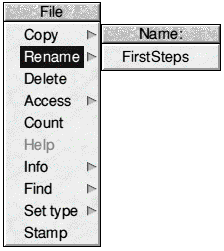
If no items were selected and the mouse pointer was over a file, application or directory icon then the name of that item (preceded by "File", "App." or "Dir." as appropriate) will appear in this position. So, in the example shown earlier, because the mouse pointer was over an OvationPro file named "FirstSteps" what appeared in this position was File "FirstSteps".
Open a directory viewer on your hard drive and click MENU over it to display the filer menu. Now slide off the second item on the menu, (which could say any of a variety of things depending on where the mouse pointer was when you clicked MENU , as described previously) to open the Selection menu, which will look something like the one on the right.
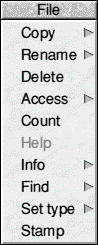
With your hard drive filer window open (displaying something like ADFS::HardDisc4.$ at the top), click on the Apps directory - the directory will become highlighted. Click the MENU button and you will see that the Selection option shows "Dir. Apps" . Moving the mouse to the right over the arrow will take you into the directory sub-menu. If you select any option within this menu it will be carried out on the directory Apps.
The options on this sub-menu are:
Some operations can be carried out on more than one item if several are selected and many of the options above are available for both files and folders. Obviously not all operations can be performed on a group of objects, for example, you can't rename a group of files.
As you might expect this selects all the objects in the directory.
De-selects any and all objects that have been selected.
This leads to a menu that lets you set a number of options that affect the way filer operations are carried out.
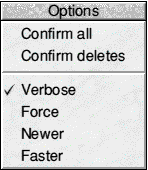
Confirm All - If this is selected then whenever you carry out an operation on a file such as copying, moving, deleting, etc. a window will open asking you to confirm that you want this to happen. This would normally be switched off.
As with the Display options described earlier options selected from this menu only remain in force until you switch off the computer. They can be set permanently using the !Configure application described later.
This lets you create a new directory or folder. You will find as you acquire more files and applications that you need to create directories to put them in. Try to do this in a methodical way so that you can group similar items together to help you to find them when you need them just as you do with a 'paper' filing system.
When you choose a name for a directory it is a good idea to make it reflect the contents, e.g. Letters, Games etc. There are a few restrictions on the characters you can use in directory names;
Open the Filer menu and slide the mouse pointer off New Directory and the window shown will appear.
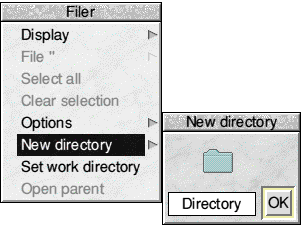
A default name of 'Directory' is placed in the icon for the new directory name. You probably won't want to use this, so delete it using the Backspace key and enter the name of your choice.
If you now either press the Return key or click on the OK button the new directory will be created in the same directory that the mouse pointer was over when you opened the Filer menu.
Alternatively you can drag the folder icon in the window to a directory viewer and the new directory will be created there. To drag the icon just put the mouse pointer over it and hold down the SELECT button. Move the mouse pointer while keeping SELECT held down and the Folder icon will follow. When it is over the directory viewer you want to create the new directory in just release the mouse button.
This makes the directory the mouse pointer was over when you opened the Filer menu the Currently Selected Directory (CSD). There is no need to bother too much about this as you will probably never need to use this facility.
As you might expect this will open the parent directory of the directory the mouse pointer was over when you opened the Filer menu. It is similar to clicking ADJUST on the window's close icon except that it leaves the first directory viewer open.