|
www.riscos.com Technical Support: |
Windows, Icons, Menus and Pointers
We will now explore the WIMP environment.
Move the mouse pointer over the top of the HardDisc4 disc drive icon and click the SELECT button.
To clarify this, the Active Point of the mouse pointer is the tip of the arrow, so place this point approximately in the centre of the icon you wish to select When you press a mouse button don't hold it down (unless you are dragging an object - see later), just click it and release it quickly. The wimp may interpret a long press of the mouse button differently to a sharp click.
When you click on the hard drive icon the hard disc light should come on momentarily, indicating that the disc is operating. A window will then open on the screen showing you what is on the disc, in icon or picture format. The window you have just opened should look something like this.
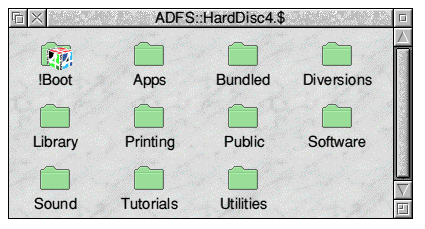
This window (or directory viewer as it is properly called) has several characteristics that are common to almost all the windows you will encounter using RISC OS, no matter what version.
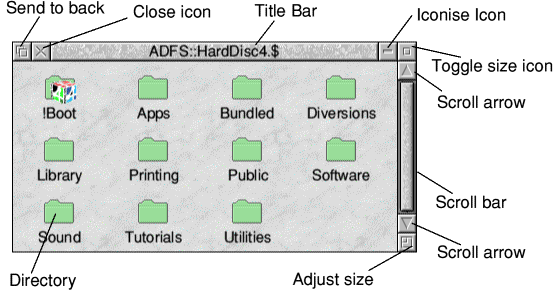
The Title Bar is always at the top of the window, and contains the title of the file or the directory you are looking at. The window shown has the title ADFS::HardDisc4.$
You can now explore some of the features or RISC OS windows. In all cases click the SELECT button unless directed otherwise.
A skill you will need to learn is Double-Clicking. A double click means clicking a mouse button twice in rapid succession while pointing at an icon. It is important that you do not move the mouse between clicks.
You can close the window by clicking on the Close Icon, the small cross towards the left hand end of the Title bar. If you close a window it will vanish from the screen.
You can move a window around the screen and position it where you wish. Do this by pointing the mouse anywhere on the title bar and clicking and holding down the SELECT button while at the same time moving the mouse around the screen. This procedure is known as dragging and is an important technique you will need to develop to use the desktop and RISC OS programs. The window should move instantly when you drag the mouse. This facility for re-positioning is important because you will often find yourself with several windows on the screen and you will need to be able to move them around. Drag the window up towards the top of the screen and release the button.
The Toggle Size icon is found at the top right hand corner of the window. Clicking SELECT on this icon will expand the window to the full width of the screen, or as wide as is required to show everything within the window (see below). If everything in the window is already visible the toggle size icon will have no effect.

The Adjust Size icon is at the bottom right hand corner of the window. Clicking and dragging this icon (that is, put the mouse pointer over the icon, press and hold down the SELECT button while moving the mouse) will allow you to move the bottom corner of the window, thus altering its shape. This is useful if you wish to make the window small and thin to perhaps tuck it out of the way at the edge of the screen. Try dragging the Adjust size icon towards the left of the screen and then downwards to create a tall, thin window. Notice that the contents re-organise and remain in alphabetical order. Now click on the Toggle Size icon a couple of times to see the effect.
Return the window to a tall thin shape. Use the Adjust Size icon if necessary. Now move the Adjust Size icon up towards the top of the window until the window only shows the top three icons. You will now be able to see what is known as the Scroll Bar down the right hand side of the window. This looks like an elevator in a lift shaft. Click the SELECT button on the arrow at the foot of the scroll bar and see how the scroll bar moves down and the 'view' into the window moves with it. If you click on the arrow at the top of the scroll bar the view will move up. Now if you do the same thing using the ADJUST button you will see that the bar moves in the opposite directions. Alternatively you can drag the scroll bar itself up and down the shaft.
The picture below shows a desktop window with its main features illustrated. The iconise icon may not be present in your windows but this function can still be used as described below.
You can convert any current window to an icon on the desktop. This is useful for temporary space saving, but does not save your data unless you save it yourself, so if you are using a program to complete some work we recommend you save your data before experimenting. Click on the iconise icon or, if there is no iconise icon, then click on the close icon whilst holding down the Shift key. The current window will close and appear as an icon on the desktop backdrop. Exactly where the iconised icon will appear depends upon how your computer is configured (see later chapter ).To reopen the window to its full size double-click on the icon.
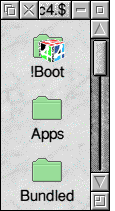
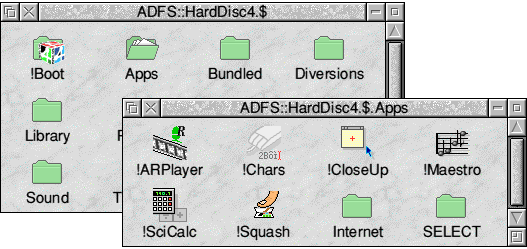
The icon Apps on the screen is a also a directory. To open this directory and see its contents move the pointer over the top of the Apps icon on the icon bar and click the SELECT button. This should open another window. If you also have the original directory viewer open your screen should now look similar to this with the windows overlapping.
You can now use another window feature to alter the order in which the windows appear, the Send to Back icon at the top left hand corner. Click SELECT on the send to back icon and the window will go to the back, that is, behind the other window.
You can easily bring a window to the front by clicking SELECT on its title bar, assuming that you can see it.
The word Directory actually refers to the way that files are arranged on your hard drive and the word Folder describes the way that this is represented visually in the Wimp by the icons which resemble the folders used in office filing.
These two words are now used interchangeably, so both in this book and elsewhere phrases like open the directory and open the folder can be taken to mean the same thing.
To 'open' a folder just double-click on its icon. You can try this with one of the folder icons in the HardDisc4 viewer window (but don't use !Boot) the Bundled folder would probably be a good choice. When you double-click on the Bundled folder icon a new directory viewer will open showing its contents.
You can use the 'click and drag' process to position the windows so that they are side by side or one above the other.
So far you have used the SELECT button to carry out all the above tasks. If you use ADJUST you will see slightly different results.
Close the Bundled directory viewer again by clicking on its close icon. Now double-click on the Bundled folder icon again but this time use the ADJUST button instead of SELECT . A new window showing the contents of the Bundled directory will open just as before, but this time the previous window, the HardDisc4 directory viewer, will have closed leaving you with only the Bundled directory viewer open.
If you now use the ADJUST button on the close icon to close the Bundled directory viewer you will see that the window closes but the previous window, or Parent window, reopens.