| First Steps in Programming RISC OS Computers |
|
| Martyn Fox |
Chapter 11 : A Game with Moving Graphics
In Section 6 we found out how to create lines and shapes on the screen, using commands such as DRAW and CIRCLE FILL. This is one of two ways of using graphics; the other is to use pre-prepared pictures and plot them on the screen where you want them.
These pictures are called sprites. You've already met them when using the desktop as they form the little pictures in all the icons, and you may have tried designing them using Paint. A sprite is actually part of the screen display and it can be any size, from a single pixel to the entire screen, or even larger.
Our next program will grow to be the longest and most complex we've met in this guide so far.
Designing the Sprites
In this program, we'll use virtually everything we've met in this guide so far, so if you skipped something, you'd better go back and read it!We are going to create a pac-man type character and move him around the screen. Later we'll make him gobble up dots on the screen and find out how to move him over a patterned background.
Like the previous programs in this guide, this program is designed to work in either mode 27 or mode 12. There are a fair number of differences between them, though, especially in the design of the sprites, so there are two complete sets of program and sprite files, in sub-directories Munchie_27 and Munchie_12. Open whichever one is right for you and make it the currently selected directory.
If you're content to use the sprite files already provided, skip the next section. If you'd like to try creating your own, read on.
The first step is to create the character, using Paint.
You'll find full details of how to use Paint in your RISC OS Applications Guide. Because we're going to use simple sprite plotting, you will need to create sprites with the appropriate pixel shape and number of colours for the mode you'll be using. It's easier to do this with the desktop in the same mode. You'll probably have it in that mode already, except possibly for the number of colours so first ensure that the desktop is in a sixteen colour mode.
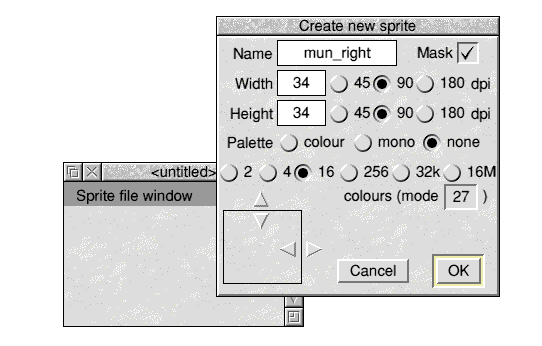
Start up Paint and click on its icon on the icon bar. A sprite file window will appear, together with a 'Create New Sprite' dialogue box.
The dialogue box will show you the number of colours, which should be 16, and the resolution. For mode 27, this should be 90 pixels per inch horizontally and vertically. For mode 12, it should be 90 horizontally and 45 vertically.
Every sprite must have a name. As we're calling our program 'Munchie' and our first sprite will show our character facing to the right, we'll call it 'mun_right', so type that into the 'name' box. It's important to get the sprite names correct, as we will be calling them by name in the program. Note, by the way, that sprite names are always lower-case.
Choosing the Sprite Size
We now have to decide how big we want our sprite to be. The width and height are given in pixels, not OS units. As we saw in Section 6, mode 27 has square pixels, two OS units wide and two high, and in mode 12, each pixel is two units wide and four high.You can make the character any size you like, but you will have to set two variables in a later version of the program according to the width and height you choose. In the listings, we're going to assume that the sprites are the same size as the icons in directory windows. These are usually 34 pixels square in mode 27, or 34 pixels wide by 17 high in mode 12.
When you've entered the width and height, turn the mask on and the palette off, then click on the 'OK' box. The dialogue box will vanish and another window will appear, showing the sprite itself (a white square) The sprite window will probably be on top of the sprite file window, unless you've moved it. Click Menu over the sprite window, go through to the 'Paint' submenu and choose Show colours with Adjust (to keep the menu open) and Show tools with Select.
Before we go any further, look at the colours in the 'colours' window. You will see that they have eight shades of grey and the various other colours of the desktop, together with an extra box which represents the sprite's mask. Remember that we won't be using our sprite in a desktop display, but in a normal mode, either 27 or 12, and we saw its colours in Section 6. If we design our sprite using the colours we have here, it will look all wrong when we plot it.
When we set the colour of a pixel, we simply give it a number. All we have to do is change the colours in our display to be the same as the ones in the mode which we'll be using and all will be well. Click Menu on the sprite file window and go to the 'Display' submenu. You'll see an option called Use desktop colours which has a tick. Clicking on this will turn off the tick, and close the window if you used Select.
At the same time, the colours will change. They still won't look right if you're in a sixteen colour mode, though, because this mode can't show the colours we want as well as all those of the rest of the desktop at the same time. The solution is to change to a 256 colour screen mode. You should now have two identical sets of colours. The white square in the sprite window will appear to have vanished, leaving just an outline, because it's in colour 0 and colour 0 has just changed from white to black.
Drawing the Outline
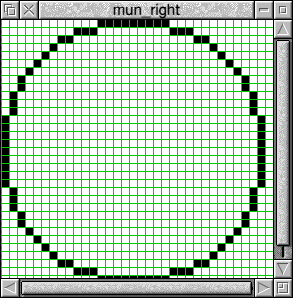
Before setting to work on the sprite, you'll need to enlarge the work area so that you can easily select individual pixels. Click Menu over the sprite window, go to the 'Zoom' submenu and enlarge the black sprite in the window to 8 times its normal size. There is a grid over it, so that you can see the individual pixels, but you probably won't be able to see it at first, because it is also black! Go to the Grid submenu and turn it green. The small rectangles you can see are the pixels. If you are in mode 12, they will be twice as high as they are wide; if you are in a square pixel mode, such as mode 27, they will be square.Because we are going to start by drawing black lines, the first thing to do is turn all the pixels white again. Go to the 'tools' window and choose Replace colour - it doesn't matter here whether you use local or global - then choose white in the 'colours' window and click on any pixel in the sprite window. All the pixels will turn white.
The next thing we need is a black circle. Choose Circle outlines and black. then draw a circle filling the sprite, like this:
We're going to need this circle again later, so we need to keep a copy of it in its present form. Click Menu over the sprite in the sprite file window, go to the Sprite 'mun_right' submenu and use the copy option to make a copy of it called, say, 'mun_x'.
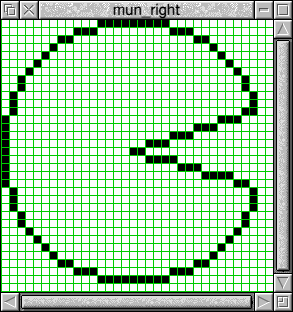
The next step is to draw an open mouth. Use the Set/clear pixels option to remove the straight line down the right-hand side of the circle by turning its pixels white, then draw a black 'v' shape, like this:
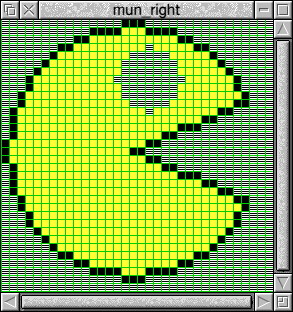
You can now use the Replace colour - Local option to turn the space inside the shape yellow and the surrounding area the mask colour. Finally, give your creation an 'eye', which can either be a colour or a section of mask, so that it looks like this:
You now have something worth saving, so save the sprite file with the filename 'MunSprites'.
We now have a sprite showing our character facing right. As we will want to move him in all directions, we'll need three more sprites showing him facing left, up and down.
You made a copy of the sprite earlier, when it was just a circle. Do the same thing again with the completed sprite, calling this copy 'mun_left'. To make the copy face in the opposite direction, double-click Select on it to open its sprite window, open a menu on the window, go to Edit and choose Flip horizontally. This will turn the sprite round and you can close the sprite window again and resave the file.
Completing your First Four Sprites
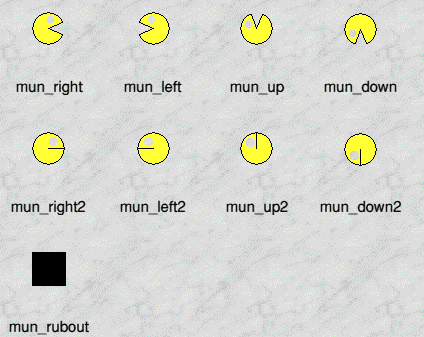
You could create two more sprites, with the character facing up and down, by rotating the one you already have through 90 degrees, but it may not look very good, especially if you are using mode 12. As the pixels aren't square, RISC OS has to create one pixel out of two in some places and two pixels from one in others. An alternative method is to copy the 'mun_x' sprite that you saved when it was just a plain circle and create a new sprite from that one. You can create a character with a mouth at the top, called 'mun_up', and flip it vertically to create 'mun_down'. You should now have four sprites that look like this: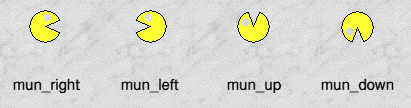
So far, so good, but we don't want our character to wander around the screen with his mouth gawping open all the time. He really needs to open and close it as he goes, so that he appears to be gobbling things up!
This means that we need yet another four sprites with their mouths closed. Fortunately these are easier to draw.
Go back to your circle, make a copy called 'mun_right2' and draw a black line from a little to the right of the centre out to the right-hand side of the circle. Colour the space inside the circle yellow and give it an eye as before. Make a copy, flipped horizontally, called 'mun_left2' and repeat the procedure for 'mun_up2' and 'mun_down2'.
Before you finish this exercise, there is one more job to do. We need a sprite to draw over our character to rub it out when we move it. Open the menu on the sprite file window, go to New sprite and create a sprite the same size as your existing ones called 'mun_rubout'. This is just a completely black sprite without a mask or palette. Your sprite file window should now look like this:
Save your sprite file for the last time and close down Paint. We're ready to start looking at the program.
The Munchie Listing
The first program will concentrate on moving our character around the screen. We won't list it in one piece but you can see the whole thing by looking at the file.
      10 REM > Munchie
      20 REM Draws pacman-type figure
      30 ON ERROR REPORT:PRINT" at line ";ERL:END
      40 PROCinit
      50 PROCgame
      60 END
      70 :
This listing shows how we can structure a program by breaking it down into procedures. The main section, from lines 10 to 70, just calls two procedures, PROCinit, which sets up the initial conditions, and PROCgame, which plays the game itself. In later versions we'll call PROCgame repeatedly, using a REPEAT ... UNTIL loop, to give you several tries at the game.
Initialisation and System Sprites
      80 DEFPROCinit
      90 *SLoad MunSprites
     100 hstep%=10:vstep%=10
     110 MODE 27:REM use mode 12 for standard resolution monitor
     120 GCOL 8,0
     130 ENDPROC
     140 :
The first action of PROCinit in line 90 is to load the file containing the sprites which we've just created. Line 90 does not quote a full pathname for the file, so the filing system will look for it in the Currently Selected Directory. This would normally be the root directory of your hard disc, so you need to change it to the directory containing the sprite file.
Sprites can be stored in various places in the machine's memory. A properly written application which uses sprites would have its own sprite area within its section of the memory, which other programs wouldn't have access to. The Wimp system, which takes care of the desktop, has an area of this sort.
Because we want to keep our program simple, we're using a sprite area called the System sprites area. Sprites stored here can be handled using star commands and any program can get to them. It's generally recommend that you don't normally use this area and it's usually configured to be zero bytes in size. Before you can run this program you will have to allocate some space to the system sprite area, which you can do by opening the Task Manager window. Click Select on the icon at the right-hand end of the icon bar and the window will appear. Look under 'System memory allocation' to find 'System sprites' and drag out a red bar to the right of it. If you're using the MunSprites file included in the files, you'll find that you have to drag it out to at least 192k if you're using mode 27, or 96k for mode 12, because the file contains a large background sprite that we'll be using later. Don't drag it out too far because you'll be taking memory away from the rest of the machine.
You can configure your machine to start up with memory already allocated to system sprites with the command:
*Configure SpriteSize 192k
or whatever size you want. This will take effect when you press Ctrl-Reset. To return to normal, type:
*Configure SpriteSize 0k

Incidentally, after you've run the program, you can see what is in the system sprites area by typing *SList, and how much spare space you have by typing *SInfo. The *SLoad command removes any sprites already in the area before loading in your new file. If you already have some sprites loaded and you want to add some more to them, use *SMerge instead.
The variables hstep% and vstep% in line 100 are the distance that our character will move horizontally and vertically every time you press a key, and are in OS units. If you think the game would be improved by moving in smaller or larger steps, you just have to change these variables.
This shows the value of setting up such variables at the beginning of the program. It means you can alter the way it works without having to hunt through it.
You will notice that the GCOL command in line 120 has two numbers after it. When this happens, the graphics colour is set by the second number and the first number determines how the colour is plotted. You can find a full list of GCOL numbers in Appendix 1.
Getting the Sprite Onto the Screen
In this case, we're not going to draw lines and shapes but plot sprites, so it doesn't matter what we put as the second number. Making the first number 8 means that when sprites are plotted, the machine will take account of their masks. This won't make any difference in this first version of the program, because we're putting our character on a black background, but it will make a difference later on.
     150 DEFPROCgame
     160 xpos%=200:ypos%=200
     170 *SChoose mun_right
     180 PLOT 237,xpos%,ypos%
     190 REPEAT
     200   PROCmove
     210 UNTIL FALSE
     220 ENDPROC
     230 :
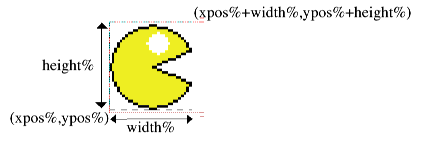
Having finished setting up the initial conditions, we now get onto PROCgame. The first action of this procedure is to set up two variables, xpos% and vpos%, which determine where the sprite will appear on the screen. These are the horizontal and vertical coordinates of the bottom left-hand corner of the sprite in OS units.
There are two steps to putting a sprite on the screen. We first have to select which sprite we want to draw, then we give a command to plot it. Because our sprites are in the system sprite area, we can use a star command to select one and we do this in line 170 with *SChoose followed by the name of the sprite.
The keyword PLOT is a general purpose command for putting graphics on the screen. MOVE, DRAW, CIRCLE FILL etc. are all special types of PLOT command. The first number following PLOT is the type of PLOT action. You can find a full list of PLOT actions in Appendix 3. As an example, PLOT 4,100,100 means MOVE 100,100 and PLOT 5,500,600 means DRAW 500,600. Line 180 with Plot code 237 means 'draw the selected sprite with its bottom left-hand corner at (hpos%,vpos%)'.
Lines 160 to 180 between them put our character on the lower left-hand side of the screen, facing to the right. Having done this, we can set about reading the keys and moving him.
Reading Keys and Moving Sprites
We can now see the advantages of structured programming coming into play. The loop in lines 200 to 220 simply calls PROCmove repeatedly until we press Esc to end the program. All we need to know at this stage is that PROCmove reads the keyboard once for each time round the loop and moves the character if we pressed an appropriate key.
     240 DEFPROCmove
     250 char%=INKEY(0)
     260 IF char%=ASC("Z") OR char%=ASC("z") PROCleft
     270 IF char%=ASC("X") OR char%=ASC("x") PROCright
     280 IF char%=ASC("'") PROCup
     290 IF char%=ASC("/") PROCdown
     300 ENDPROC
     310 :
When we examine PROCmove, we see that its first action is to get the ASCII code for the key pressed, not using GET but using the INKEY keyword which we met in Section 8. If we used GET, the program would freeze on line 250 until we pressed a key. It would then check the code of the key which we'd pressed, move the character if it was an appropriate key and repeat itself, freezing on line 250 again. It would go round the loop once for every keypress. Because we're using INKEY, the program keeps going round and round the loop regardless of whether we press a key or not.
In the case of this simple program, it doesn't make a lot of difference whether we use GET or INKEY as nothing happens between keypresses. The advantage of using INKEY is that you can make other things happen in the meantime. You might, for example, have a second character on the screen which moves around all the time. If you used GET, you wouldn't be able to make it move continuously between keypresses as the program would spend most of its time frozen in the GET instruction. This will make a difference when we get to the next section and add music to our game.
This program goes round the PROCmove loop continuously, waiting no time at all for you to press a key. It actually checks to see if you've pressed one since it last checked - anything you keyed in would be in the keyboard buffer.
Lines 260 to 290 check for one of four keys - Z, X, ' or /, which move our character left, right, up and down respectively. We check for the ASCII codes of both shifted and unshifted Z and X so that the program works whether the CapsLock key is turned on or off. This isn't necessary with the up and down characters, unless you want to play the game with the Shift key held down! It also gets round the problem that if you're running the program on an older machine, the shifted ''' is '"', but on a more modern machine it is '@'. If none of these keys has been pressed, the program simply goes back round the loop.
Moving Around
We now look at several procedures, four for moving the character, one in each direction, and one for rubbing him out before we redraw himThe procedures for moving our character are very similar to each other. In each one we call PROCrubout, which deletes the sprite from its current position, change the value of xpos% or ypos% as appropriate, select the correct sprite to make the character face the way it is going and plot it in its new position.
Each procedure has two lines to select a sprite, ensuring that we get an open-mouth and a closed-mouth sprite on alternate keypresses. The technique relies on the fact that the starting values of xpos% and ypos% are multiples of hstep% and vstep%. Every time we move the character, we add or subtract either hstep% or vstep% to or from xpos% or ypos%. This means that, if we divide, say, xpos% by twice hstep%, the remainder (which we obtain with MOD) switches between zero and non-zero every time we press a key. Lines 400 and 410 in PROCleft, and the corresponding lines in the other moving procedures, make use of this to select the open-mouth and closed-mouth sprite alternately.
PROCrubout simply plots our black sprite, mun_rubout, over the top of the character to obscure it.
You should now be able to move your character around the screen, using the Z, X, ' and / keys. If you move him off the screen, you will have to bring him back again, as we haven't yet included any checks to limit the values of xpos% and ypos%.
You're probably thinking 'He's got a mouth, he should be able to eat something'. That is our next step.
Collision Detection
Rather than have our character wandering aimlessly around the screen, waiting only for you to press Esc, we'll draw some small white circles for him to gobble up and, when he's eaten the last one, we can print a message asking if you want another go.Drawing the circles is quite easy. We just have to invent some coordinates, using Basic's random number generator, and draw circles in the appropriate places. We'll deal with that part shortly. The matter that requires rather more thought is collision detection - knowing when our character has found one of the circles.
There are two ways of doing this. One way is by examining the colour of each pixel in front of the character and checking to see if one of them isn't black. We could do this with Basic's POINT keyword, like this:
col%=POINT(x%,y%)
The value of col% will be the logical colour number of the pixel at (x%,y%).
This would certainly work with our present program, where we have a plain background. If we were moving our character, say, right, we would simply examine the colours of each pixel to the right of the sprite and check to see if any of them weren't the background colour.
Things would get more complicated, though, when we moved on to using a patterned background, as we will do later. We could ensure that the background didn't include the colour of the circles and check for that one, but that would restrict our design. Things would also get even more difficult if, instead of a plain circle, we plotted another multi-coloured sprite for our character to gobble up.
Storing the Positions of Circles
The other technique for detecting a collision is to keep a note of where everything is on the screen and simply work it out. We can use an array variable with 10 elements to store the coordinates of 10 circles and we know where the bottom left-hand corner of the character is, as its coordinates are stored in xpos% and ypos%.In this program we will give each circle a radius of 10 OS units. We'll also introduce two new variables, width% and height%, to store the width and height of the character. Remembering, then, that xpos% and ypos% are the coordinates of the character's bottom left-hand corner, we have found a circle if:
x coordinate of circle > xpos%-10 (circle is not wholly to the left of the sprite)
AND:
x coordinate of circle < xpos%+width%+10 (circle is not wholly to the right of the sprite)
AND:
y coordinate of circle > ypos%-10 (circle is not wholly below the sprite)
AND:
y coordinate of circle < ypos%+height%+10 (circle is not wholly above the sprite)
When all four of these conditions are met, a collision has occurred between the character and the circle.
We don't need to look at the entire program again. PROCmove and PROCrubout are unchanged and the four procedures for moving the sprite have only had one line added to each of them. We'll be adding a number of lines to the beginning of the program, however.
For the same reason, we won't list the whole game again, but there are some changes to the first part:
      10 REM > Munchie2
      20 REM Draws pacman-type figure
      30 ON ERROR REPORT:PRINT" at line ";ERL:END
      40 PROCinit
      50 REPEAT
      60   PROCgame
      70 UNTIL (char%AND &DF)<>ASC("Y")
      80 END
      90 :
There are only two lines to add to the main part of the program, which are now lines 50 and 70. Instead of PROCgame running indefinitely, it will now finish when the last circle has been gobbled up and asks the question 'Another go?'. The ASCII code for the key which you then press is put into variable char%. Line 70 forces this to upper case, as we saw in Section 9, so that it doesn't matter whether the Caps Lock key is on or off. If you pressed 'Y', the loop repeats and you get another game. Any other keypress will end the program.
     100 DEFPROCinit
     110 *SLoad MunSprites
     120 dotnum%=9
     130 width%=68:height%=68
     140 hstep%=10:vstep%=10
     150 DIM dot%(dotnum%,1)
     160 MODE 27:REM use mode 12 for standard resolution monitor
     170 ENDPROC
     180 :
PROCinit has had three lines added and one removed. The old line 120 contained an instruction GCOL 8,0 which told the machine to plot sprites with a mask. This has now been moved into PROCgame.
The new line 120 sets up a variable dotnum%, which contains one less than the number of circles which we want to plot. It's one less because the 10 circles will be numbered 0 to 9.
We need to know the size of the character sprite for collision detection, so we introduce width% and height%, which are in OS units. Whether you're using mode 27 or mode 12, the sprite measures 68 units square (unless you created your own and made it a different size), so width% and height% will both be this value.
Finally, in line 150 we define a two-dimensional array variable to hold the coordinates of all the circles. The elements of an array are numbered from zero so, if dotnum% is 9, they range from dot%(0,0) to dot%(9,1), enough to hold two coordinates for 10 circles. We'll use the elements whose second number is 0 for the x coordinate and the one whose second number is 1 for the y coordinate. The x coordinate of circle 5, for example, would be in dot%(5,0) and its y coordinate in dot%(5,1).
The new version of PROCgame begins with the definition of yet another variable. This one, dotleft%, holds the number of circles remaining on the screen at any point in the game. It starts life as one more than dotnum% - 10 for 10 circles - and is decreased by 1 each time we eat up a circle. The procedure's main loop, which calls PROCmove, stops repeating when dotleft% is reduced to zero and all the circles are gone.
Drawing Circles
At the start of the game, we clear the screen and set the graphics foreground colour to white, ready to draw our circles. The drawing is done by PROCsetdot which we call once for each circle, passing to it the number of the circle in its parameter num%. That procedure, as we shall see shortly, both draws the circle on the screen and puts its coordinates into two elements of the array.Having drawn the circles, we get to line 260 which contains the GCOL instruction telling the machine to plot sprites with masks.
The next few lines are the same as in the old listing of PROCgame, setting up the starting position of the character with xpos% and ypos%, choosing the right-facing sprite and plotting it. There is one extra line before we get to the loop that calls PROCmove. It would be rather nice to tell the player how long he took to eat up 10 circles so that he could try to beat his time on the next go. We saw in Section 3 how the Basic variable TIME increases every one hundredth of a second. We store its value at the start of the game in variable start%.
In the earlier version, we called PROCmove with a REPEAT ... UNTIL FALSE loop which kept on repeating until we pressed Esc or reset the machine. There was no other way of terminating our character's aimless wanderings around the screen! We now have a definite point at which to end the game - when the last circle has been eaten. Line 330 takes care of this, by allowing the program to continue when dotleft% has been reduced to zero.
The remainder of the procedure reads TIME again and prints how many seconds have elapsed since the start of the game, then prompts you to press 'Y' or 'N'. The final loop in the procedure waits for the correct keypress.
Plotting at Random
In PROCsetdot we invent the x and y coordinates for a circle and plot it on the screen. We wouldn't want the circles to appear in the same places every time or the game would soon become very boring. What we need for our coordinates are random numbers and we generate these with Basic's RND keyword.An expression such as RND(6) will produce a whole number between 1 and 6. The number is not chosen completely at random, but the machine uses such a complicated procedure for producing it that it will seem like it. If the number in brackets is (1), the expression produces a fraction between 0 and 1.
If we want to produce a number between, say, 4 and 8, we could use:
x%=RND(5)+3
Because the random number is between 1 and 5, adding 3 to it will give us a result in the range that we want.
We use this technique in PROCsetdot.
     410 DEFPROCsetdot(n%)
     420 dot%(n%,0)=RND(1200)+40
     430 dot%(n%,1)=RND(600)+300
     440 CIRCLE FILL dot%(n%,0),dot%(n%,1),10
     450 ENDPROC
     460 :
Line 420 generates an x coordinate between 40 and 1240 which will keep the circles away from the sides of the screen. Line 430 not only keeps them away from the top, but ensures that none of them will be put in the bottom third of the screen. This means we can be certain that we will not begin a game with a circle underneath the starting position of the character, which would spoil it.
You will recall that PROCgame calls this procedure once for each circle, passing the circle number to it in n%. We use this number to select which elements of dot%() are used to store the coordinates.
Spotting Collisions
If you make these changes and run the game, you will find that it behaves just the same as before, except that 10 circles appear on the screen in random places. Nothing happens, however, when you find one of them. A circle may get rubbed out when you move the character over it, but the program doesn't know it's gone and the game won't end when you've rubbed out the last one. This is because we haven't yet built in any collision detection.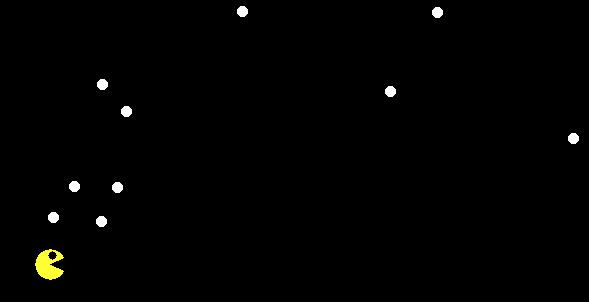
Add an extra line to each of the four 'moving' procedures, PROCleft, PROCright, PROCup and PROCdown, e.g.:
     600 DEFPROCleft
     610 PROCrubout(xpos%,ypos%)
     620 xpos%-=hstep%
     630 PROCcollision
     640 IFxpos% MOD (hstep%*2)=0 THEN *SChoose mun_left
     650 IFxpos% MOD (hstep%*2)<>0 THEN *SChoose mun_left2
     660 PLOT 237,xpos%,ypos%
     670 ENDPROC
     680 :
The extra line calls the collision detection procedure. It doesn't affect the way PROCleft etc. works but just arranges for a collision to be checked for each time the character is moved.
Now we just add one more procedure and a function:
     960 DEFPROCcollision
     970 FOR num%=0 TO dotnum%
     980   IF FNfound(num%) THEN
     990     GCOL 0
    1000     CIRCLE FILL dot%(num%,0),dot%(num%,1),10
    1010     GCOL 8,0
    1020     VDU 7
    1030     dot%(num%,0)=-1
    1040     dotleft%-=1
    1050   ENDIF
    1060 NEXT
    1070 ENDPROC
    1080 :
    1090 DEFFNfound(num%)
    1100 IF dot%(num%,0)>=xpos%-10 AND dot%(num%,0)<=xpos%+width%+10 AND dot%(num%
   ,1)<=ypos%+height%+10 AND dot%(num%,1)>=ypos%-10 AND dot%(num%,0)>0 THEN =TRUE
   ELSE =FALSE
The procedure PROCcollision is called each time we recalculate the position of our character. This procedure delegates detection of whether or not a collision has occurred to a function, FNfound, and takes the appropriate action if it has.
We need to check the position of each circle in turn to see if our character has collided with it, so we use a FOR ... NEXT loop to go through all the circle numbers. We pass each number to FNfound, which returns a value, TRUE if there is a collision or FALSE if there isn't.
Lines 980 to 1050 are an example of conditional execution over several lines, which we first met in Section 3. Lines 990 to 1040 are called if a collision is detected. Our first task is to rub out the circle. Redrawing the character might do this, by being plotted over the top of it, but we could easily have the situation where only part of a circle gets rubbed out, so we must do it properly.
In this version of the program, we can simply draw a black circle over the top of the white one. Line 990 sets the colour, line 1000 draws the circle and line 1010 returns the GCOL setting to the one required for plotting a sprite with a mask.
Our program would be greatly improved if the machine made some sort of sound every time we gobbled up a circle. The simplest way of doing this is with a VDU 7 command, which is provided by line 1020.
Getting Rid of the Circle
Although we've rubbed out the circle, we haven't done anything about its coordinates. Because FNfound works purely by checking coordinates, it could think it had found another collision if we were to steer the character back to where the circle was, even though we'd made it invisible. We need to do something.The answer is to 'move' the coordinates of the circle out of the way. We'll do this simply by making the x coordinate -1, which would put the circle just off the left-hand side of the screen. In practice, there's nothing to stop the character moving off the left-hand edge and thinking it has found a collision, so we'll arrange FNfound so that it refuses to recognise a collision with a circle whose x coordinate is less than zero.
The only thing left in this version of the program is to get down to the nitty-gritty of FNfound and how it detects a collision, We listed all the criteria which must be met a few pages back. Line 1100 combines all of them into one line, using AND keywords so that they must all be correct, and also adds an extra one. The x coordinate of the circle must be greater than zero, for reasons that we've just discussed. If all five of these conditions are true, the function ends by returning TRUE, otherwise it returns FALSE.
Your program should now work as intended, deleting circles when you touch them and beeping as it does so. When you've eaten all the circles it should tell you how long you took and invite you to try again.
You could, of course, replace the circles with anything you like, provided you can draw it, by modifying PROCsetdot. If the object is larger than the circles, though, you'll have to modify line 1100 in FNfound.
What we really need to do something about, though, is that plain black background.
Adding a Patterned Background
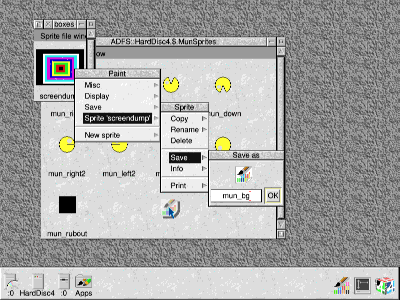
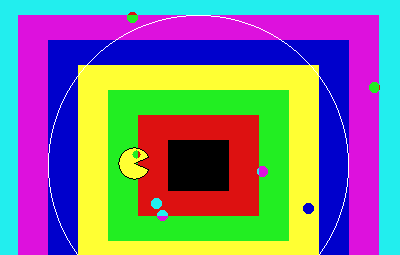
First produce your background. You can put anything you like on the screen, though it had better be in the same mode as your game to avoid complications. You then have to save the screen.Back in Section 6 we met a program called 'boxes' which drew multi-coloured rectangles on the screen. You may consider this a suitably striking background for moving sprites around in front of, in which case, you will find that the MunSprites file already contains a sprite which holds a copy of the entire screen produced by this program (known as a screendump), called 'mun_bg'.
Alternatively, you may wish to create your own picture. If you write a program to do this, put this line on the end:
*ScreenSave Background
'Background' is a filename. you can, of course, use any other filename you like.
This command saves the screen as a sprite in the Currently Selected Directory (unless you give it a full pathname). It actually saves the current graphics window, so if you use it in a program where this is less than the full screen size, reset it to full size first by using a VDU 26 command.
You'll find that your new file has a 'sprite' filetype and, when you load it into Paint, you'll discover that it contains a single sprite called 'screendump'. You can, of course, use Paint to modify it if you think you can improve it.
It would be more convenient if all the sprites in our game were in the same file. You can add the background sprite to the MunSprites file with a Save operation.
Load your 'MunSprites' file into Paint so that its sprite file window is open. Click Menu over the 'screendump' sprite in its sprite file window and go to the Sprite 'screendump' submenu and through to Save. When you have the Save box open, change the sprite name to 'mun_bg' and drag it into your MunSprites file window. This will copy the background sprite across to your MunSprites file, which you should then resave. We've now finished with the 'Background' file and you can delete it.
This new version is included in the files as Munchie3. The first changes to the program are at the beginning of PROCgame, which now looks like this.
Lines 210 and 220 have been altered and there is a new line which is now line 280.
In the previous version, PROCgame started by clearing the screen. We now call PROCbackground, which simply plots the background sprite to redraw the background.
Making the Circles Stand Out
After drawing the background, the next job is to draw the circles, but we now have a snag. If we draw a white circle in a place where the background is white it will be invisible. This is where GCOL followed by two numbers comes to the rescue. You will recall that the second number refers to the colour and the first number tells the machine how to plot it. The first number in line 220 is a 3, which means the colour number is exclusive ORed with what is already on the screen.We met the exclusive OR function in Section 9. It compares each bit of one number with the corresponding bit of the other and produces a bit which is zero if they are the same and 1 if they're opposite. Because the second number after the GCOL keyword is 7 (binary 111), the lowest three bits of what is already on the screen are inverted. If the background is black (colour 0), it becomes white (colour 7). Conversely, a white background turns black. If the background is, say, red (colour 1), it turns cyan (colour 6). This means that our circles will always stand out from the background, whatever colour it is. If a circle covers the boundary between two colours, the circle itself will have two colours!
Replacing the Background
Because we now have a background with some detail in it, we must have a way of putting it back in place of our character when we delete him to move him. There is more than one way of doing this and we'll take a look at two ways.The first technique is to save the piece of background where you're going to plot a sprite, using a special sprite for the purpose, and put it back again when your character moves on. This is the purpose of PROCget_bg, which we call in line 280 before we plot the character sprite in its starting position.
We'll look at PROCget_bg later. All we need to know for now is that it saves the area of the screen that our character is going to cover, putting it in the 'mun_rubout' sprite. This is very convenient, as it means that we don't need to modify PROCrubout. That procedure removes the character sprite from the screen by plotting the mun_rubout sprite over it. This sprite was originally black, but in this version of the program it contains whatever background was present on that part of the screen before the character sprite was plotted over it.
We need to add one more line to each of our four 'moving' procedures, so that they all look like this:
     710 DEFPROCright
     720 PROCrubout(xpos%,ypos%)
     730 xpos%+=hstep%
     740 PROCcollision
     750 PROCget_bg
     760 IFxpos% MOD (hstep%*2)=0 THEN *SChoose mun_right
     770 IFxpos% MOD (hstep%*2)<>0 THEN *SChoose mun_right2
     780 PLOT 237,xpos%,ypos%
     790 ENDPROC
     800 :
Once the sprite in its old position has been rubbed out and the new position defined, the portion of the background in the new position is saved by PROCget_bg before the sprite is plotted over it.
Before we come to our two new procedures, we must make a change to PROCcollision. The old version deleted a circle by drawing a black circle over it - not a very good idea when we're using a patterned background! We need to put the background back where the circle was.
We could save a small sprite to hold the background behind each circle, but we'll use a simpler idea. We will set the graphics window so that it just covers the circle and plot the background sprite.
The beginning of PROCcollision now looks like this:
    1010 DEFPROCcollision
    1020 FOR num%=0 TO dotnum%
    1030   IF FNfound(num%) THEN
    1040     VDU 24,dot%(num%,0)-10;dot%(num%,1)-10;dot%(num%,0)+10;dot%(num%,1)+10
   ;
    1050     PROCbackground
    1060     VDU 26
    1070     VDU 7
The rest of the procedure is unchanged.
We've changed the content of three lines which are now numbered 1050 to 1070.
Plotting the Background Over a Circle
In line 1040, we set the graphics window to the size of the circle. As we saw in Section 10, we do this by sending a sequence of numbers to the VDU circuitry. The first is 24 to tell it that we're setting the graphics window. This is followed by eight numbers in pairs - don't forget the semi-colons which tell Basic to send two 8-bit numbers for each coordinate. The coordinates are in the order minimum x, minimum y, maximum x and maximum y, and are each 10 OS units greater or less than the x or y coordinate of the centre of the circle. You will have to change this line if you replace the circles with something larger.Having set the graphics window, we can give the instruction to plot the background sprite, via PROCbackground, but only a tiny part of it will actually be plotted. Not only is this quicker; it also means we will not rub out the other circles and the character sprite. The VDU 26 command in line 1070 restores the graphics window after we've finished so that it covers the whole screen.
All that remains now are our two new procedures:
    1170 DEFPROCbackground
    1180 *SChoose mun_bg
    1190 PLOT 237,0,0
    1200 ENDPROC
    1210 :
    1220 DEFPROCget_bg
    1230 MOVE xpos%,ypos%
    1240 MOVE xpos%+width%,ypos%+height%
    1250 *SGet mun_rubout
    1260 ENDPROC
PROCbackground plots the background simply by selecting the background sprite and plotting it, taking the graphics origin as the position of its bottom left-hand corner, because it contains the entire screen.
Saving the Background as a Sprite
PROCget_bg introduces us to the command *SGet. This saves part of the screen as a sprite, taking the two most recent positions of the graphics cursor as opposite corners. Line 1230 moves the graphics cursor to the bottom left-hand corner of the area we wish to save and line 1240 moves it to the top right-hand corner.The *SGet command in line 1250 stores the area where we're going to plot our character as sprite 'mun_rubout'. As this sprite already exists, its previous contents are overwritten by the new sprite. If the sprite didn't already exist, it would be created.
This is a very thorough way of saving and replacing the background if you have other objects on the screen and you don't know where they are. Whatever is behind the character will reappear when he moves on, whether or not it's part of the original background sprite. Unfortunately it's also rather slow. Every time you move the character, you have to plot a sprite, grab a sprite and plot the character sprite, and that's ignoring the small amount of time it takes to calculate its new position and deal with anything else which may be happening! The character may not show up clearly, as it spends only a small part of its time actually on the screen and the rest of it invisible, while the background is being redrawn and resaved.
Another problem manifests itself if you're using an older machine with the slower ARM 2 processor. You may find that the time taken for each move is actually longer than the repeat key time delay on your keyboard. This means that, if you hold a key down to send your character across the screen, he will continue moving after you've taken your finger off the key because you've stored up keypresses faster than the program could handle them.
Clearly we could do with a faster way of doing things.
Faster Background Replacement
When we rubbed out the circles in this version, we set the graphics window to just cover a circle and simply plotted the background sprite. There is no reason why we shouldn't use this method to rub out our character as well.Instead of adding to the program and further complicating it, we're actually simplifying it this time and it will end up shorter than before. We'll call this version Munchie4.
This is what you would get if you were to go through the program and delete all the lines which call PROCget_bg. There should be five of these; one in PROCgame and one in each of the four 'moving' procedures. You could then delete PROCget_bg itself from the end of the program.
We're no longer going to save the background before plotting the sprite, and as we don't rub it out by drawing the 'mun_rubout' sprite over it, you could, if you wished, delete the sprite from the sprite file.
All we need to do now is a new version of PROCrubout which looks like this:
     550 DEFPROCrubout(x%,y%)
     560 VDU 24,xpos%;ypos%;xpos%+width%;ypos%+height%;
     570 PROCbackground
     580 VDU 26
     590 ENDPROC
     600 :
We've already seen the principle of this procedure when we were rubbing out circles in the previous version. Line 560 sets the graphics window so that it just contains the character sprite. Line 570 plots the background sprite but the plotting action is confined to the graphics window.
If you had another object moving around the screen which could go behind your character, you would have to redraw both of them. Start off by replacing the background over both of them and then redraw first the back object, then the front one.
Dealing With a Bug
If you've tried to produce Munchie4 by modifying Munchie3 as we've just seen, you would find a problem with this version as it stands. If you allow the character to wander off the screen, all the circles disappear!To understand why, look at PROCrubout. Its action consists of setting the graphics window to cover the character in its present position, calling PROCbackground to plot the background sprite in the window, then resetting the window to cover the whole screen, by means of the VDU 26 command. This last action is necessary so that we can plot the sprite in its new position.
If the new position of the sprite is partially off the screen, our next call to PROCrubout will attempt to set a graphics window which is also partially off the screen. RISC OS does not allow this and ignores the command completely, leaving the window at its previous setting, covering the entire screen. The result is that the call to PROCbackground plots the background sprite over everything, obliterating the circles.
The best way out of this problem is to prevent the character going off the screen! We can do this by adding some checks to PROCmove:
     470 DEFPROCmove
     480 char%=INKEY(0)
     490 IF (char%=ASC("Z") OR char%=ASC("z")) AND xpos%>=hstep% PROCleft
     500 IF (char%=ASC("X") OR char%=ASC("x")) AND POINT(xpos%+width%+hstep%,0)>=0
   PROCright
     510 IF char%=ASC("'") AND POINT(0,ypos%+height%+vstep%)>=0 PROCup
     520 IF char%=ASC("/") AND ypos%>=vstep% PROCdown
     530 ENDPROC
Lines 490 and 520 are concerned with moving the sprite left and down. We simply have to check whether or not the new position of the bottom left-hand corner (xpos%,ypos%) has a coordinate below zero and avoid calling the moving PROCleft or PROCdown if it has. If the other two lines worked in the same way, they would need to take the screen size into account and you would have to remember to alter them if you rewrote the game to run in another screen mode.
We can avoid having to do this by using the POINT expression which we looked at when we were considering ways of detecting collisions. We follow the POINT keyword with the x and y coordinates of the point we're interested in and the expression produces a number which tells us the colour of the pixel at that position. The colour doesn't interest us in the slightest but if the point is off the screen, the number is -1. This gives us a way of checking if our character would be drawn partially off the screen without having to know the screen size.
Note the extra pair of brackets round the first two expressions in each line. These are necessary to ensure that the OR comparison is made before the AND one.
Using a Separate Sprite Area
As we saw earlier, the sprites used by this program were loaded into the system sprite area so that they could be handled by star commands. This is not a particularly efficient way of doing things because some memory has to be specially allocated to this area, which will be wasted after you've quit the program.A properly written program which use sprites has its own user sprite area within the program memory. This has to be specially set up and the sprites loaded and manipulated using an operating system command called a software interrupt or SWI. This type of command is introduced in section 14. The SWI which handles sprites is called OS_SpriteOp. Because this SWI does everything associated with sprites, it is very comprehensive and a full description is outside the scope of this guide but section 14 will show you how to use it in this program. A full account of all software interrupt routines can be found in the RISC OS Programmer's Reference Manual, available on CD-ROM from RISCOS Ltd.
We also still have the problem of the whereabouts of the MunSprites file. We either have to keep this file in the currently selected directory or write the program to include its full pathname. This makes it more difficult to copy the program or move it about on the hard disc. We'll see how to solve this problem in section 15.