| Beginner's Guide to WIMP Programming |
|
| Martyn Fox |
Chapter 6: Icons and Indirected Data
You probably noticed, while playing with your new window, that nothing much seems to happen when you scroll it, except that the scroll bars move If you have textured window backgrounds configured, the texture moves, but that's all you see. The window is remarkably empty and needs filling with something.
There are two types of window: those that contain pictures or text, such as Draw or word processor windows, and those that contain only icons, which may themselves contain text or sprites. The important difference is that the former require action on the part of the program to redraw them, while the latter can be redrawn entirely by the Wimp.
A special technique is required to redraw a window, which we shall see later. For the moment, however, we will concentrate on windows that contain only icons. Our window has bit 4 of the window flags set, which means we do not have to redraw it ourselves.
Creating Icons
We discovered in the previous section that a window definition consists of 88 bytes, the last four of which (at b% + 84) contain the number of icons in the window; we set this figure to zero in our simple window because we didn't create any icons at the time. When we called Wimp_CreateWindow, the definition was copied to somewhere in the RAM where RISC OS stores such things, and we were free to use our data block for other purposes.An icon consists of an addition to the window definition, in the form of an extra 32 bytes. There are two ways of creating one. We could either include it in the original definition, adding 32 bytes for each icon and setting the number of icons in b%+84, or we could add it after the window itself has been created, using the SWI Wimp_CreateIcon. Here, we will use the latter technique.
Let's start with something simple. We will create an icon at some convenient place in our window, containing the word 'Hello'.
To create the icon we will use a function. We'll tell it the x and y coordinates in the window's work area of the bottom left-hand corner of the icon, and it will return the icon handle, which is given to it by the Wimp. This is basically the number of the icon in the window.
  940 DEFFNmake_icon(x%,y%)
  950 REM creates an icon at given window coordinates and returns icon handle
  960 b%!0=main%:REM Window handle
  970 b%!4=x%:REM Minimum x coordinate
  980 b%!8=y%:REM Minimum y coordinate
  990 b%!12=x%+200:REM Maximum x coordinate
 1000 b%!16=y%+44:REM Maximum y coordinate
 1010 b%!20=&9700303D:REM Icon flags
 1020 $(b%+24)="Hello":REM Text string
 1030 SYS "Wimp_CreateIcon",,b% TO handle%
 1040 =handle%
 1050 :
To call this function, we add a line to PROCinit, immediately after the creation of the window:
  370 DEFPROCinit
  380 REM initialisation before polling loop starts
  390 DIM b% 1023
  400 quit%=FALSE
  410 PROCcreate_window
  420 ih%=FNmake_icon(100,-100)
  430 ENDPROC
  440 :
These additions are in a new version of the !RunImage file called page_040 in the listings.
The new function creates an icon 200 units wide by 44 units high, with the word 'Hello' vertically and horizontally centred in it, and with a bright yellow background. Line 420 in PROCinit tells it to locate the icon 100 units in and 100 units down from the top left-hand corner of the window.
The data block, which we set up in our function, consists of the window handle plus a 32-byte icon data block, making a total of 36 bytes.
The first four words of the icon data block (after the window handle) contain the minimum and maximum x and y coordinates, like just as the start of the window block. These are obtained from the parameters passed to the function. The next word holds the icon flags, whose 32-bits have the following meanings:
| Bit | Meaning | |
| 0 | Icon contains text | |
| 1 | Icon is a sprite | |
| 2 | Icon has a border | |
| 3 | Contents horizontally centred | |
| 4 | Contents vertically centred | |
| 5 | Icon has a filled background | |
| 6 | Text is an anti-aliased font | |
| 7 | Icon has to be redrawn by task | |
| 8 | Icon data is indirected | |
| 9 | Text is right-justified | |
| 10 | If selected with Adjust, don't cancel others in same exclusive selection group | |
| 11 | Display sprite (if any) half size | |
| 12-15 | Icon button type | |
| 16-20 | Exclusive selection group (ESG) | |
| 21 | Icon is selected and inverted | |
| 22 | Icon is greyed and cannot be selected | |
| 23 | Icon has been deleted | |
| 24-27 | Foreground colour | |
| 28-31 | Background colour |
We will not cover the use of fonts in icons in this description. If bit 6 is set, though, bits 24-31 are used for the font handle.
Each icon has a button type, which controls how it responds to mouse clicks. For a full list, refer to the Programmer's Reference Manual. The ones of most interest to us are:
| Type | Meaning | |
| 0 | Click does nothing | |
| 3 | Click notifies task | |
| 6 | As 3, but can also drag (holding down the button returns button state times 16) | |
| 9 | Menu type icon. Moving over it selects it, click notifies task | |
| 15 | Writable icon |
When an icon is selected it is inverted.
Each icon belongs to an exclusive selection group. When an icon is selected, any others in the same group are deselected, unless the ESG number is zero. This feature is used by radio icons in dialogue boxes. If you're not using this feature, give the icon an ESG of zero.
Now let's try something more adventurous. First, delete the last line that we added to PROCinit, so that it now looks like this again:
  370 DEFPROCinit
  380 REM initialisation before polling loop starts
  390 DIM b% 1023
  400 quit%=FALSE
  410 PROCcreate_window
  420 ENDPROC
  430 :
We're going to create our icons in a different way.
We are about to introduce four new procedures. The next version of the !RunImage file can be found in the listings as page_043.
At the moment, PROCmouseclick only handles mouse clicks on the icon bar. If we were to expand it so that it did all the processing of all the clicks on our new window (and any other windows the program might create), we would end up with a complicated birds-nest of CASE ... OF ... ENDCASE structures. To avoid this happening, we'll arrange for processing of all mouse clicks over the window to be done in a separate procedure.
We can do this by adding one line to PROCmouseclick:
  510 DEFPROCmouseclick
  520 REM handles mouse clicks in response to Wimp_Poll reason code 6
  530 REM b%!0=mousex,b%!4=mousey:b%!8=buttons
  535 REM b%!12=window handle (-2 for icon bar):b%!16=icon handle
  540 CASE b%!12 OF
  550   WHEN -2:CASE b%!8 OF
  560     WHEN 1:quit%=TRUE
  570     WHEN 4:!b%=main%:SYS "Wimp_GetWindowState",,b%:SYS "Wimp_OpenWindow",,b%
  580   ENDCASE
  590   WHEN main%:PROCwindow_click
  600 ENDCASE
  610 ENDPROC
  620 :
At the start of PROCmouseclick, the program checks the window handle in b%+12. If this is -2, indicating we've clicked on the icon bar, it then checks the buttons as before, and either opens the window or quits the application.
If the mouse was not clicked on the icon bar, we get to line 590 where we check to see if the window handle was the one for our new window. If it was, we call the first of our new procedures:
 1060 DEFPROCwindow_click
 1070 REM handles mouse clicks on window
 1080 REM b%!0=mousex,b%!4=mousey:b%!8=buttons
 1085 REM b%!12=window handle (-2 for icon bar):b%!16=icon handle
 1090 CASE b%!8 OF
 1100   WHEN 1:PROCkill_icon
 1110   WHEN 4:PROCnew_icon(b%!0,b%!4)
 1120 ENDCASE
 1130 ENDPROC
 1140 :
As its name implies, PROCwindow_click handles mouse clicks over the window. We don't need to check the window handle in this procedure because, if we get here, it has already been done. We just need to examine the state of the buttons and act according to which one has been clicked. Lines 1100 and 1110 do this for us; we call PROCkill_icon if Adjust has been clicked and PROCnew_icon if it was Select.
Now look at three more procedures:
 1150 DEFPROCget_origin(handle%,RETURN xorig%,RETURN yorig%)
 1160 REM returns coordinates of window work area origin
 1170 LOCAL c%
 1180 c%=b%+800
 1190 !c%=handle%
 1200 SYS "Wimp_GetWindowState",,c%
 1210 xorig%=c%!4-c%!20:yorig%=c%!16-c%!24
 1220 ENDPROC
 1230 :
 1240 DEFPROCnew_icon(x%,y%)
 1250 REM creates an icon at given screen coordinates
 1260 REM b%!0=mousex,b%!4=mousey:b%!8=buttons
 1265 REM b%!12=window handle (-2 for icon bar):b%!16=icon handle
 1270 PROCget_origin(main%,xorig%,yorig%)
 1280 ih%=FNmake_icon(x%-xorig%,y%-yorig%)
 1290 !b%=main%:b%!4=ih%:b%!8=0:b%!12=0
 1300 SYS "Wimp_SetIconState",,b%
 1310 ENDPROC
 1320 :
 1330 DEFPROCkill_icon
 1340 REM deletes icon which has been clicked on
 1350 REM b%!0=mousex,b%!4=mousey:b%!8=buttons
 1355 REM b%!12=window handle (-2 for icon bar):b%!16=icon handle
 1360 !b%=b%!12:b%!4=b%!16
 1370 SYS "Wimp_GetIconState",,b%
 1380 SYS "Wimp_DeleteIcon",,b%
 1390 SYS "Wimp_ForceRedraw",!b%,b%!8,b%!12,b%!16,b%!20
 1400 ENDPROC
 1410 :
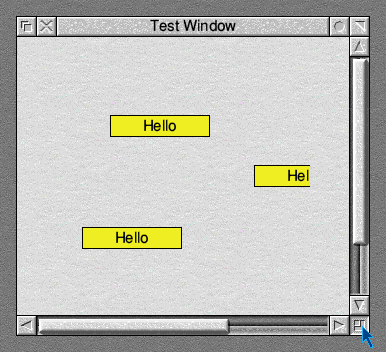
Clicking Select on the window creates an icon at the mouse pointer. Clicking Adjust over an icon deletes it. Have a bit of fun with this, then read on to discover how it works.
Making Icons Come and Go
When we click Select, we call PROCnew_icon, passing to it the screen coordinates of the mouse as x% and y%. To turn these into window coordinates, we need to know the position of the window's work area origin.As this is something we shall need to do time and time again when programming with the Wimp, it's worthwhile having a special procedure to do it, so let's look first at PROCget_origin.
Because we need to have two values returned by this routine - the x and y coordinates of the work area origin - we are not using a function, but a procedure with 'RETURN' in front of two of its parameters. The effect of this is to make the passing of values from outside the procedure to the local variables within it a two-way process. At the end of the procedure, the values of the local variables xorig% and yorig% are passed back to the two global variables in the statement that called it.
This is also the first time that we've used a data sub-block, located at the top end of our main data block. If we used the block starting at b%, there is always a risk that the procedure might be called at a time when this block is already in use, and we could overwrite important data. By using this part of the block, we can use just a few bytes, and then discard them again when we have finished. There is a better way of doing this, which we will look at later.
Finding the Origin
The procedure first puts the window handle in the first word of the block, at c%, then calls Wimp_GetWindowState. As you may recall, this call puts the first 32 bytes of the window data into our data block, but starting at c%+4, after the window handle, which means that everything is moved on four bytes in the block. If you look back at the listing of PROCcreate_window, you will see that the first four-byte word, which is now at c%+4, contains the minimum x coordinate of the visible area of the window, and the word now at c%+20 contains the scroll x offset. The scroll x offset is, in fact, the distance in graphics units between the left-hand edges of the work area and the visible area. If we subtract c%!20 from c%!4, we get the x coordinate on the screen of the left-hand side of the actual window. The procedure puts this into variable xorig%.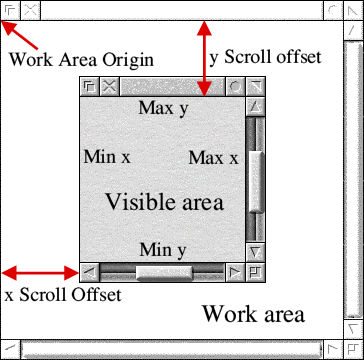
The y scroll offset is a negative figure so, by a similar bit of mathematics, if we subtract the y scroll offset at c%!24 from the maximum y coordinate of the visible area at c%!16, we get the y coordinate of the top edge, which we put in variable yorig%. In other words, xorig% and yorig% are the x and y screen coordinates of the top left-hand corner of the window - the work area origin.
Returning to PROCnew_icon, we start with x% and y% as the screen coordinates of the mouse pointer. If we now subtract xorig% from x% and yorig% from y% (which gives us a negative number), we end up with the position of the mouse pointer in terms of window coordinates! This is what FNmake_icon requires in order to create an icon where we click the mouse, so we feed it these numbers when we call it in line 1280.
Although we have created a new icon, it will remain invisible on the screen unless we redraw that portion of the window. Fortunately, there is a call to do this, Wimp_SetIconState.
This call is really meant for modifying the icon's flags, but if we put zero in b%+8 and b%+12, it will leave them alone and just redraw the icon. We just have to put the window handle in b% and the icon handle, which we've just obtained from FNmake_icon, in b%+4.
You can see, by the way, from this example, how we can keep reusing the data block at b% for new purposes. After we've finished a call to the Wimp, we extract any data we need from the block, and then set it up for a new purpose.
Making the Icon Disappear
When we want to delete an icon, we click Adjust on it, and the program returns from Wimp_Poll with the window handle in b%+12 and the handle of the icon that we've clicked on in b%+16 (see the REM statement at the beginning of the procedure). In PROCkill_icon, we transfer these details to b% and b%+4 respectively and call Wimp_GetIconState. This gives us the minimum and maximum x and y coordinates of the icon in the four words beginning at b%+8.A call to Wimp_DeleteIcon will delete the icon from the window definition, but it won't remove it from the screen. To do this we need to redraw the part of the window it occupied, which is where the information we've just obtained from Wimp_GetIconState comes in. We use it in a call to Wimp_ForceRedraw.
This call is a little different to most other Wimp calls, in that it doesn't use a data block, but has all the parameters passed to it through the ARM's registers. The window handle is put in R0, and the minimum and maximum x and y coordinates, that we obtained from Wimp_GetIconState, put in R1 to R4.
If you leave out the call to Wimp_ForceRedraw, by the way, you will see that an icon doesn't vanish when you click Adjust on it, but it will disappear if you then scroll it out of the visible area and back again. You can even make half of it vanish!
Indirected Data
When we were looking through the window data, we saw how up to 12 bytes were available for the window title, and learned that, if the title were more than 12 characters long, it would have to be indirected. This means it would be held in a buffer, elsewhere in memory.The same thing applies to any text in an icon. To illustrate this, let's make some changes to our icon block. First, though, we need to allocate some memory to hold our icon text, so we change the third line in PROCinit, and add an extra line:
  370 DEFPROCinit
  380 REM initialisation before polling loop starts
  390 DIM b% 1023,ind% 50
  400 $ind%=""
  410 quit%=FALSE
  420 PROCcreate_window
  430 ENDPROC
  440 :
This sets up 50 bytes, beginning at address ind%, and puts a null string in them. If you wish, you can replace the null string with anything you like, up to 50 characters. Now we will alter our icon flags to make the icon writable, with indirected text. Rewrite the last part of FNmake_icon, so that it now reads:
  950 DEFFNmake_icon(x%,y%)
  960 REM creates an icon at given window coordinates and returns icon handle
  970 b%!0=main%:REM Window handle
  980 b%!4=x%:REM Minimum x coordinate
  990 b%!8=y%:REM Minimum y coordinate
 1000 b%!12=x%+200:REM Maximum x coordinate
 1010 b%!16=y%+44:REM Maximum y coordinate
 1020 b%!20=&0700F13D:REM Icon flags
 1030 b%!24=ind%
 1040 b%!28=-1
 1050 b%!32=50
 1060 SYS "Wimp_CreateIcon",,b% TO handle%
 1070 =handle%
 1080 :
This version of the !RunImage file is in the files as page_049.
By altering the icon flags, we have changed the background colour to white, altered the button type to 15 (hex F), meaning that the icon is writable, and set bit 8 to 1, indicating that the text is indirected.
The 12 bytes beginning at b%+24, which previously held the text, now contain three four-byte words. The first is the address of the buffer where our text is held, in this case ind%. The second is the address of the validation string. We'll meet validation strings later on, but for now we just put -1 in this word.
The third word contains the length of the buffer. We defined this as 50 bytes with our DIM statement in line 390 of PROCinit, so we'd better not use more than this.
Writing to an Icon
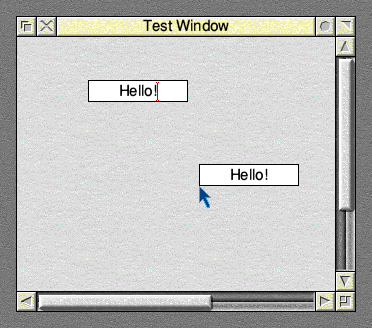
When you run the program, the window will appear as before, and clicking Select in it will make an icon appear. Our new icon will be white, and it will also be empty, unless you put some text between the quotes in line 400 in PROCinit. When you click either Select or Adjust on the icon, however, wondrous things happen! The caret appears in the icon, and the window title bar turns cream. This is because our window now has the input focus. Indeed, if there was another window on the screen which had the caret, its title bar would have turned from cream to grey as it lost it.You will now find you can type text into the icon at the caret. If you type in enough to overflow out of the icon box, you'll be able to bring it back and read it, by scrolling the caret along it with the cursor keys. It is all being stored in the buffer at ind%, up to 50 characters.
If you click Select elsewhere in the window, you will produce another icon, containing the same text. This is because all our icons have their indirected text stored at the same address, at ind%, which is a bit naughty, really. You will find you can move the caret from icon to icon by clicking the mouse. If you change the text in one icon, the others will not automatically change, because we have not used Wimp_SetIconState to redraw them. By scrolling an icon out of the visible area and in again, however, or by dragging a window or menu across it, you can make it show the latest state of the text buffer.
We have lost the ability to delete icons by clicking Adjust on them, as the writable icons intercept the mouse clicks, but this arrangement will do for demonstration purposes.
So there you are, we've covered indirected data and writable icons in one fell swoop. There are three main uses for indirected data:
- Where the text is more than 12 bytes long.
- When the icon is writable. The text you type in can easily be taken from the buffer.
- When you need to change the text in an icon. If you do so, you will have to redraw the icon, as we have seen.
Now for one last experiment. Change line 400 in PROCinit so that it now reads:
  370 DEFPROCinit
  380 REM initialisation before polling loop starts
  390 DIM b% 1023,ind% 50
  400 $ind%=STR$~PAGE
  410 quit%=FALSE
  420 PROCcreate_window
  430 ENDPROC
  440 :
This puts the value of PAGE, which is where the program starts in memory, into the buffer in hexadecimal form.
After saving the !RunImage file (you can find it as page_051), start up the application several times by double-clicking on its icon more than once, so that you have a string of icons on the icon bar. Open a window for each one and click Select once in each, to produce one icon, which should show the value of PAGE for that version of the application.
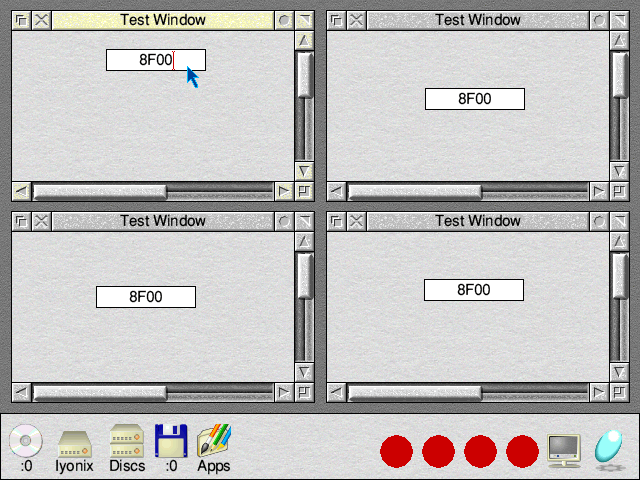
You will find that all the icons will show the same value, probably &8F00. Surely, though, this would mean that all the identical versions of our application start at the same address in memory. Is that possible? With RISC OS, all sorts of things are possible.
In this case, the explanation is that the memory map is not fixed. The memory controller moves RAM around the map in blocks of 8K, 16K or 32K, depending on whether your machine has one, two or four megabytes (or 4K in the Risc PC and later machines). Each time you start up an application, a block of memory is allocated to it whose size is determined by the WimpSlot instruction in the !Run file. The memory controller switches between the blocks during calls to Wimp_Poll. Each block is given the start address &8000, which is where a !RunImage file would start if it were written in machine code. In the case of a Basic program, though, the first 3¾K is used for Basic's variables, which is why PAGE is at &8F00.
Because only one application is actually running at any one moment, the banks of RAM can be switched in and out, so they can all occupy the same address space.