
|
www.riscos.com Technical Support: |
SrcEdit is a text editor, based on the RISC OS editor (Edit), with extra features to make it more suitable to create and edit program sources.
You can control SrcEdit from a menu tree, which is described fully in this chapter. However, many menu choices are available directly from the keyboard; once you are familiar with SrcEdit, you may find that you prefer this method. These keystroke equivalents are listed later in this chapter.
You can load SrcEdit either by double-clicking on the !SrcEdit icon from a directory display, or by double-clicking on a file of type Text (&FFF). You will then see an icon similar to that of Edit on the iconbar (a pen and program listing).
When you first open a new SrcEdit window, an I-shaped bar - the caret - appears at the top left of the window. This is where text will appear when you start typing. You can open more SrcEdit windows, but only one of them will have a caret in it: this is called the current window. It is also identified by the fact that parts of its border appear in cream rather than grey. You can type only in the current window.
If you type in some text without putting in any carriage returns, and using the system font (the default font) you will find that the window scrolls sideways. This is because the default SrcEdit window is not as wide as the screen. You can break your text into lines by pressing Return. Alternatively, click on the Toggle Size icon to extend the window to the full screen and avoid having to scroll sideways. There is another way of getting all your text into the window, using the Format command; this is described later.
As you type, you will notice that SrcEdit fills the current line and then carries on to the next line, often breaking words in the middle. Ignore this for the moment, as there is a menu option (Wordwrap) that will take care of it, and this will be described later.
If you need to insert or delete text, position the caret where you want to make the alteration by moving the pointer there and pressing Select. You can insert text simply by typing. If you want to delete a character, position the caret immediately after it and press either Backspace or Delete; hold the key down and the auto-repeat will come into effect, deleting more characters.
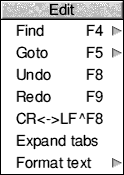
The top level menu for text windows contains the following options:

This menu offers six options:

Info tells you about SrcEdit, including the version number of your copy of the program.
File gives information about the file you are working on, in particular:
New view opens a second window on the same text. This allows you to look at two parts of the same document, and makes many actions such as copying from one part of a document to another much easier. Remember that you are looking at one document, not at two separate copies of it: to illustrate this, try looking at the same part of a document in two views (not the way you will normally use New view!); enter some changes in the first view and you will see the same changes appearing in the second view. This is particularly useful with large documents.
Column tabs switches on a different type of tab insertion; for more detail see the chapter entitled Laying out tables - the Tab key. When this option is on, it is ticked in the Misc menu and ColTab appears in the Title bar.
In SrcEdit the default state is to have Column tabs on.
Overwrite, means that each character you type replaces the character at the cursor, instead of pushing the cursor aside and inserting the new character. When this option is on, it is ticked in the Misc menu and Overwrite appears in the Title bar.
Wordwrap prevents words being split over line-ends as you type. When this option is on, it is ticked in the Misc menu and Wordwrap appears in the Title bar. Do not confuse this option with Wrap, selected from the Display submenu. Wordwrap, unlike Wrap, inserts a newline character (which is there although you cannot see it on the screen) when the cursor moves to a new line.
The Save menu allows you to save a complete file; you can also save part of a file using the Select menu.
In order to save a file in the easiest way, you need to have on the screen the directory display for the directory where you want to save the file.
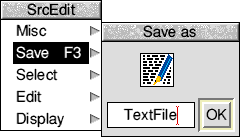
This action assigns a full pathname to the file, as you will see from the Title bar of the SrcEdit window. When you have made some changes to the text and want to save the file a second time, use the Save option again, but this time, provided you want to use the same filename, you can save the file by clicking the OK box. Saving the file with the same name overwrites your old file with the new information.
You can also save part of the text, typically for printing or transferring to another application, using the Select/Save option, described in the next section.
You can select blocks of text, then manipulate them.
The simplest way to select a block is to position the pointer where you want the block to start, click and hold down the Select button, then drag the pointer to the end of the block and release the button. The selected block of text is highlighted.
If necessary, you can then use Adjust to 'adjust' the ends of the block. Position the pointer exactly where you want the block to start or finish, click Adjust and the block lengthens or shrinks accordingly. This is particularly useful when you want to select a block that extends beyond the part of the text you can see in the window. Select a few words or lines at the start of the block, scroll until you can see the point where you want the block to end, place the cursor there and click Adjust.
Here are some other ways of selecting blocks of text:
| To | Do this |
|---|---|
| select a single word | double-click Select |
| select a single line | triple-click Select |
| extend block to whole word | double-click Adjust |
| extend block to include current line | triple-click Adjust |
Once selected, text can then be saved, copied, moved, deleted, de-selected (cleared) or indented by choosing options from the Select menu:
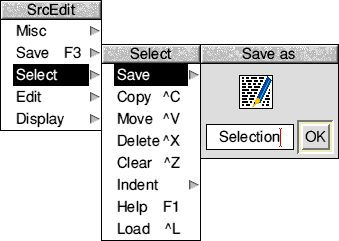
To Save a selected block, move to Save from the Select menu, and follow the standard saving procedure. Use this option to copy a selection into another SrcEdit window; open a new window and drag the icon into it. The copied block will appear after the current caret position in the destination window. The caret is also moved to the end of the copied text.
To make a Copy of a selected block of text, select (highlight) your block of text and then position the caret where you want the copy inserted, then call up the Select submenu and click on Copy. The original block remains selected. Keep clicking on Copy to make as many copies as you want.
If the caret is already at the position where you want the copied block to appear, press and hold Ctrl while making the selection in the usual way. Copy the block by pressing Ctrl-C. This way you can make a selection without moving the caret.
If you copy to a position inside a selected block, both the original and the new copy remain selected. If you then make multiple copies you will get double the number you indicate. This may happen accidentally if you position the caret immediately to the right of a selected block ending in a newline character: because the newline character does not appear on the screen it is not highlighted, but is still part of the selected block. To undo an action, choose Undo from the SrcEdit menu.
To Move a selected block of text, select your block of text and place the caret where you want the text moved to, then click on Move.
If the caret is already where you want the block to end up, press and hold Ctrl while making the selection in the usual way. Then still holding Ctrl, press V, and the block will be moved to the caret position. This way you can make a selection without moving the caret.
To Delete a selected block of text, click on Delete. The marked block then disappears. (Undo - in the Edit menu - allows you to reverse any changes or deletions made in the Select menu).
To Clear or 'deselect' a block of text you have previously selected, click on Clear. The highlighted block reverts to normal and the block is no longer selected.
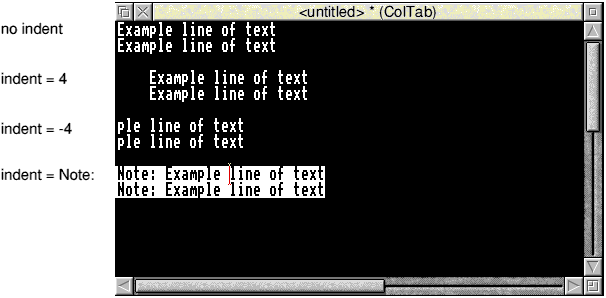
Indent allows you to indent a selected block of text. The indent is defined in character spaces. You can also use Indent to add a text prefix to the beginning of each line of a block.
To indent a selected block of text, call up the Indent submenu:
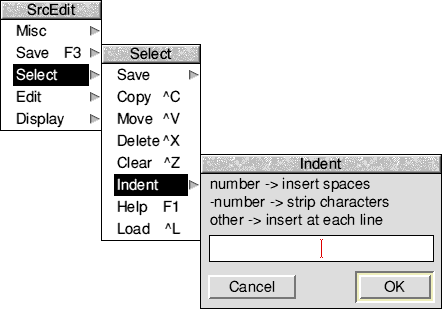
You can then type in three different types of indent:
By selecting some text and choosing the Help submenu, some language-specific help can be given on that selection. This help is supplied by a language package, which will have registered a help file containing typically a list of help messages for keywords of a programming language (e.g. the C printf function).
The Load submenu allows you to load a file into the editor, whose name is given by the current selection. The rule used to determine the name of the file to be loaded (assuming the current selection is in a file whose name has the form DirectoryPath.LanguageExtension.foo) is as follows:
DirectoryPath.LanguageExtension.Selection
For example, you may have a C source file with a line #include "defs.h". By selecting defs.h and typing Ctrl-L the header file defs.h will be loaded into SrcEdit (providing it can be found on one of the search paths).
The first option in the Edit menu is Find. At its simplest, this allows you to locate any character(s) in your file. You can also use it to replace text with other text. To make sure that the search is complete, always position the caret at the start of the file before giving the Find command. In the following description, the text being searched for is referred to as a 'string'; it may consist of any sequence of letters, numbers, spaces or other characters.
To use Find without doing anything with the found string, choose Find in the Edit submenu: the Find text dialogue box appears, with the caret in the Find box. Type in the string you want to locate and press Return. The caret then moves to the Replace with box.
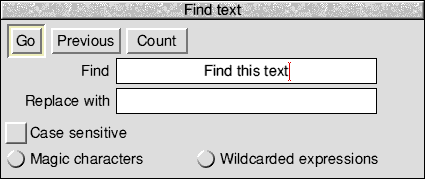
Since on this occasion you do not want to replace the found strings, either click on Go, press Return or press F1.
Edit finds the first occurrence after the caret of the word in your file, then displays the Text found dialogue box, indicating the operations available.
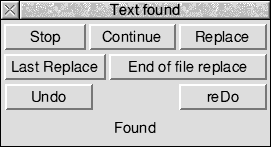
To look for the next occurrence of your string, click on Continue. To abandon the search, click on Stop or press Escape.
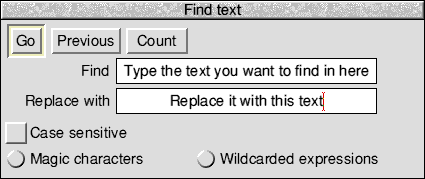
To use Find for replacing a string with a new string, go to the Find text dialogue box as before, but this time, insert the new string into the Replace with box. Then press Return, and the Text found dialogue box appears.
Click on Replace to substitute the new string for the old string; if you do not want to change this particular occurrence of the old string, click on Continue and SrcEdit moves on to the next one.
If you click Last Replace, SrcEdit replaces the currently found instance of the string, but does not search for further occurrences.
If you click on End of file Replace, SrcEdit finds and replaces all occurrences of the string from the present one forward to the end of the file, without stopping at each one for instructions.
Clicking on Undo takes you back to the last string replaced and returns it to the original version; click Redo to change it back again.
The display at the top of the dialogue box keeps you informed of the state of the search; if SrcEdit cannot find the word you have specified, it displays the message Not Found.
Besides using the Select button, you can control all these options from the keyboard; the particular keys are indicated by the capital letters in the dialogue box. Press S and the search Stops, press C and it Continues, D and it will reDo, and so on. Pressing Escape or Return also stops the search and removes the Text found window.
Note that you can use Find to delete strings in a text, by entering nothing in the Replace with box, and clicking on Replace in the Text found dialogue box, thus replacing the found string with nothing: deleting it, in effect.
There are several other useful facilities in the Find text dialogue box:
You can also use the Find facility to search for classes of characters. To activate this feature, click on Magic characters (or press F5) in the Find dialogue box.
Magic characters are indicated by a \ character, as shown in the lower half of the dialogue box, which shows you the available characters.
Type these characters in directly as shown in the window.
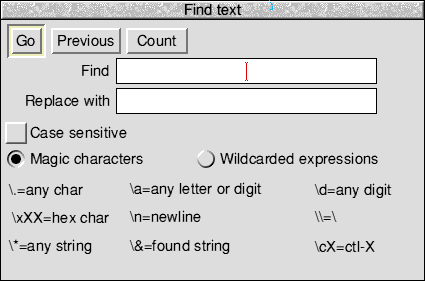
The magic characters operate as follows:
| Character | Meaning |
|---|---|
| \* | matches any string (including a string consisting of no characters at all). This is really only useful in the middle of a search string. For example, jo\*n matches jon, john, and johaan. |
| \a | matches any single alphabetic or digit character. So t\ap matches tip, tap, and top, but not trap. |
| \d | matches any digit (0 to 9). |
| \. | matches any character at all, including spaces and non-alphabetic characters. |
| \n | matches the newline character (remember that to the computer, this is a character just like any other). |
| \cX | matches Ctrl-X, where X is any character. |
| \& | is used in the Replace with box to represent the found string: the string matched in the search. This is particularly useful when you have used magic characters in the Find string. For example, if you have searched for t\ap, and you want to add an s to the end of all the strings found, \&s in the Replace with box will replace tip, tap and top by tips, taps and tops. |
| \\ | enables you to search for a string actually containing the backslash character \ while using magic characters. To search for the strings cat\a or cot\a, enter c\at\\a. |
| \xXX | matches characters by their ASCII number, expressed in hexadecimal. Thus \x61 matches lower-case a. This is principally useful for finding characters that are not in the normal printable range. |
There is also a facility for specifying wildcarded expressions in search strings. In order to use this facility, click on Wildcarded Expressions (or press F6) in the Find dialogue box.
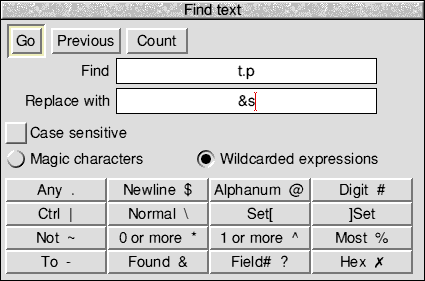
Click on the wildcard character you wish to enter and it is copied into the text box.
The wildcard characters operate as follows:
The full power of the wildcard facility can be illustrated by a few examples.
Find: [a-z]
and click on Count.
Find: %@
and Click on Count.
Find: %@
Replace with: (&)
and click on GO, then on End of File Replace in the Found dialogue box
Find: \#include "h\.%@"
Replace with: #include "?0.h"
and click on GO, then on End of File Replace in the Found dialogue box
Find: ~[ -\~$]
Replace with:
and click on GO, then on End of File Replace in the Found dialogue box (i.e. find all characters outside the set from the space character to the ~ character, and newline, and replace them with nothing). In fact this could be written without the \, since ~ would not make sense in this context if it had its special meaning of Not, ie:
Find: ~[ -~$]
To send the caret to a specific line of text, use the Goto option. Call up the Goto submenu and SrcEdit displays a dialogue box:
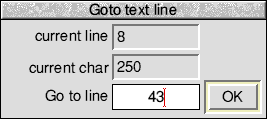
Type in the line number you want to move to, then click on OK. The dialogue box disappears, and the screen displays the caret, positioned at the beginning of the line you have just specified. Note that this option understands 'line' to mean the string of characters between two presses of Return. If you have not formatted your text, a line in this sense may run over more than one display line.
Undo allows you to step backwards through the most recent changes you have made to the text. The number of changes you can reverse in this way varies according to the operations involved.
Redo allows you to remake the changes you reversed with Undo.
CR LF allows you to convert the linefeeds in your text to carriage returns (and carriage returns to linefeeds). Carriage returns appear as the characters [0d] in your text.
If you convert from linefeeds to carriage returns, the file will be converted to one continuous line, with carriage return characters inserted where linefeeds have been removed. Though it is possible to edit a file in this state, you may find that updating the screen takes a long time. This facility is useful when importing text from other text editors, which may use carriage returns where SrcEdit uses line feeds.
Expand Tabs converts each tab character into eight spaces, since some printers can interpret spaces more easily than the tab character. If you have imported a file that was produced on a word processor, you may find it uses tab characters. These appear in the SrcEdit file as the characters [09] in your text.
Format text allows you to reformat a paragraph of text - from the caret to the next blank line or line starting with a space - so that the lines fill the screen and break correctly at the ends of words. It is useful for tidying up text after editing. Position the caret at the beginning of the paragraph, choose Format text in the Edit menu and enter the number of characters per line you want your text to have in the Format width dialogue box. Then move the pointer back over the Edit menu and click on Format text to format the paragraph.
The setting in the Format width dialogue box also controls the length of lines when you are entering text with Wordwrap switched on.
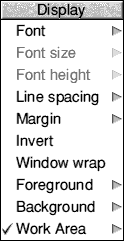
Display allows you to change the way your text looks on the screen: you can experiment with fonts, colours, line spacing and margins. However, the features you select do not form part of the text when you save it.
For example, if you choose New view in the Misc menu, you will have a second window on your text. If you wish, the Display features in these two windows can be different; this will not affect the text as such.
Font offers you a choice of fonts (typefaces). System Font is the default style, and has a fixed character width. For further information on fonts, see the RISC OS User Guide.
You can use Font size to set the point size (height and width) of the characters displayed on the screen. Either select one of the sizes indicated or position the pointer on the bottom (blank) line of the menu; you can then type in another size.
Font height allows you to set the height of the characters displayed on the screen leaving their width unchanged.
Line spacing increases or decreases the space between lines. Its units are pixels (the smallest unit the screen uses in its current mode). The selected font size assigns a suitable line spacing; this option is therefore used only to increase (or if you type a negative number, to decrease) the given spacing.
Margin sets the left margin, again in pixels.
Invert swaps foreground and background colours, so that black text on white becomes white text on black, and so on.
By default, SrcEdit assumes a text width of 76 characters, but the default window is not as wide as the full screen. You can of course change the number of characters per line (by choosing Format text in the Edit menu) or enlarge the window to the full screen by clicking on the Toggle Size icon. Alternatively, clicking Window wrap makes your text fit the size of the window. When Window wrap is on, you can change the window to any size, and the width of the text will change accordingly. You can revert to the default by selecting Window wrap again.
Foreground allows you to set the text to any one of the sixteen colours, by clicking on the selected colour square from the palette displayed.
Background allows you to set the window's background colour, as above.
Work Area allows you to set the extent of your SrcEdit windows so that you can have windows which are wider than the current screen mode. You can specify a wider window in terms of System Font characters in the Work Area submenu (the size of System Font characters is used even if the current font used is a fancy font). This is particularly useful if you have sources which, for example, are 80 or 132 characters wide and you are viewing them in mode 12. The maximum size of window width which can be specified in this manner is 192 System Font characters.
There are two ways of printing a SrcEdit file; however, to use either, you first need to load a printer driver.
If the file you want to print is already loaded into SrcEdit, call up the Save as dialogue box and drag the icon onto the printer driver icon on the icon bar. This will print the current version of the file, whether or not it has been saved.
If the file is not loaded into SrcEdit, you can simply drag the files's icon from its directory display onto the printer driver icon. You can also do this if the file is loaded, but if you have made any changes to it since you last saved it, they will not appear in the printed copy; only what has been saved will be printed by this method.
Tables can be set out in two ways using tabs - as regular columns or irregular columns.
If you want your table to have columns regularly spaced eight characters apart, select Column tabs in the Misc submenu. The word ColTab will appear in the window's Title bar to remind you that you have done this. Pressing Tab will then cause the cursor to jump to the next tab position. This is very useful for creating simple tables that will not display much text:
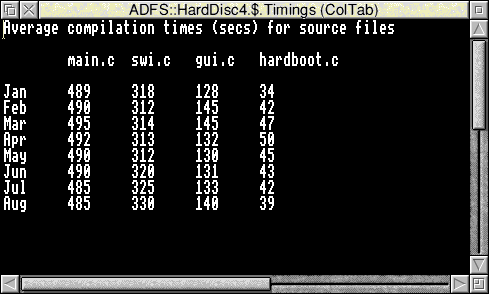
Column Tabs is selected by default in SrcEdit.
To set out a table with irregular columns, make sure that Column Tabs in the Misc submenu is not selected. Type in the first line - the column headings, for example - as you want it to appear, using spaces to separate the text in the columns. Then press Return. On the next line, pressing Tab will make the cursor jump to the position underneath the start of the next word in the line above.
So, in the following example of a simple diary, the column headings (Person, File, Task and Reason) were typed in using spaces, then the following lines were typed in using tabs (including the dashes used as underlines for the column headings):
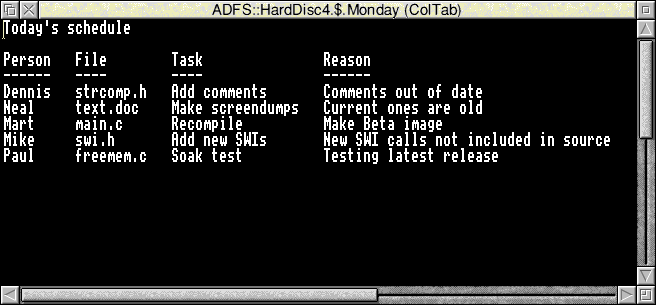
Note: Both the table layout methods described above will only work with a fixed width font (e.g. the System font). If you create a table and subsequently display the screen in another font, the text in the table will not line up correctly with the column headings.
If you want to add all the text from another file into the file you are currently editing, position the caret at the point where the inserted text is to appear. Call up the directory display for the incoming file, and drag its icon into the text window. The entire contents of the source file are then copied into the destination file at the caret position. The caret will appear at the end of the text you have inserted.
SrcEdit has a useful bracket-matching facility. If you place the caret to the left of an opening bracket - any of the set (, [, or { - and press F10, the corresponding closing bracket will become the current selection; similarly by placing the caret to the left of a closing bracket - any of the set ), ], or } - and pressing F10, the corresponding opening bracket will be selected. If there is no matching bracket an error message is generated. This is a particularly useful feature in heavily bracketed expressions and blocks of code which extend over a large amount of source code, and is useful in conjunction with the Ctrl-F7 feature (toggle caret and selection), thus moving the selection between matching brackets.
The purpose of throwback is to allow translators (compilers/assemblers) to signal the editor when they have detected source errors. On receiving such a signal, SrcEdit displays a window which shows the name of the file which was being processed when the error(s) were found, the name of the file in which the error(s) were found, and the relevant line number together with the text of the error message. Also displayed is the severity level of the error(s): Serious Error, Error, or Warning. The complete list of errors is shown in a scrollable window. We shall refer to a single line of this window as an error line. You can scroll through these as with any normal text window, using the vertical and horizontal scroll bars.
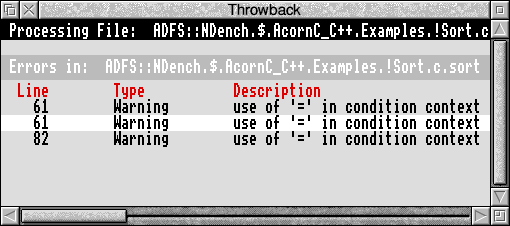
Double-clicking Select on an error line opens an edit window on the appropriate file (if it is not already open), and highlights the line containing the selected error. The selected error line is also highlighted in the scrollable error window. Clicking Adjust on an error line removes it from the list (presumably you have either corrected the error or have chosen to ignore it). Note that error line numbers refer to the original source when it was processed. You may, in the course of correcting errors, insert or delete lines; the position in the source where errors were detected remains correct despite your edits (provided that the edits are made as a consequence of throwback).
'Informational' throwback is also supported for tools like !Find. The functionality of such a throwback window is the same as for 'error' throwback.
First double click on !SrcEdit and !CC in a directory display to load them as applications with icons on the icon bar. Next open the subdirectory AcornC_C++.Examples.CError to show the text file HelloW containing the source of the program example of that name.
HelloW is a trivial C program which when run prints Hello World on the screen. It is written to be compiled with an integral link step by CC to form an executable image file. Its source contains a simple error which will be detected by CC when you try to compile it.
Drag the source file HelloW to the CC icon to make the CC SetUp dialogue box appear with the Source writable icon initialised to the absolute file name. Ensure that the Throwback option is enabled. The correct dialogue box appearance is as follows:
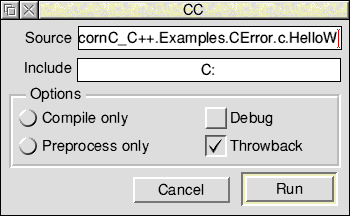
Click Menu on the setup box and ensure that the Work directory item on the menu displayed has the default setting of '^'. Click on the Run button on the SetUp box to start compilation. This has the normal effect of removing the setup box and putting the CC output display on the screen, but almost immediately afterwards the compiler produces an error and requests SrcEdit to display a Throwback error browser:
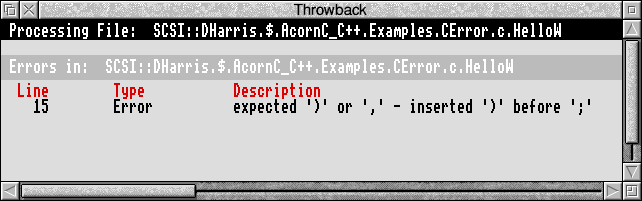
Double click Select on the compiler error message:
expected ')' or ',' - inserted ')' before ';'
SrcEdit displays the source file with the offending line that caused the error clearly highlighted:
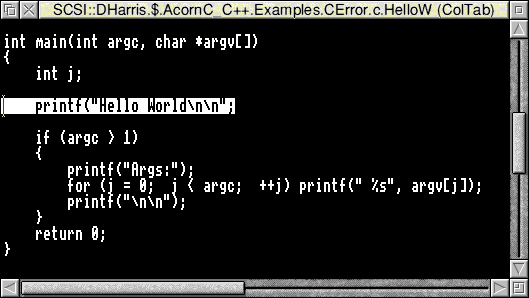
Examining this line closely shows that a closing bracket is missing before the ending semicolon. Insert this bracket in SrcEdit and save the file. Click Select on the CC icon bar icon and click on Run to repeat the last compilation. If you have changed the HelloW source correctly, the compilation should now complete with no errors, hence without bringing back the SrcEdit browser.
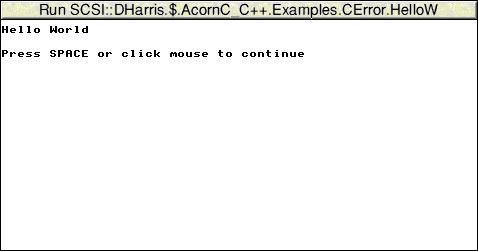
When the CC save dialogue box appears, click on the OK button to save the executable file produced in the directory Examples.CError. Now double click Select on the newly created executable image file in a directory display. The image file should run, printing the Hello World message in a RISC OS run window:
First double click on !SrcEdit, !ObjAsm and !Link in a directory display to load them as applications with icons on the icon bar. Next open a directory display on the subdirectory AcornC_C++.Examples.AsmError.s to show the text file HelloW containing the source of the program example of that name.
HelloW is a simple assembly language program which when run prints Hello World on the screen. It is written to be assembled to an object file by ObjAsm then linked to form an executable image file with Link. Its source contains a simple error which will be detected by ObjAsm when you try to assemble it. The line containing the error is:
= "Hello World"13,10,0
Examining this line shows that a comma is missing after the close quote. Correct this and you will then be able to assemble the program without error.
First double click on !SrcEdit and !C++ in a directory display to load them as applications with icons on the icon bar. Next open the subdirectory AcornC_C++.Examples.C++Error to show the text file HelloW containing the source of the program example of that name.
HelloW is a trivial C++ program which when run prints Hello World on the screen. It is written to be compiled with an integral link step by CC++ to form an executable image file. Its source contains a simple error which will be detected by C++ when you try to compile it. The line containing the error is:
cout << "Hello World\n;
Examining this line closely shows that a closing double quote is missing before the ending semicolon. Insert this double quote in SrcEdit and save the file. Click Select on the C++ icon bar icon and click on Run to repeat the last compilation. If you have changed the HelloW source correctly, the compilation should now complete with no errors, hence without bringing back the SrcEdit browser.
When the C++ save dialogue box appears, click on the OK button to save the executable file produced in the directory Examples.C++Error. Now double click Select on the newly created executable image file in a directory display. The image file should run, printing the Hello World message in a RISC OS run window.
To retain the same set of options whenever you use SrcEdit, set the menu and dialogue box entries to the required configuration and then choose Save options from the SrcEdit icon bar menu. The options you have chosen are then saved in two files:
<SrcEdit$Dir>.choices.options
<SrcEdit$Dir>.choices.liboptions
These files are read when SrcEdit starts up. The options saved are:
| Foreground Colour | Window work area width |
| Background Colour | Column tab |
| Font Width | Overwrite |
| Font Height | Wordwrap |
| Left Margin in pixels | Warn multiple edits |
| Extra spacing between lines | Current language |
| Window wrap | Search path |
| Font name |
If you set the Column tab, Overwrite or Wordwrap options in the Misc submenu in a SrcEdit window, they will only apply to that session of SrcEdit in that window.
To change these three options and retain the new settings whenever you use SrcEdit, you must set them in the Options submenu in the SrcEdit icon bar menu, and then choose Save options.
Pressing Menu on the SrcEdit icon on the icon bar produces a menu with the following options:
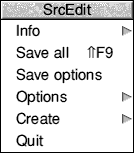
Info gives you some information about the version of SrcEdit you are using.
Save All saves all modified buffers, and closes all open windows.
Save Options saves the current settings of all SrcEdit options to file, so that there is no need to set the environment variables used to maintain these options.
The Options submenu allows you to set the following options:
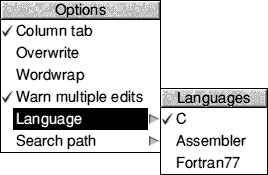
Column tab, Overwrite and Wordwrap are similar to the options on the Misc submenu in the section entitled The Misc menu. They are used to set the default options for all windows opened by SrcEdit.
Warn multiple edits, if enabled, will warn you when you attempt to load a file which is already loaded in a modified SrcEdit buffer. This reduces the chance of you accidentally editing two copies of the same file, and then saving one over the other. In such a case you will be presented with a dialogue box, giving you the choice of having a read-only copy of the file, a normal editable copy, or to cancel the load of the file. If you choose to have a read-only copy, then the SrcEdit window for the document will have Read-Only in its Title bar and you will be prevented from making any edits to the contents of the document.
The Language submenu gives you a list of any language packages which have registered themselves with SrcEdit. You can select which of these languages is current, and this will determine what Help text is available, and also the default search path used when loading from a selection.
Search path - If you load from a selection (i.e. when you have chosen Load from the Select submenu), SrcEdit will look in a number of places for the file to be loaded. You may set a comma-separated list of paths to search by typing them into the Search path writable icon (described on If (1) fails try to load file:). Note that each such path should either be a path variable or be explicitly terminated by a dot.
Create leads to a submenu which enables you to open windows for specific types of file: Text, Data, Command, Obey and Make files.
In addition, the Create submenu allows you to set up SrcEdit Task windows, these are described in the next section.
Finally, Quit stops SrcEdit and removes it from the computer's memory, first presenting you with a dialogue box for confirmation if there are any current files you have not saved.
SrcEdit task windows allow you to use Command Line mode in a window. To open a task window, choose Task window from the SrcEdit application menu. You can have more than one task window open. When you open a task window, you will see a * prompt. You can now enter commands in the window just as if you were using Command Line mode.
The major advantages in entering commands in a task window instead of at the Command Line prompt are that:
You can also supply input to a task window by selecting some text from another text file and choosing TaskInput from the task window menu. The selection may be in any SrcEdit window.
You cannot use graphics in a task window. The output of any commands that use graphics will appear as screen control codes in the task window.
The menu for a task window contains the following options:
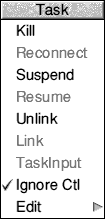
Kill stops and destroys the task running in the window.
Reconnect starts a new task in the window, allocating memory to the task from the Task Manager's Next slot.
Suspend temporarily halts the task running in the window.
Resume restarts a suspended task.
Unlink prevents the sending of typed-in characters to the task. Instead, they are processed as if the task window were a normal SrcEdit text window.
Link reverses the effect of Unlink.
TaskInput reads task input from the currently selected block.
Ignore Ctl, when selected, prevents any control characters generated by the program from being sent to the screen.
Edit leads to the normal SrcEdit menu. Although this makes available most of SrcEdit's features, you cannot use facilities such as the cursor keys or keys such as Page Up and Home while you are using a Task window.
In order to use a task window, you will need to be familiar with Command Line mode. There are some commands which you will find are more useful in a task window than they are directly from the Command Line. In particular:
*wimpslot min [max] can be used to adjust the amount of memory available to the task, which will otherwise start up using the Next space allocation. If you want to remove all the memory allocated to a task without closing its window or destroying the task, use the command *wimpslot 0 0.
*filer_opendir path opens a new directory display for the directory with the given path. The path must start with a filing system name. For example:
adfs::DHarris.$.Research
The command *Spool should not be used from a task window. Because its effect is to write everything that appears on the screen to the spool file, using *Spool from the desktop will produce unusable files full of screen control characters. There is, in any case, no point in using *Spool, since the output from the task appears in the window, and can be saved using SrcEdit as normal.
When you run a command in a task window, the computer divides its time between the task window and other activities running in the desktop. You should note that some time-consuming commands, for example, a *Copy of a large file, may prevent access to the filing system that they use until the command is complete.
Note that Command Line concepts such as current directory become relevant when you are using Task Windows.
On occasions, it can be convenient to use the keyboard instead of the mouse, especially once you are familiar with SrcEdit through its menus.
 _ _  _ _![[UP]](../../symbols/entities/8593.png) _ _ ![[DOWN]](../../symbols/entities/8595.png)
| Move caret one character left, right, up or down. |
| Shift-_ SHIFT-
| Move caret one word left or right. |
| Shift-_ SHIFT-
| Move caret one windowful up or down. |
| Ctrl-
| Move caret to start of file. |
| Ctrl-
| Move caret to end of file. |
| Ctrl-_ CTRL-
| Move caret to start or end of line. |
| Ctrl-Shift-_ CTRL-SHIFT-
| Scroll file without moving caret. |
| Ctrl-Shift-
| Scroll all documents up by one line. |
| Ctrl-Shift-
| Scroll all documents down by one line. |
| Copy | Delete character to right of caret. |
| Shift-Copy | Delete word at current caret position. |
| Ctrl-Copy | Delete line at caret. |
| Home | Place caret at top of document. |
| Insert | Insert space to right of caret. |
| Page Up/Page Down | Scroll up or down one windowful. |
| Shift-Page Up/Page Down | Move caret up or down one line without scrolling. |
| Ctrl-Page Up/Page Down | Move caret and scroll up or down one line. |
| Shift-F3 | Toggle column tabs on or off. |
| Shift-F1 | Toggle overwrite mode on or off. |
| Ctrl-F5 | Toggle word wrap on or off. |
| Ctrl-F7 | Make where the caret is the current selection, and move the caret to where the selection was (i.e. toggle caret and selection). |
| Ctrl-Z | Clear selection. |
| Ctrl-X | Delete selection. |
| Ctrl-C | Copy selection to caret. |
| Ctrl-V | Move selection to caret. |
| F1 | Request language-specific help. |
| Ctrl-L | Load file whose leafname is given by selection. |
| F4 | Display Find dialogue box. |
| Ctrl-F4 | Indent text block. |
| F5 | Display GoTo dialogue box. |
| F6 | If no block is selected, select the single character after the caret. If a block is selected, and the caret is outside it, extend the selection up to the caret. If a block is selected and the caret is inside it, cut the block from the caret position to the nearest end of the block. |
| Shift-F6 | Clear the current selection. |
| F7 | Copy the selected block at the current caret position. |
| Shift-F7 | Move the current selection to the caret position. |
| F8 | Undo last action. |
| F9 | Redo last action. |
| Ctrl-F6 | Format text block. |
| Ctrl-F8 | Toggle between CR and LF versions of the file. |
| Ctrl-Shift-F1 | Expand tabs. |
Note: these keystroke definitions only come into play once the Find dialogue box has been displayed (e.g. by typing F4).
| _
| Find / replace text string. |
| F1 | Display Text found dialogue box. |
| F2 | Use previous find and replace strings. |
| F3 | Count occurrences of find string. |
| F4 | Toggle case sensitive switch. |
| F5 | Toggle magic characters switch. |
| F6 | Toggle wildcarded expressions switch. |
| F2 | Open a dialogue box enabling you to load an existing SrcEdit file into a new window. |
| Shift-F2 | Open a dialogue box enabling you to insert an existing SrcEdit file at the caret position. |
| Ctrl-F2 | Close window. |
| F3 | Save the file in the current window. This is a short-cut to the normal Save as dialogue box. |
| Shift-F9 | Save all window edits. |
